[]
More about this later!

[]
More about this later!
Yeah, it is overdone but that is the point actually. Remember, I use these videos for two reasons. To share here as well as with a video editing community and training for students on how to achieve simple, yet dynamic and powerful video composites.
Where do you put your video editing tips? I’ve been looking for some good After Effects techniques for gritting things up a little - faux tracking glitches, faux digital video glitches, melting film effect, focus pulls and stuff like that.
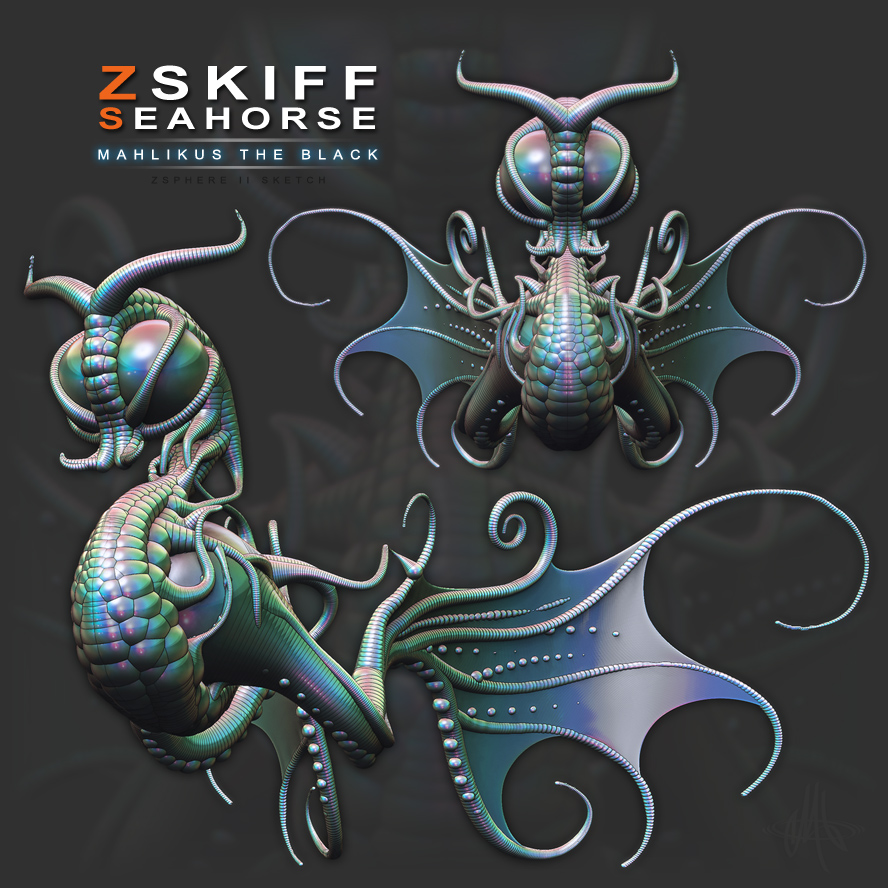
I prefere the last version, beautiful.
ZSphere 3.5 ROX!! Excelent!
Now we need the mesh and color 
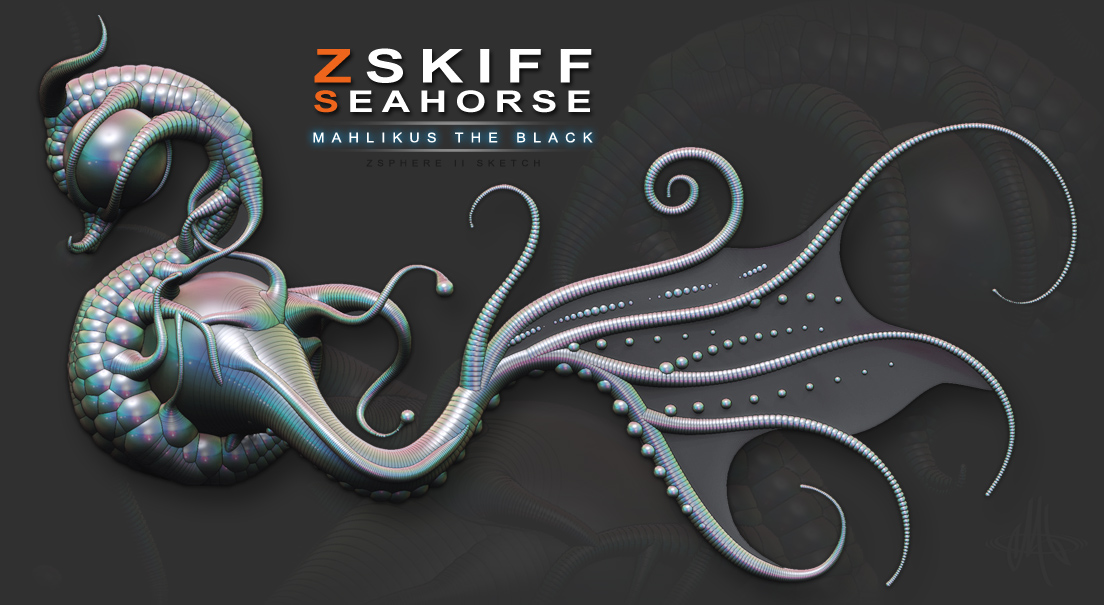
Like the new angles on the zskiff!!! 
Cool works! I was wondering what does zskiff mean? Sorry and thanks
Awesome Models and Videos! Would you mind sharing your work flow on how you achieved the membrane on the sea horses tail. Im trying to do something similar on a model Im working on.
Thanks in Advance
Glenn
hey Mahlikus really love the curves and flow of this piece has alot of life… How are you liking the new unified skinning algorithm?.. now all we need now is to get the weekly sketch challenges going again since alot of the old group is coming together again then it will be like old times…
its good too have you back posting here again…
I prefer the older setup too. The latest pose is a test. Just wanted to experiment with skinning the zskiffs and merging subtools. Color and additional sculpting with be coming soon!
Spanx!
A long long time ago…
In a ZBrush far far away…
When ZSpheres FIRST came into existence, my buddy slosh coined the term zif as a truncation of the word zsphere. It was short, easier to type, and we old schoolers started using the word. Well, same goes for sketch zspheres with Zspheres II…That alone is a mouthful, “ZSpheres II Sketch ZSpheres” so I expanded the word zif to zskiff (two ff’s for Zifs II and the sk for sketch). So, We now have zifs and zskiffs. 
Thank you!
As for the workflow:
Select the Plane3D tool (or whichever tool fits your needs) in the Tools Palette and (if a Z Primitive) turn it into a polymesh by clicking the “Make Polymehs3D.” No need to draw the tool on the canvas first BTW. Next, reselect your Zskiff and draw it on the canvas. Enter edit mode (T keyboard shortcut) and use the SubTool palette to append the mesh to the zskiff tool. Model and transpose as needed.
   I used the Plane3D tool as a test. Once I realized this worked, I screen captured the Seahorse profile and used C4D to patch model a new mesh with better topology. I then used the above method to append the new tail fin mesh as a subtool.

   To properly transpose the whole model, the zskiff must be skinned and then this will allow you to merge subtools to it.

   Hope that helps. Unfortunately I am not in the proper environment to record a quick video.
I like the new algorithm. It is pretty genious if you really really look at.
I have already started working on ideas and images to start The Weekly Challenge up again…So it will be coming soon! It’s REALLY good to be back here.
Thanks man for the explanation. Very nice forging of words
[]
           <b>H</b>ello everyone.
           Here is the first in a series of Quick Tips and Trick in ZBrush.
           This video covers adding and using subtools with your ZSpheres Sketching.
           Very simple, easy, quick tutorial.
           Hope it helps.

           Enjoy.</span><object id="veohFlashPlayer" name="veohFlashPlayer" height="475" width="720"></object></span><object id="veohFlashPlayer" name="veohFlashPlayer" height="475" width="720">
[<!--[attach=161688]EARS-TOOL.jpg[/attach]-->]
:white_small_square: [<b>DOWNLOAD</b>](http://www.mahspot.com/assets/video/zskiff_tutorial_%20tool.zip) :white_small_square:
Thank you so much sir.
Again, beautiful updates -thanks for sharing the vids and your workflow tips !
Thanks Mahlikus The Black!
Thanks for these vids! Learned a few things from the Manthis vid. I was having issues getting the ends of my strokes to smooth the way I wanted, even with the different smooth brushes. It never dawned on me to drop a single ZSketch zsphere as an anchor for my desired stroke. Really helped me ALOT!
Ha! I wasn’t a user then but remembered seeing the old zifs and thinking they were awesome in their own right. Prior to the release of 3.5 I went back to find them.
The new skinning algorithms definitely make it really easy and quick to have a better starting mesh from just zifs. But the cool thing about zskifs, IMO, is that it allows you to explore more ideas in 3d in ways that are either not as efficient or possible with zifs. Being able to pose with a Zsphere rig and play with proportions or forms at the same time before committing to actual geometry is awesome.
jaystein777, Etcher, roger, TonyEdwards: Thank you and you are all very welcome. I am glad it is helping!
Being back makes me proud and humbled.
I love this place!
[](javascript:zb_insimg(‘161805’,‘GARTH.jpg’,1,0))
     <b>H</b>ello everyone.
                     Here is the <i><b>Second</b></i> in a series of Quick Tips &Tricks using ZBrush 3.5r2.
                     This video covers skinning a ZSpheres Sketch with additional mesh for
     modeling and transpose adjustments.
                     Very simple, easy, quick tutorial.
                     Hope it helps.

                     Enjoy.</span><object id="veohFlashPlayer" name="veohFlashPlayer" height="475" width="720"></object></span><object id="veohFlashPlayer" name="veohFlashPlayer" height="475" width="720">
[<!--[attach=161804]tool.jpg[/attach]-->]
<object id="veohFlashPlayer" name="veohFlashPlayer" height="475" width="720"> </object></span> </span>:white_small_square: [<b>DOWNLOAD</b>](http://www.mahspot.com/assets/video/garth_mesh.zip) :white_small_square:
Thanks for taking the time to make this Mahlikus!
And for posting the video as a download. For some reason where are not allowed view veoh in our country.
Appreciate your efforts.
Regards,
Yvan.
Another very nice presentation, michael <img src=“http://www.zbrushcentral.com/pixo/atn.gif”><img src=“http://www.zbrushcentral.com/pixo/atn.gif”><img src=“http://www.zbrushcentral.com/pixo/atn.gif”>