Anyone done any polycount tests yet? I definitely seem to be pushing more polys a little more smoothly than before.
Hello
The noise will inflat your mesh or suck in if your intensity is up pretty hi. Which I noticed that your intensity is up pretty high. Try turning down the intensity and you will get closer to the results but you have to remember you are looking at a noise that is viewed almost like a bump map and then being applied like a displacement when you click apply to mesh. Also turning up your snormals to 100. Less overlapping meshes.
Paul
Hi, anyone know if you can import an .obj mesh created in any 3D app. then create a armature from ZSpheres then “bind” the ZSphere armature to the imported mesh for posing?
For example, can you import a worm shaped mesh then add a ZSphere armature, then “Bind” the armature to the mesh and then pose the mesh using the ZSphere armature?
If this works, then I am one happy camper. 
Wow, I’m supposed to sleep tonight?
So far I’ve tried the new brushes and the new Zspheres. Personally, from my own experience, I am not that impressed. The general functionality in regards to movement and sculpting seems more sluggish than in ZB3. The brush strengths seem higher as well. The clay tubes brush, for example, was decent at a strength of 9 but now I need to dial it down to 2 just to achieve the same level of effect.
The Planar brush seem ok for rough shapes like rocks etc but unless you know what you are doing, it’s hard to do precision work with them.
Sketching with Z spheres looks good in the video demo but I found them kind of frustrating to work with. Again, if you want to do precision work or even general specific shapes, they are difficult to work with. For example, there’s no flow control when sketch with them so things can build up really quickly sometimes.Also, If you manage to get a shape you like and then you smooth out the result, you can sometimes end up shrinking things so you lose the shape you like.
You can achieve the same or similar result by using regular Zspheres, building up a decent for then creating a unified skin in ZB3 or ZB2.
But this is just my own experience. I’m sure that other people are delighted with the new stuff and may find the tools better to their workflow.
Paul
(mix_mash)
I like the new brushes and I also like the import obj function.
Got a lot of training to do to become a better artist and bring my skills up to a higher level.
Able to do more since the layout of the program is far better than 3.1.
The few features that I am not able to do in 3.5 I use 3.1.
Overall I am impressed with the speed and performance of the program. The error I did recieve were mine for not reading the support page first!
Also note that on my VISTA 64 version I was required to update the 2008 c+ files and much to my surprise 3.5 ran faster than before.
Final thoughts are the pixologic team did an outstanding job and I hope I can start posting something worth looking at.
I seems to be more stable to me which I really thing this is a .5 upgrade
it is as advertised. The rigging with exterior meshes not just Zspheres seems to be solid now. I have not crashed yet so that is good.
However I am not overly sold on the Z2 sketch tool as of yet. 3D coat voxels system is far superior in building up meshes. The Z2 sketch tool is too clunky. The One really good thing about it though is that it is nondestructive.
Have not check out light box fully and realy need to go through the documentation for a full grade on it.
All in all it seems to be a solid release to build on. Pixologic did a good job!
3D Coat’s voxels allow for more sculpting freedom, but for building a mesh of any shape, they don’t even come close to Zspheres.
hmm im not sure, has the topotool changed and if what is new? for me it looks the same, maybe more stable etc but i havent found anything new?!?
I did a quick polygon pushing test last night. I managed to push demohead to 19 million. I was astonished.
I’ve always thought that zbrush was great but just when you wanted that extra push, you never had enough ram to go the extra level. well theyve done something clever and now the model can get a lot higher and to my disbelief, I was able to paint on the model and rotate around easily.
I’ll need to do more testing but the engine is definitely more efficient.
Specs: core 2 quad q6600 GO stepping, windows 7 64-bit, 6gb ram. default zbrush settings.
Have anyone tried out the retopo?
Any improvement that should be note about?
First 35 min I went and done the very things I do in v3.1, this was to check if new bugs where there, which there was.
The Good.
Zoom is much better, can now actualy get close. I had no cave in geometry when using project for re-topology.
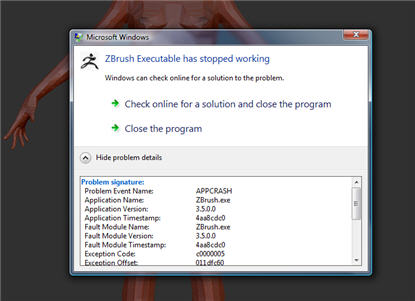
UPDATE: I did have problerms with retopology projection on the same model today. Folding in eyes, toes, and finger nails. Project all doen the same thing no matter what distance setting, then crashed. Results are you still need to make your meshes with good topology first time around. Forget about sculpting right upto high details, then doing your retopology, as the Projection tools are still no good. nice idear that fails.
Attachments
anyone know how to get hotkeys working. It just cancels out on my computer.
Also how do you customize the startup document… it seems to just “prefer” it’s own startup thingy with lighbox.
For normal mapping flipping, check out preferences -> Importexport.
There is a NormalMapFlipVert setting that might do the trick.
A few observations:
-
In 3.1 if I have a tool with multiple subtools, and I hit “f” key, the entire figure would be framed. Now it zooms in on the selected subtool, even if the whole figure is visible. I found that if you hit “f” twice, you can get the whole figure framed, but on some subtools, it frames the figure very far away.Can I change this? It is very handy to be able to frame the entire model with one click.
-
In 3.1 my view would pivot around the center of any visible subtool (WITHOUT Local Rotate turned on). If two or more subtools were visible, my view would rotate around their combined pivots. If the entire figure was visible, it would rotate around the center of the whole figure. I loved this. In 3.5, the view rotates around the world center, no matter what subtool or subtools are visible. Thus, when only the hand is visible, for example, and I rotate, it flies off screen. Local Rotate is not nearly as handy. First you have to click on the subtool to activate it, then it doesn’t rotate around the subtool’s center, but around the point you clicked. Is there any way to make 3.5 behave more like 3.1?
-
Since Subtool Master isn’t working, is there any shortcut for mirroring subtools? I basically wore that button out in version 3.1.
-
When we save brushes, do the curves save with them in 3.5? In 3.1 I had to use the Reload Brushes With Curves plugin.
-
Can you no longer Cntl + Shft click on a different subtool to make it the active subtool?
Thanks
regarding 1. I think you may have a spiking point somewhere, not certain.
(I have a wacom, and I have assigned the front pen button to RMB, the rear button on the pen is MMB)
regarding 2. Yes this is normal, I use a 3.2 for mac, and I have learned how to work. This is how it works with 3.2, seems tricky, but once you get used to it you will love it.
Using a pen/tablet, let your hand lay on the tablet, let your pen tip hover close to the tablet, over your active subtool. Hold down the alt key, then hold rmb, then drag to the right, as soon as your mesh begins move let go of the alt key. Now the mesh will be zooming in and out instead of panning.
Now what is key - Where you first hovered over your mesh, that will now be where the navigation will rotate around. (local on). You don’t need to click on the mesh with a brush.
Also, as you work, you can simply hover and hold rmb and drag your hand left and right to rotate the ztool. That will also reset where you are now rotating around your mesh.
This is all fantastic once you get used to the feel and the way you can work, close up or far away, you need not actually drag on the canvas (pen touching tablet), and you need not brush on the mesh. I always leave local on.
regarding 5. alt +LMB on the subtool you wish to activate.
Forgive me if these tips do not work. I am assuming 3.5 windows is now navigating like 3.2 mac.
Yes, you can zoom in without limitation now, which is so much nicer for fine detail areas with lots of close together points.
It still doesnt work well with perspective on, but that is not so important for retopo.
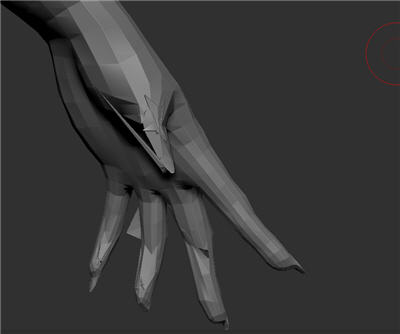
Same issues with “twisted”/inverted geometry around some simple low poly appendages, sadly.
After Ctrl-clicking a key, you can’t move the cursor at all, or it aborts. So it is a little tricky.
Hi,
Very positive first impressions on my part, but as always there has to be a couple of flies in the ointment. But 98% of the time ZBrush seems more like an elixir to grant you super powers, rather than an ointment for coughs, colds, greasy holes and pimples on the dickie.
I was very curious about ZSpheres II after my rational thinking had sort of dismissed it as “maybe” useful. But boy am I glad someone like Pixologic pushed this out with 3.5. Very very inspirational to block out forms on top of a armature like rig. Posing work in progress, check. Adding more zspheres to the armature without interfering with previous work, check. Just very liberating, even if the unified skin is just that.
The adaptive skinning of ZSpheres II is excellent, or rather as good as I could imagine a bunch of balls stuck together would produce a mesh. There is a fair amount of control over adaptive mesh creation but the default adaptive skin adheres so well to the zspheres that few tweaks are necessary. Really looking forward to delving deeper with adaptive skinning.
The new brushes (many new brushes) confuse me slightly but I just need to put in the time to learn them. At first the backtrack feature (under the Stroke palette) seemed a bit silly but I can appreciate the added control, especially with the planar brushes, excellent stuff. I will do my best to try the various brushes and their settings but I might, like with 3.1, go back to just using the standard, smooth and pinch brushes :o
Normal map creation from the canvas (using the NormalRGBmat material) is broken for me, which is a shame. I also get a few best render artifacts with various materials. But I am hoping the .zbr from 3.5 can be used in 3.1. EDIT: Turning of Preferences > Performance > MultiDraw removes the best render artifacts but the NormalRGBmat is still blurred and looses intensity when best rendered (best render is is needed to retain the tileable mapping, else there is a nasty 2 pixel high seam at the top of the image, 1 pixel high seam at the bottom and a slight 1 pixel wide seam on the left of the image).
A couple of small display artifacts while polypainting appeared now and again, and one set got stuck in my polypainting (or so it appeared). Not so nice. Will try updating drivers and such before trying to duplicate the problem.
Creation of Displacement and Normal maps with models that have UVs spread across 1*1 UV regions crashes ZBrush. But being able to output maps at 8K alleviates that (for some people). Perhaps the DispMapCreate and NormMapCreate zscript functions can succesfully output maps from select UV regions? A quick script could easily be made, at least for generating maps 1 subtool at a time.
All in all I think this is the best ZBrush yet. Close to 11 hours usage today and no crashes. Higher polycounts with the same system specs. Slightly choppier rotation (hard to tell) but just as responsive to brush strokes as before. Oh, and a big thank you to the complaining so and so’s ;). A floor grid, improved perspective, rotation set to the Y axis and Right Mouse Button rotation is pure bliss. You were absolutely right Lots of hugs and man kisses from here :lol:
And of course, thank you Pixologic for another free upgrade.
Mark