Update. Now I think it looks a lot less like the hulk.

Update. Now I think it looks a lot less like the hulk.
Hi Olivier, Im enjoying the rendering Im seeing and I have a question about the specular map. I saw your previous screenshot and I understand that you use a vrayblendmtl and shellac to have greater control over specular but you mentioned that you use two specular (one blurry and one sharp), I was wondering if you could elaborate on it a bit more. Where are you putting each map? What type of material are you using for your coat material in the VrayBlend? Does one of the maps go into the specular amount of the FastSSS2? I really appreciate you sharing all that you have and I was just wondering if you could help shed some light on the subject. I really like the results that youre getting and I would love to be able to recreate it. Any info that you can share would be awesome!
JJP3D - Here’s an overview of how I did it.


I placed the “water” specular in the SSS shader and the glossy in the coat material. Logically it’s it should be the opposite but the result is the same. for the glossy (coat) specular, I didn’t use any map but I reused the same bump map as in the sss shader. In the sss shader, I did the water specular with the help of the map like I showed before.
The renders at the left and middle are both layers without bump or displacement or sss. You can also see the result to the right with bump and displacement). The displacement really changes everything.
Does that answer your question?
I started rigging/skinning. There’s still a lot of work to be done to fix the deformations but I had to try out a render.

great work, personally inspirational. thanks for posting.
Trybrow - Thanks! This must be the first time somebody uses the word “inspirational” in one of my threads. I truly appreciate your comment!
I’ve started getting this weird bug with one of my layers. It’s like there’s noise in the mesh but I never used any surface noise on it. I Had this bug before on another project where I would simply turn on and off a layer many times and it would get worse and worse.
This time I don’t get where the noise comes from. The only hint I have is it’s happening on the layer where I’m sculpting the pose. Also, I imported the low res pose from a 3dsmax rig.
has this happened to anybody before? It’s very frustrating.
and here’s a very small update.

I have exactly the same problem here… The noise type thing appears whenever I turn on and off a layer…
selwy - Nice to know I’m not the only one. I posted the thread in the troubleshooting section here. If I ever get the answer, I’ll make sure to get back to you.
Are you using 3dsmax to create the base mesh?
If you subdivided your mesh after making the layer, I don’t think the detail on the new subdivision is in the layer. Perhaps this could be related to the noise you are getting
I did all the subdividing before creating any layers and I always make sure to get to the highest level before hiding/showing or pressing record on a layer.
I ended up fixing my problem but I still don’t know what causes it. I had 3 layers:
-Work/pose (the problematic one)
-veins
-bump
So I ended up just deleting the “work” layer and just making the pose without layers (I hide “veins” and “bump” and sculpt). It fixed the bug but this workaround will not work for everybody.
I did some work on the other character.

Too skinny: anyway it is excellent overall.
Ah; you might considere to refine the eyebrows.
Marsw - Thanks! I’ve heard the “skinny” comment more than once. I’ve worked on it. Is it better?
For the eyebrows, one thing that’s not helping is I’m rendering without GI to save some time. I’ll go over the look of it before the final render.

Hi interesting character…
I would suggest you add more damage to the suit. Damage on the head is very big. I would add damage on the sleeves (cut)
It’s a known layer bug. It can be quite frustrating. Hopefully they will have a fix soon.
<svg version=“1.1” baseProfile=“full” xmlns=“http://www.w3.org/2000/svg” style=“height: 0; width: 0; position: fixed”> <filter id=“bpm-darkle”> <feColorMatrix in=“SourceGraphic” type=“hueRotate” values=“180”></feColorMatrix> </filter> <filter id=“bpm-invert”> <feColorMatrix in=“SourceGraphic” type=“matrix” values=" -1 0 0 0 1 0 -1 0 0 1 0 0 -1 0 1 0 0 0 1 0"></feColorMatrix> </filter> </svg>
Wow, nice blood effects. Were those painted in Zbrush or in Photoshop-type app later?
ModoSsv - Thanks. I’ll try to add some cuts later.
INFINITE - Yes! Very frustrating. It’s the kind of bug you noticed after 4h of work…
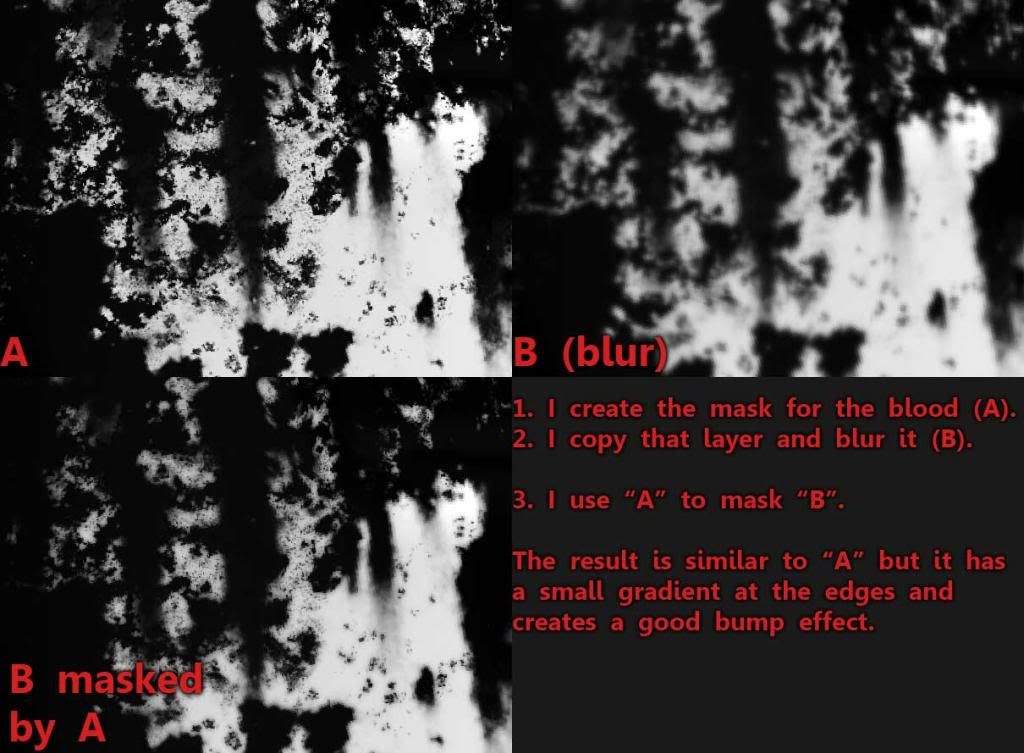
ButtercupSaiyan - It was done in MARI. You can see how I did the bump HERE.
Here’s where I’m going with the composition.
Hi Olivier. Yes, now is in the average build. Keep the good work. Cheers.
Thanks Marsw!
I decided to got another way with it and focus more on presenting the character.

You know, this thread keeps getting more and more awesome

