Superb
Thanks Gordon,
If you downloaded it a moment ago then please download again - I made a small error that meant the plugin garbled the result in some circumstances!
ZBrush script - Change Default Material for ZBrush 4R5
https://dl.dropbox.com/u/76819766/zbrush/saf.zsc
copy to ZStartup\ZPlugs\
source:
[ISubPalette,Zplugin:SAF]

[Ibutton, "Zplugin:SAF:Change Default Material",  " ",
    [IFreeze,
        [IUnPress,Transform: Edit]
        [If, 1,
            [IPress,Material:Load]
        ]
        [IPress,Document:New Document]
        [IPress,Draw:Mrgb]
        [ISet,Draw:  Z Intensity,1]
        [ISet,Draw:Draw Size,1]
        [CanvasStroke,(ZObjStrokeV02n3=YH20V18p3BH20V19p46H20V19P)]
        [CanvasStroke,(ZObjStrokeV02n3=YH5V52p33H6V52p76H6V52P)]
        [CanvasStroke,(ZObjStrokeV02n2=YH5DCV35Dp37H5DCV35DP)]
        [CanvasStroke,(ZObjStrokeV02n2=YH5DAV52p2BH5DAV52P)]
        [CanvasStroke,(ZObjStrokeV02n2=YH3V359p36H3V359P)]
        [CanvasStroke,(ZObjStrokeV02n3=YH2FFV1EDp2DH2FFV1ECp52H2FFV1ECP)]
        [CanvasStroke,(ZObjStrokeV02n2=YH1A5VB3p18H1A5VB3P)]
        [CanvasStroke,(ZObjStrokeV02n3=YH4A8V104p37H4A7V104p45H4A7V104P)]
        [CanvasStroke,(ZObjStrokeV02n2=YH4A7V27Bp32H4A7V27BP)]
        [CanvasStroke,(ZObjStrokeV02n2=YH149V2B6p37H149V2B6P)]
        [CanvasStroke,(ZObjStrokeV02n2=YH227V1ACp33H227V1ACP)]
        [CanvasStroke,(ZObjStrokeV02n3=YH374V298p32H374V297p3FH374V297P)]
        [CanvasStroke,(ZObjStrokeV02n3=YH423V159p30H423V158p3AH423V158P)]
        [CanvasStroke,(ZObjStrokeV02n2=YH32AV193pA0H32AV193P)]
        [IPress,Document:Save As Startup Doc]
    ]
    [MessageOK, "Restart Zbrush!", " "]
    [IPress,CLOSE]
]
These are great Marcus! The Max UV detail is awesome. Very good idea.
Thanks Nick! 
New to the boards, so like… hi. ^^
Other than that I would like to contribute to this thread by providing this snippet of code below for hotkey lovers and Wacom Intuos/Cintiq users like myself to utilize the radial touch strip more in their work flows while ZBrushing. This ZScript will introduce a focal shift and Z intensity hotkeyable buttons and respective increment slider to the Misc Utilities, similar to that of the Draw Size.
Special thanks goes to ZScript guru  Marcus_civis
 , as it was his original code and code referencing that helped me put this together, I just swapped out certain variables like the total ZScript noob that I am.
 So I’ll just praise Marcus again and leave it at that
For the total noobs (points to myself):
- Unzip the file to your Desktop
- Copy the HotkeyFocalS_ZIntens.zsc file to your ZBrush 4R5/ZStartup/ZPlugs folder
- Restart ZBrush
- Check ZPlugins menu>Misc Utilities
- Hotkey and bind to wacom tablet properties
Download here: HotkeyFocalS_ZIntens.zip (3.54 KB)
(The code text file is included in the zip)
Super, was wondering why them sliders were being quirky  Thanks again Marcus!!!
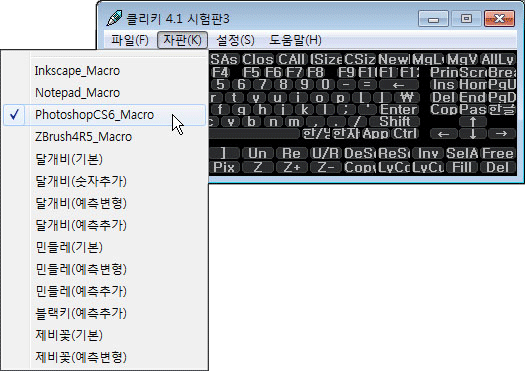
Hi, All!
This Clickey 4.1 beta 3 program is an Macro On-screen keyboard.
This program is made in Korea.(Free private user)
Please test it.
My YouTube Video and Blog…

When subdividing in ZBrush the mesh tends to get smaller as a result of the effect of smoothing. Often this doen’t matter too much but sometimes you might want to preserve the proportions of the low res model. This macro will do that.
It is based on an idea and code originally posted in this thread by Marsyas and Svengali. All I have done is convert it into a macro.
To install, simply save the file to your ZBrush /ZStartup/Macros/Misc folder and press Macro>Reload All Macros. You will then have a button called ‘SmartDiv’ in the Macro>Misc sub-palette.
Note: should you wish to undo the smart division you will need to undo five times to get back to the point when you pressed the macro button.
Download here:
Very interesting! I haven’t thought about the cage feature in such a long time. Thanks for making this Marcus.
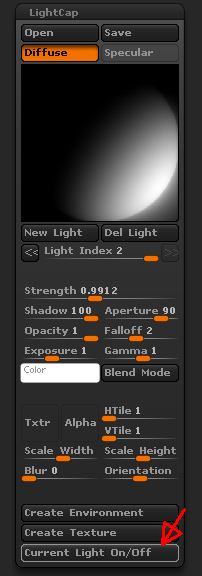
This plugin adds a button to the LightCap sub-palette so that the selected light can be turned on or off. This is useful if you want to isolate different lights when working with the LightCap.
Note: the plugin does not store the light values between sessions so you should save your LightCap with all lights turned on.
Installation
- Unzip the zip file to your Desktop.
- Copy the LightCapOn-Off.zsc file to your ZBrush 4R6/ZStartup/ZPlugs folder.
- Restart ZBrush. The new Current Light On/Off will be at the bottom of the Light>LightCap sub-palette.
Instructions
- In the LightCap>Light Index slider, select the light you want to turn on/off.
- Press the Current Light On/Off. If the light is on then the current strength setting will be stored and the light turned off. If the light is off the the previously stored strength setting will be restored.
Download here:
Attachments

I moved the posts about a perspective/ortho script to a new thread in the ZScript Help forum:
http://www.zbrushcentral.com/showthread.php?179439-Perspective-Ortho-script-help
I have all the files in the right directory but continue to get an error message about the dll not being in the “expected place?” If not the zplugs directory, then where?
Check that your unzipping program didn’t create an extra folder. The plugin has a single data folder called PixolsTo3Ddata which should be in the ZStartup/ZPlugs folder. The PixolsTo3D.zsc file should be directly in the the ZStartup/ZPlugs folder. If this doesn’t help then please post a screenshot of your ZStartup/ZPlugs folder contents.
Sometimes you might want to do something to all subtools and would find it useful to have a macro for future use. This example shows how it can be done if you are prepared to edit a macro in a text editor like NotePad.
First of all record a macro of the action you want to apply but just do it with one subtool. Make sure you select the subtool before starting recording the macro and don’t select any other subtool before ending the recording. Save the macro to your macros folder, select a new subtool and test it, to see that the macro does what you want.
Next you’ll need to open the macro file in a text editor. You’ll find it in the ZStartup/Macros folder (or a subfolder of that). Open it up and you’ll see code something like that below. The Gray code is the start and end of the macro; leave that as it is. The bit you need to copy is between the [IConfig,4.6] and the last bracket ‘]’.
//ZBRUSH MACRO - Recorded in ZBrush version 4.6
[IButton,???,"Press to run this macro. Macros can be aborted by pressing the ‘esc’ key.",
   [IShowActions,0]
   [IConfig,4.6]


  //Copy all the code here and put it in the DoIt routine in the attached macro.


]//end of macro button
Next open the Do All SubTools macro attached to this post. You’ll find the Do It routine towards the top. Paste the code from your macro in the middle of the routine:
[RoutineDef,DoIt,


	//put code here


]//end of routine
When you’re done editing, save the file to the ZStartup/Macros/Misc subfolder and press ‘Reload All Macros’ or restart ZBrush. The macro should then work on any number of subtools.
Download here:
And here is a version which works for the VISIBLE subtools only (the active subtool is treated as visible) -
So I’m curious on how this plays out in the background does it apply the macro to all the sub tools at the same time or does it apply the macro sequentially to each next sub tool. The reason that I ask is because I recently had a situation where I had too many subtools, so I tried pre-processing and decimating them all, but my computer crashed in the pre-process attempt. However doing a pre-process current to each individual tool my computer could manage that, but it tool me a very long time due to me having 100+ subtools. So if i had a macro that could do things sequentially that would save me tons of time and would what I’m looking for. Just assuming that the code above does them all at the same time.
Assumption is wrong. It processes 1 subtool and moves to the next one. 100 subtools why? Be sure to try out ZBrush layers, not the ones under tool…quite powerful. http://docs.pixologic.com/reference-guide/layer/
As Doug says, this will process the subtools sequentially. However you can’t use a macro to carry out plugin actions (as only one macro/plugin/zscript can be active at one time) so the macro will not work in the scenario you give.
Thank you so much for this useful script. I can now fill my canvas easily with ‘processed’ subtools so I can rotate the mass of them and ‘l@@k’ for “something” on the canvas to edit further and then paint on and or with.  Still need to tweak my macros a bit.
DoVisible fails with error message if there is only 1 subtool. Seems like stuff doesn’t work after the error message too.