had a question about flowing over a mesh. i was just wondering, is there is a certain pattern or flow that you need to go over the body to improve the mesh quality? and if so can you show what it would look like on a regular human? perhaps a diagram like ive seen on the face.
Hi Point,
Rastaman had sent a PM to me with 2 some suggestions for the problem. Holes for nose, eyes and mouth in a ZSphere base mesh seem to cause the problem when doing the retopo.I have not tried those tips for now, because at the time I got Rastaman’s email I had already tried another path, which was simply to leave the head of the goblin like it is and just seperate him from the body. Then I only retopoed the body. This is a quite simple solution, mainly because the goblin is going to have clothes anyhow and so those body parts underneath the clothes will be deleted because I won’t need them for the final sculpt and in order to “save” polys.
I may post Rastaman’s email with his suggestions -if it’s okay for him-, but I have to search for it first (to many emails lately… ). Maybe meanwhile he will answer himself.
As for your question concerning the wip thread: I have not posted one up to know, but I will do it as soon as I’ll find some time.The goblin is almost finished now. The final face will look like this:
[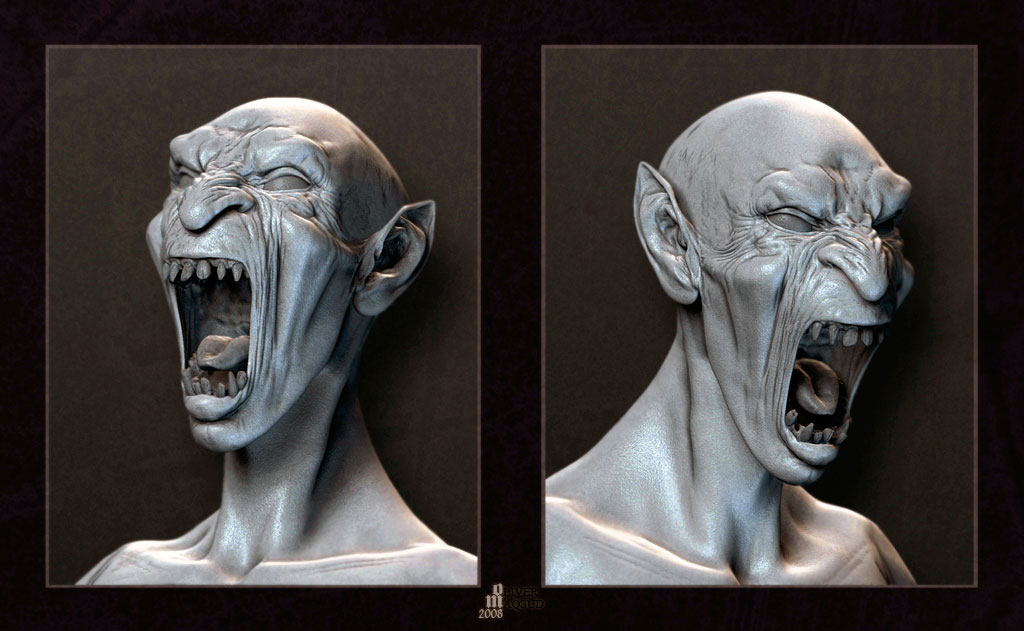 ]
]
I have another version of the goblin’s head (turned into a Zombie with simple help of a coffee grounds texture:lol: ) in my ZBrush for concept designthread though.
Cheers!
Very nice model, Oliver, congrats. 
About the described problem:
First, take a look into my old Post #21 (Solution for retopoing high detailed merged meshes) here:
http://www.zbrushcentral.com/zbc/sh…89&page=2&pp=15
especially this part:
On very complex and fine details, sometimes wired result can occur in the 'a'-preview.
In that case lower the value of the Tool -> Rigging -> Projection strength.
You can later reveal missing details with the Morph-Brush if you previously
stored the morph-target in your high-level mesh before you enter the detail-
tranfer-setup
is always worth a try.
Another solution is described by John Strieder:
http://www.zbrushcentral.com/zbc/sh…1586#post451586, also described by Scott Spencer in his actual book.
According to my own tries, these solutions work mainly with closed meshes.
If your mesh has holes (Nose, eyes, mouth etc. they will problably lack.
ZBrush 3.1 seems to have enourmous problems when calculating a retopo over a mesh with holes.
Seems to be a fundamental algorythm-problem in the programming.
I haven’t found a solution for that so far, sorry.
Merry christmas to all,
Rastaman 
Merry Christman Rastaman, always helping out those in doubt. Merry Christmas everyone.
Thanks again Ralf and
Merry Xmas & a Happy New Year to all of you!:D:D:D:D
Hi. I have several problems with creating topology (sorry if wrong thread):
I cannot scale in the model as close as I want, it’s locked and I can’t work well on small parts like eyes.
Also if I isolate a part of the mesh before doing topology, the mesh won’t unhide its hidden part anymore.
I wasn’t able to ctreate new polylines even after hitting edit poly again and resetting masking. And a lot of points gathered in the same place. 
And how to export the mesh out?
Sorry for noobish questions!
Just to let you know that step 2 in “Edit Existing Topology” should actually be placed after step 4. After much confusion I figured this out.
Firstly thank you very much for all this information.
I am having problems getting to grips with connecting subtools. I have a head and body that are separate and I would like to connect them, I’ve managed to do it, but in order to do so I had to go to the lowest subdiv of my model, ‘make polymesh 3d’ for both the head and body and insert mesh. Then retopo them together.
In doing this i’ve lost all my high detail from the head and body, Is there some way to connect these 2 parts, and get my high detail over to the new polymesh?
Thanks in advance! Heres a pic so you can see how much detail im losing.
I tried making the polymeshes much higher res, but in doing so there were so many topo lines (and crashes) that connecting them was nigh impossible.
[ ](javascript:zb_insimg(‘135189’,‘drae.jpg’,1,0))
Yes, you can either progect mesh from the Adaptive skin or use the projection method using subtools, another possible way is to use the projection brush with two appended subtools.
Not sure if this has been covered.
When i’m drawing new points on the reference mesh, if I use the move tool to adjust the position of a point, they don’t stick. My points are just floating around in space, not snapped to the model. I’m sure it’s a switch i’ve got turned off or off somewhere, any ideas?
Also, I don’t understand, ctrl+click is supposed to start drawing from a new point, but if I do that all it does is mask off the entire ref. model.
I wish I knew a switch for that too…
Thirded! I really need to be able to slide my points around the surface!!!
So I am having a difficult time understand proper topology mapping. What are the rules, guidelines, or things to consider when placing vertices and edges? I’ve noticed that some people place edges on the high points of their sculptures, others place edges and vertices in creases, and sometimes both. I understand (sort of ) why we would like edges in joints. But I would like more detailed information or descriptions.
Also, when I topologize (sp?) around a model I would like to turn the opacity of the model up so I cannot select the vertices in the back. Is there a way to do that? Also is there a way for the vertices and edges to be visually bolder? The tutorials I watch seem to have all these bold lines and dots and I have these incredibly faint ones.
Thank you everyone!
This link helped me a lot. Sorry I didn’t see it before I asked my question. While I understand proper topology depends on large part on the final application I still see guidelines do prioritize decisions.
http://www.pixolator.com/zbc/showthread.php?t=9313
i hope this helps others too!
I still would like to know how to make my grid more visible and how not to select vertices on the other side of the mesh!
Now some of my grid isn’t even showing up anymore
here are some pics
[attach=140703]retop probx 1.jpg[/attach]
[attach=140704]retop prob 2.jpg[/attach]
Attachments


Hey all, question for the topo experts.
I’m trying to build a very simple basemesh similar to what metamesh is using in this image.
http://www.zbrushcentral.com/zbc/attachment.php?attachmentid=126487
Is there a guide somewhere or a general rule of the topology for something like this? IE where the best edge loops are for sculpting.
Hi. There is some info here
http://www.subdivisionmodeling.com/forums/showthread.php?t=8000
http://www.subdivisionmodeling.com/forums/showthread.php?t=8911
http://www.subdivisionmodeling.com/forums/showthread.php?t=9104
Good day or night to you all!
This is my first post since I’m kinda desperate. I’ve been working with Zbrush for almost 2 years now. And I’ve never needed to post before since I’ve always found in here the solution to my problems (I must admit that you guys rock) but this time… I’m having problems with topology and I’m starting to get desperate.
My way of retopology is to create an unified skin of the tool and then use this method
- Load the model you want to edit
>
- Select a new ZSphere tool.
>
- Clone your model.
>
- Make sure that the subdiv level of the cloned model is at 1 or 2 (If you don’t, it doesn’t work! The original model can have as high subdiv levels as you like)
>
- In the Tool:Rigging subpalette, select the original model, and activate (optional) the Projection Mode, so that the model which will be generated is projected on the Template.
>
- In the Tool:Topology subpalette, select the cloned model. All the lines will show up.
>
- Enter the Edit Topology Mode.
Rather than using a cloned model or tool, I use the unified skin version, but thing is, that now I need to make a very detailed model, and using a 128 unified skin is not good enough for retopo, so I tried to used a 260 skin… and that’s the problem; it doesn’t retopo with a 260 version! I don’t know why! I’ve try everything and it doesn’t work, with versions of 128 is ok, but with 260 it’s just… not working. I’m really frustrated since I’m with this for 2 days already. Can anyone help me or give a good tip about this? Thxs!
I haven’t tried your way with a unified skin, but usually, problems with a not working retopo-function are caused by a too detailed mesh, meaning the polycount is way too high for ZB to handle it in the retopo-process.
The typical sign of this matter is that you simply don’t see any mesh to retopo when you enter the retopo-mode.
Especially when you say it works with a lower detailed unified skin, I think the too high polycount is your problem.
Oh dear, maybe that’s the problem… in that case; I’m screwed, thanks anyways.
hi all this post is very big and i try found why when i add point on topology
the topology is auto masqued i must move my mesh for resee it
on way for this?