ZBrushCentral

Topology & Flow Lab

Hi there Rastaman, thanks for the response.

I’ll try to clarify:

I’m not even able to get as far as an adaptive-mesh preview. As I understand it the process is this:


  1. Make the re-topo mesh (ie - the mesh you want to use as the new topo) a sub-tool of the high-res mesh.
  2. Make the High-res mesh the active sub-tool
  3. Place a Zsphere on the canvas
  4. under “Rigging\Select Mesh” select your high res model
  5. Select the High-res mesh and make the re-topo mesh the active sub-tool
  6. Return to the zsphere
  7. Under “Topology\Select Topology” select the High-res mesh that now has the re-topo mesh as the active sub-tool
  8. turn on “Edit Topology” (under “Topology”). The topology of the re-topo mesh should now appear as yellow or orange lines over top of the high-res mesh
That’s where I’m stuck. when I hit “Edit Topology” all I get is a single zsphere or vertice in the middle of the high-res mesh rather than the whole topology of the re-topo mesh.

I’ve hit the adaptive mesh preview anyway and nothing happens, even though zbrush reports the preview as complete.

I suspect the problem has something to do with scale. I’ve run into a problem like that before I think. Something about Zbrush automatically converting objs to polymesh3D on import which has the effect of scaling it (stupid). I’ve recently noticed that if I switch between having my high-res mesh selected and the re-topo mesh (independent of the high-res mesh rather than as sub-tool) selected, there is a noticeable scale difference when normally they should match in scale when doing that. But, when I make one a sub-tool of the other the scale is the same. “Giant sigh of irritation” wouldn’t it be nice if stuff just worked!

Anyway - any insights?

P.S. - is there a way to selectively paint the high-res details from one mesh to another? So that you are only transfering details from a single part of the mesh?

I think I may have figured out why it wont work. I think my base mesh has breeched a poly-count limit for imported meshes being used as a retopo-mesh.

Here’s the reasoning:

No matter what I’ve done I’ve had the same result with my particular mesh, even though the same processes work just fine on other test models, such as the dog that ships with ZB, or a sphere. I even tried exporting both my high-res mesh and my retopo-mesh as objs, then brought them back in, and got the exact same result. Conclusion - there was something different about my mesh on a technical level from the models I was using for tests.

Then I thought that perhaps ZB had issues with triangles, which none of my test models had, while I had 6 of in my re-topo mesh. So, I isolated a portion of my mesh that I knew had no triangles, deleted the hidden parts, cloned it and used those two pieces for my test. Lo and behold! it worked. So, to confirm my theory I did the exact same thing with a portion of my mesh that I knew for sure did have a triangle, and - Hmmm, that worked too. So it wasn’t the triangles.

When the idea of density occured to me I tested it with two copies of a standard sphere. One of them I subdivided 4 times and deleted all but the highest subdivision level. The other one I subdivided 4 times and painted random shapes on. The former would be my dense retopo-mesh, the latter my textured high-res mesh. I put these through the process and sure enough ran into the same problem I was having with my model.

So - that sucks. I tend to make high-res base meshes.

Here’s a question then: does anyone know what the poly-count limit is for a retopo-mesh?

Why so complicated ?

Throw an eye in my tutorial:

http://www.zbrushcentral.com/zbc/showthread.php?t=48689

about this theme.

I did the retopo there in ZBrush, but equal where you do the retopo, the following steps are the same.

But yes, there seems to be a polygon-limit for the low-res-topo in the detail-transfer-setup, but that’s not a problem because you normally have a low-res retopo-mesh far below this (assumed) limit where you want to transfer your details from the high-res inpropper-topo mesh.
(Using a very low-res , proper retopoed mesh where you can project all the details of the high-res-mesh is the sense of this whole thing.:wink: )

Follow my steps and you should get your desired results.
And remember to perform the unmask/unhide-procedure before you work with the detail-transfer-setup.:ex:

Hey Rastaman,

I think you were asking me why my base topology is so high.

You said:

“Why so complicated?”

And:

“But yes, there seems to be a polygon-limit for the low-res-topo in the detail-transfer-setup, but that’s not a problem because you normally have a low-res retopo-mesh far below this (assumed) limit where you want to transfer your details from the high-res inpropper-topo mesh.
(Using a very low-res , proper retopoed mesh where you can project all the details of the high-res-mesh is the sense of this whole thing.:wink: )”

Your point is correct - except when the base-mesh is being designed for something a lot more demanding than games or television rigging. My work is also in many ways experimental and the result of my own meandering questions, so…

Thanks again for the help, and for sharing your tutorial. It’s deffinitely more comprehensive than the other one.

Oh, FYI - I’ve tossed the retopo solution out the window now and redone the zb work to the point it was at in the original model.

Feel free to share any other thoughts or suggestions.

Hi Francis,

I think I understand what you mean, but if you need a high-res-base for rendering or games and don’t want to use low-res-meshes with dispmaps, you can export any higher subd-level of your model for that.
The goal with the retopo-features is, that you can model a detailed version just the way you like without taking much care about the topo-flow, and when you finished, create the topo-flow that you need and project all the details to the clean retopoed mesh. So you will have a clean-topo-flow low- res base-level (what a word :cool: ) and 5 to 7 detail-subd-levels (depending on how much polys your base-subd-level has).
With that you can play.
So if you need a high res mesh, simply export a subd-level 5 or 6 of your retopoed and detail-projected final ZBrush-Model.:wink:

Hi Rastaman,

I fully understand the purposes of the retopo tool and the typical workflow. The only real difference in what I"ve been trying to do has to do with the density of my base mesh. I really wasn’t expecting the retopo tool to crap out at such a low poly count.

You suggested exporting my high-res ZB mesh. What I am after is a detailed base mesh for detailed rigging purposes, plus the usual high res model in ZB to generate displacement or normal maps from, in order to apply details like pores and extra-fine wrinkles that would not be controlled by the rig. Exporting my high res mesh would difinitely not suit my purposes.

As it happens, I’m pretty sure I could still meet my aims. The topo changes that I was still needing to do were not huge so, if I do my UVs on the current base mesh, I can generate my disp
orm maps from that and still apply them to my base mesh even if I’ve done some retopo work on it. In theory I should just have to be careful to maintain the UV layout, especially along the borders.

Well, when I jumped into zb before having my base mesh fully locked down I did so with the thought that it would make for a good experiment to see just how non-linear and fluid of a workflow would be possible with zb. Now I know.

Thanks for the input.

“Q. Is there a way to save a topology rig in progress?
A. Just Deactivate the Edit Topology Button, and then save the active ZTool, after reloading the ZTool, just activate the Edit Topology Button again, and work further. (Mouse_art)
A. You can save a retopo rig WIP and come back to it. You turn of Edit Topology and save the Tool. I tested this by saving the tool, quiting and reopening ZB3 and loading the Tool. Worked like a charm. I just hit Edit Topology again and ther was my repo rig. (Poda)”

Q: Is there a way to salvage the retopo work i’ve already done?
I saved the zTool, but i did not Deactivate the Edit Topology Button.
as a result when i retopo, the zspheres are invisible.

Also, anyone know how to edit with WYSIWYG? i keep getting code for all the icons, and they seem to get placed randomly. very confusing.

ZB31_TopoInvisible1.gif

Attachments

zbfu.jpg

this thread has been incredibly helpful. I was wondering if maybe we should have an off shoot or perhaps contain in the first post issues/bugs with 3.1.

A lot of people have upgraded to 3.1 and have to sift through 46 pages of information just to find out there may be some serious annoyances with 3.1

ANYONE HAVE INTEREST IN THIS?

Sadicus, did you perform the unhide/unmask-procedures after the reload ?

Yes.
I fixed this issue by Hiding the zspheres> saving as ztool > reloading ztool
then
unhide/unmask-procedure

So i can see the edit spheres again, and did not lose any work!

what a kooky bug! the “autoMask” thing is really annoying.
i think i’m a cult follower of ZB, however. Once these bugs are fixed, no one can stope the mighty Z!

:lol:

Help Please! I’m missing something.

I’m trying the rigging trick. I’ve looked at rastamans tut’ and played with
his AverageMan rig.

I can pose Rastamans Rigs just fine. It looks a very useful method.

But I just can’t get it to work on my models.

I can create my rig, convert to main and bind OK. But I just don’t
get useful rig transformation. When I attempt to move or rotate a
bound rig the micro-spheres ‘beyond’ the one I move don’t get affected.

Two pics below illustrate…The first is my unbound rig. The second shows
an attempt to rotate the femur. The spheres at the bottom of
the leg remain unaffected by the rotate and the pose messes up.

I have a feeling I’m missing something obvious here, but I don’t see what.

Can anyone tell me what I’m doing wrong?

Thanks in advance.

G.

Attachments

RiggProb1.jpg

RiggProb2.jpg

Here it is again:

Please try first the unhide / unmask-procedure.

90 % of all problems related with the topo- and rigg-feature is caused by forgetting this.

If the problem still remains, you maybe haven’t moved the rigg properly all inside the mesh.
This problem also occur sometimes when you use a rigg that wasn’t created directly on that particular mesh.

Thanks Rastaman.

But I did make sure everything was unmasked/unhidden.

I’ll try again from scratch tonight. I can’t remember now whether I
deleted the other subtool before rigging this model. But I think I did.

I’m also pretty sure the rig was ‘inside’. But of course it’s sometimes
hard to tell.

I’ll try again, keeping it really simple.

G.

Well. I ran a quick test with a low-poly ‘sausage’ and a four segment
rigg. It worked just fine. So now I just have to figure out what I’m doing
wrong on the ‘real’ models.:confused:

Thanks again Rastaman. It’s just frustrating when you know such a useful
feature (even unsupported) is there, and you can’t make it work.

G.

OK. I figured out my problem (I think).

It looks like I simply didn’t have enough poly’s. The mesh was only 540 polys.
concentrated around the head. I’m used to transpose posing where a low
count can be useful. But I think there were simply not enough
polys on the legs for the bind process to work out what to do.

Dividing to 2160, things were much improved. In fact it looks like I’m maybe
still a bit short for good posing (i.e. maybe I need 4000-5000).

Guess I’ll test the limits on my next try.

G

Hmmmm… does anyone know if you can get a new addaptive skin to match the model used under it? I’m trying to figure out if I can completely retopologise a model instead of simply editing the existing topology.

HiIchII3D

Yes, You can.

You use the ‘Tools/Projection/Projection’ button when you make the new adaptive skin. See the front page of this thread for the basic method. The
new skin will be projected back onto the original model.

I’m sure Rastaman has a PDF tut’ that covers it somewhere.

Personally I would add two warnings:

  1. It’s tricky to get the hang of. Lots of folks have hit ‘project causes
    a mess’ issues, which (for me) was usually caused by hard to spot errors
    in the new topology (overlaid vertices or crossed links).

  2. A projected mesh at (say) subdiv 3 or 4, will not be as good at
    preserving original detail as a modelled mesh taken to the same subdiv.
    In other words its a shortcut.

If on the other hand, you simply want a new skin EXACTLY the same as
the edited topo, simply create the adaptive skin at Density=1.

G.

Thank you very much! I found a video tutorial covering this subject if anyone wants it!

http://www.veoh.com/videos/v1107274r38q3GFB?searchId=3428757899982687232&rank=7

Thanks again for all your help. I greatly apreshiate it. I really feel confident working in Zbrush now. I love the Zbrush community :smiley:

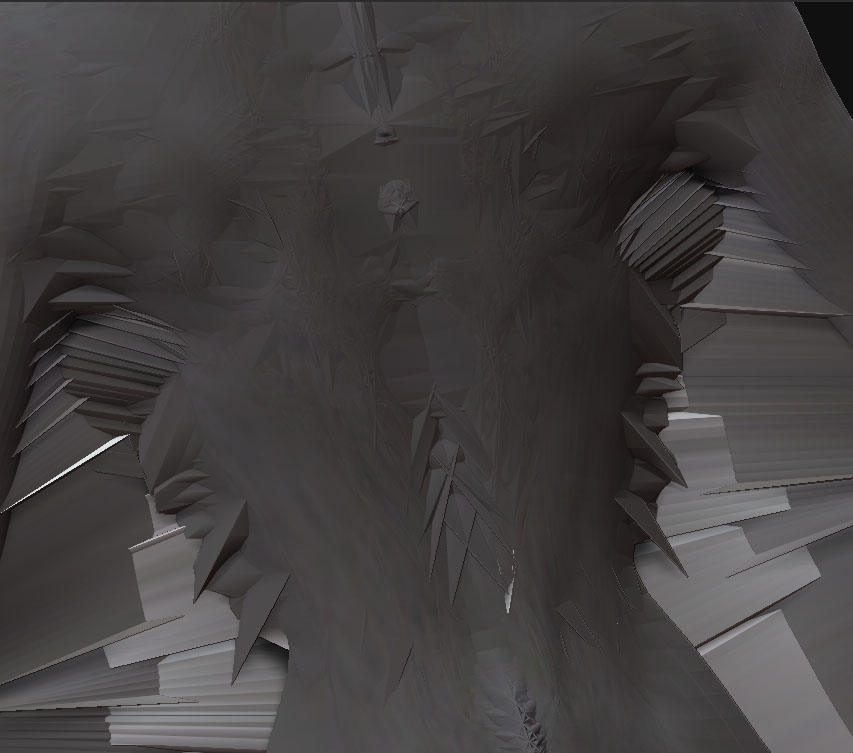
Im still getting some crazy spiking, even after following this nice little tut. Anyone have any ideas?

[projection issue.jpg]

it seems to be a point order issue, but its projected so Im not sure what is the cause.

this happens to me sometimes when I use HD Geo?