Rastaman, the picture is very clear. If you can’t save color, that’s a bit strange. Maybe you can give us the few extra settings we should alter?
Mestela, thanks for the contribution! He looks like taking a nap after a good meal. 
Rastaman, the picture is very clear. If you can’t save color, that’s a bit strange. Maybe you can give us the few extra settings we should alter?
Mestela, thanks for the contribution! He looks like taking a nap after a good meal.
I currently prefer my Light No.3 in combination with material No.3.
You have to play with the color-sliders (left side, below material).
Good results are: outer slider to blue, inner-slider to left lower part (a grey-tone). That results in a good contrast between a darker Model and allmost white topology-spheres and -lines.
Rastaman, indeed the lines are clearly visible that way. 
JVIkel, I never had the problem, but Lefty, Crusoe and others seem to have, I’d like to reproduce it. See their posts for more info.
another quick tip; if you’re previewing with projection and the mesh suddenly explodes, i’ve found its normally due to an errant zsphere connection somewhere. sometimes you can see this in edit mode (lines disappearing under the model surface, or zooming off into space), sometimes you can’t.
easiest way to see is to turn off project mode. you then get a clean mesh, with very obvious holes and twists where things have gone wrong. you can then go back into edit, delete the errant points, and rebuild.
usually if the non-project mesh looks clean, then the project-mesh will be clean too.
One further tip: Using the mouse or the touchpad instead of a tablet-pen gives much more stability against distorsions when creating the topology-mesh.
Unfortunately, the lazy-mouse does not function in topology-modus.
Running into distorsions while creating the mesh easily occurs and is later difficult to repair, so always control where the guide-line (the only connection-line you see between the circular rings) appears. It should best appear as one continous line between the rings.
Hi all,
i’m doing some test and i’ve notice when obtain a topology mesh and play with thickness , the mesh explode …
Any tips?
bye
leo
The Tutorial has a last update.
Your link on the topsite needs furthermore an actualisation.
I am currently working on a master-ZSphere-Model for use with topology-mesh-building.
So that’s not really the theme of this thread, but maybe not all users do allready know about this:
The rigging feature of ZB3 is not only good for putting riggs on your mesh-objects, but its also perfect to use as a tool for modeling with ZSpheres.
Start just as you do when rigging a mesh-objekt, but after selecting the mesh to the ZSphere(s), DON’T press the Bind-button, instead start modeling with the ZSpheres and use the loaded Mesh-model as a 3D-reference instead of using 2D-Photos.
Perfect for creating sample-ZSphere-models from a Master-Mesh-model and store & use them as a basic model for further developments.
[attach=61971]1.jpg[/attach]

Thanks a lot everyone who’s contributed to this thread, it’s been a massive help in getting started with this new tool.
One problem I’ve had a couple of times and I don’t know if I’m inadvertantly hitting something but basically my mesh source mesh and overlying topology are visible as normal, but if I add any more points they aren’t visible and if i delete points they don’t dissapear in the view. When I preview the mesh it is affected so the points are getting added/removed, but the changes aren’t showing. Is this just a bug?
Another thing is that when adding points along an existing loop (so adding points on an edge), they get placed on the edge rather than on the mesh, which is very frustrating if you want to go back and change/add detail. I’m finding myself just deleting the detail and re-drawing it. Is there any way around that? If not, then I guess that’s just something to be aware of and look out for.
Cheers
Works like a charm! Had to fix some geometry on the neck of my goblin bust!
Rastaman: nice additions. You’re finding new uses for Topology every hour ain’t 'ya? Tutorial has improved much too. It’s on the front!
Lord McGoat ( ): show some pictures to show what you mean. Maybe it’s bugs, maybe something we can solve.
Crusoe: glad it works. Can you show what exactly? Show some pictures so we can share your victory.
Busy with work. No play with Zbrush. 
Has anyone tried this? Probably everybody already knew this but I found it so easy… I only had to draw some z spheres where I wanted ( mostly in the joints)They didnt go to the infinite… they stay more or less in the center of the mesh
[attach=57502]zbones2.jpg[/attach]
Rastaman: can make an zscript of the last becasue icant follow you?
dargelos: i dont understand what you do on them? can make you explain more detailed?
Thanks both
Andreseloy
Yes, dargelos, please elaborate, it isn’t quite clear yet what you have done in the image.
I plan on writing up a tutorial.
Yeah, the zsphere posing is nice. I know transpose is cool. But it’s a pain to place the endpoints correctly again and again everytime you want to pose/repose a arm or leg. I think a zsphere armature for the ‘gross’ overall pose is easier ( and quick! ) and leave transpose for the tweaks and fingers.
Sorry for my bad explanations, this is quite new for me…
I knew about zspheres armature for posing but I didnt know you could create the bones just like you do when editing topology but the spheres dont lay on the mesh surface; they go inside de mesh more or less in the center so you can create all the structure in seconds…

Ah, I see, you’re right.
If you don’t mind, I’ll post shortly the steps with a contribute that you found that.
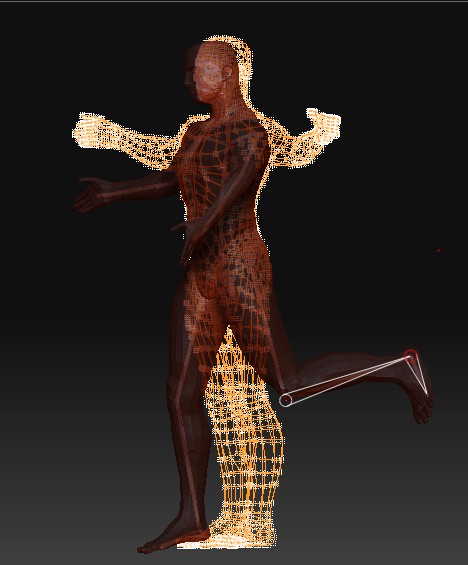
So, Dargelos was the first who found out how to do this:
Quicker (variation-) method of rigging your mesh-model with ZSpheres:
Draw a ZSphere on the Canvas and press EDIT.
Instead of going to the rigging - menue as normal, open the ‘Tool -> Topology’-menue , press ‘Select’ and choose your mesh-model.
Now, your mesh-model appears as the already known bright-yellow mesh.
Now, DON’T push any other buttons and simply move & scale your first drawn ZSphere to a desired dimension and position inside the mesh-model, activate ‘Draw’ and klick LMB inside the mesh-model to create new connected ZSpheres as a rigg.
When you’re done, open ‘Tool -> Rigging’, press ‘Select’ and again choose your mesh-model. After that, press ‘Bind’
Now your rigg is connected to the mesh and can be posed as usual.
Then you will still see the yellow-mesh in the background like on Dargelos’ pictures. Looks a little bit like a mesh with a soul.:lol:
But so far I see, it is just a variation of the normal rigging procedure and because you cannot later get rid of the yellow mesh, it’s unfortunately not for further use beside the ‘Yellow-Soul’-look.
The difference between this and the 'normal way the Wiki descripes is the following:
With the normal-rigging-technique you have to create the next ZSphere for the next Rigg-Bone exactly in the same way you model with ZSpheres, what means you LMB-click (Draw-modus) on the ‘mother’-ZSphere, drag the baby out and then position it in the move-modus to the desired point.
With Dargelos’ way you can add the new ZSpheres just more quickly by clicking on the desired place where the Zsphere should be in the mesh, so it’s the ‘topology-modus-way’ of creating a rigg.
If you try this method in the rigging-modus, you will find your new created ZSpheres far outside the mesh , dislocated in Z-Direction.
So in conclusion that shows that when working in the ‘Topology’-mode ZBrush automatically locates all new ZSpheres inside or (when in ‘edit topology’-mode) directly on the surface of the mesh-mode-Structure, so the mesh-model is the center of the coordinate-systeme, especially regarding the Z-direction.
In Rigging-mode the direct-click-method also works, but the Zspheres are all then drawn massivly in z-direction dislocated outside your mesh-model, so you have to do it in the usual way that is formerly used only to create models out of ZSpheres.
I hope all of you can understand what I tried to explain.:eek:
Dargelos way of setting up a rigg would be much quicker and more comfortabel to use if we could get rid of that yellow-mesh.:mad:
Arghhh, Pixologic, please fix this as soon as possible.:evil:
@ Andreseloy:
You do the same steps as if you would perform to rigg a mesh-model, but instead of creating a rigg for posing, you create a ZSpheres-Model just as you formely did in ZB2. The big advantage now is that you can position and dimension your ZSpheres within your ‘Master’-3D-model as a 3D-reference to create much better ZSphere-based-models than in ZB2 where you only were able to use the traditional 2D-90°-Photo-reference.
Cool ‘abuse’ of the rigging-feature, isn’t it ? :lol:
You are much better than me explaining things… I haven´t tried the way rasta did yet but what I did was opening the average tool first and then apend a zsphere as a subtool… Only this way i could make the zspheres stay inside the mesh and dont fo to the surface or very far away in the infinite jeje… then I selected a clone in rigging and topology and after that drawing the zspheres and “bones” was just clicking in the desired places… I will try to make a zscript.