ZBrushCentral

Thread of Madness - Joseph Drust

@Intervain: Thanks Magdalena! Been enjoying your latest test and experiments as well =)

@genggi99: Thanks!

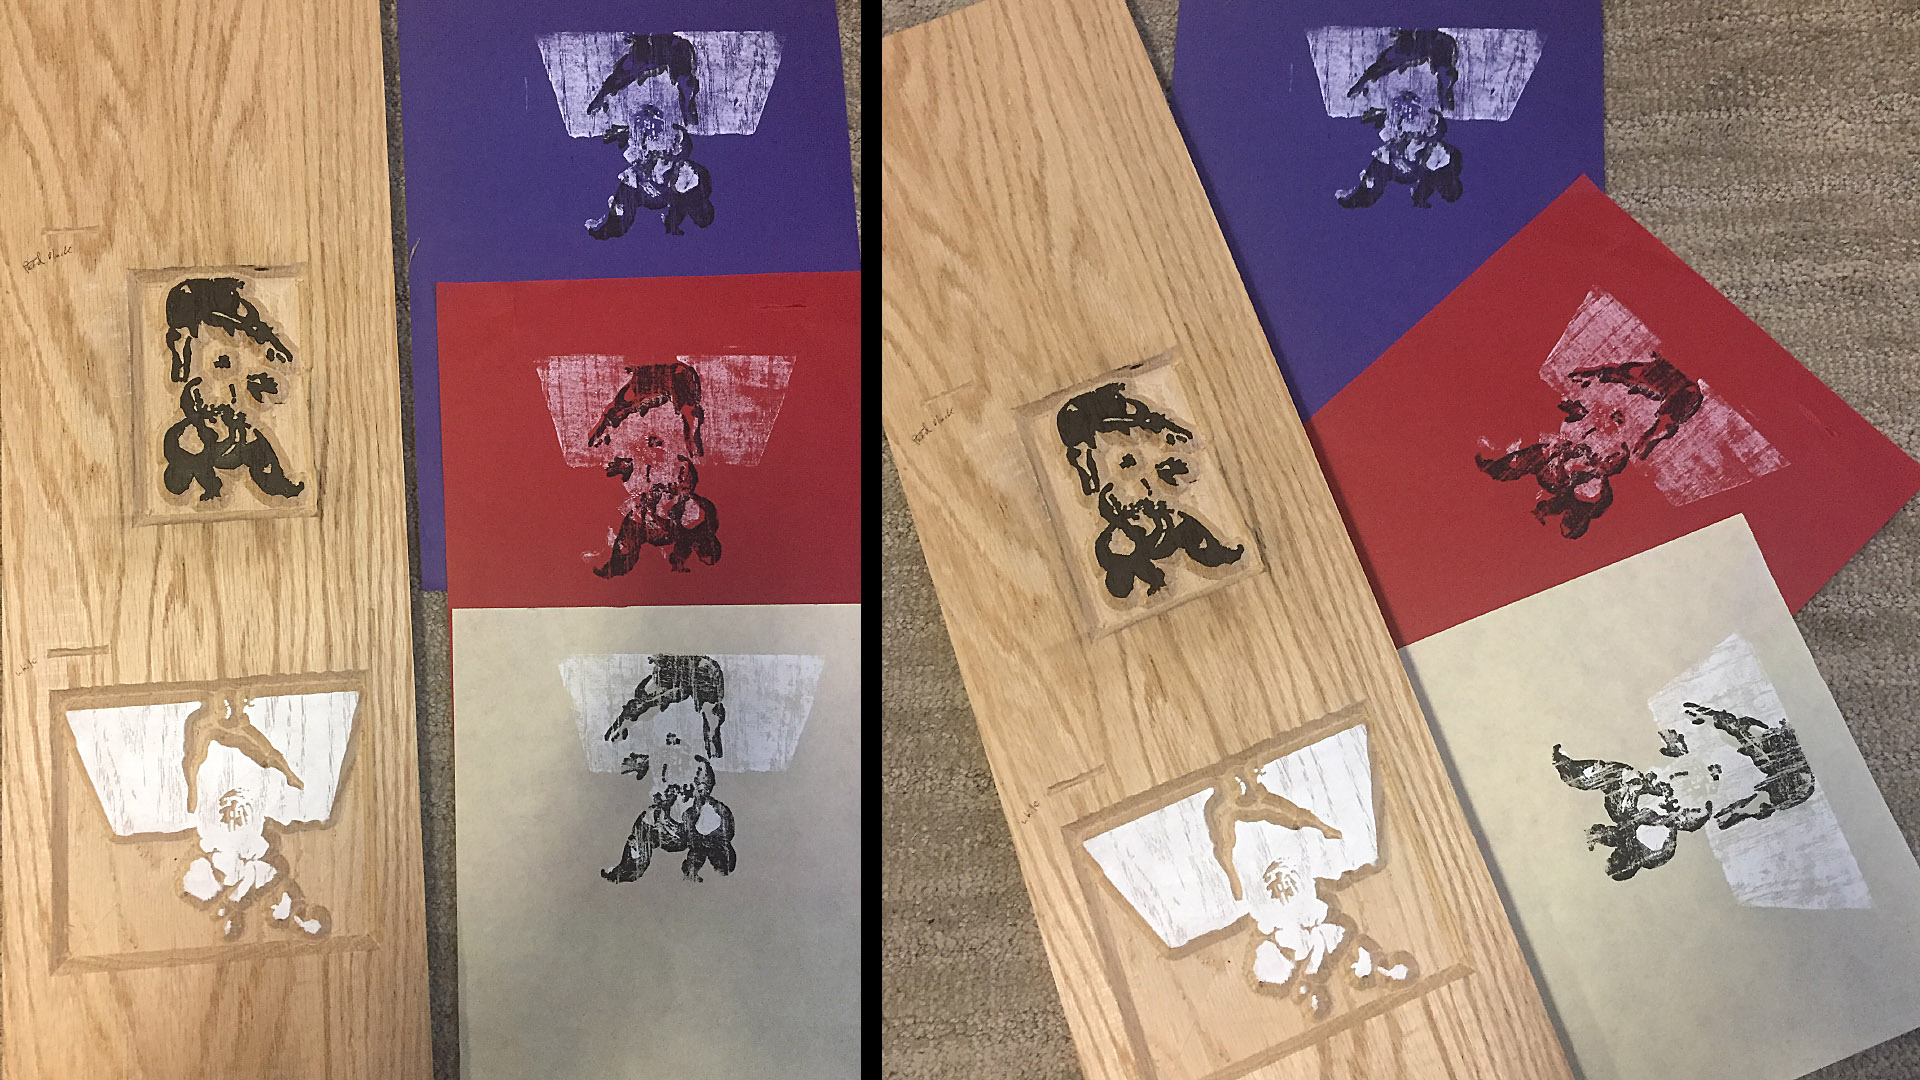
@jmenna: Thanks Joe!! Next experiment is taking one of these to a woodblock print proccess :slight_smile:

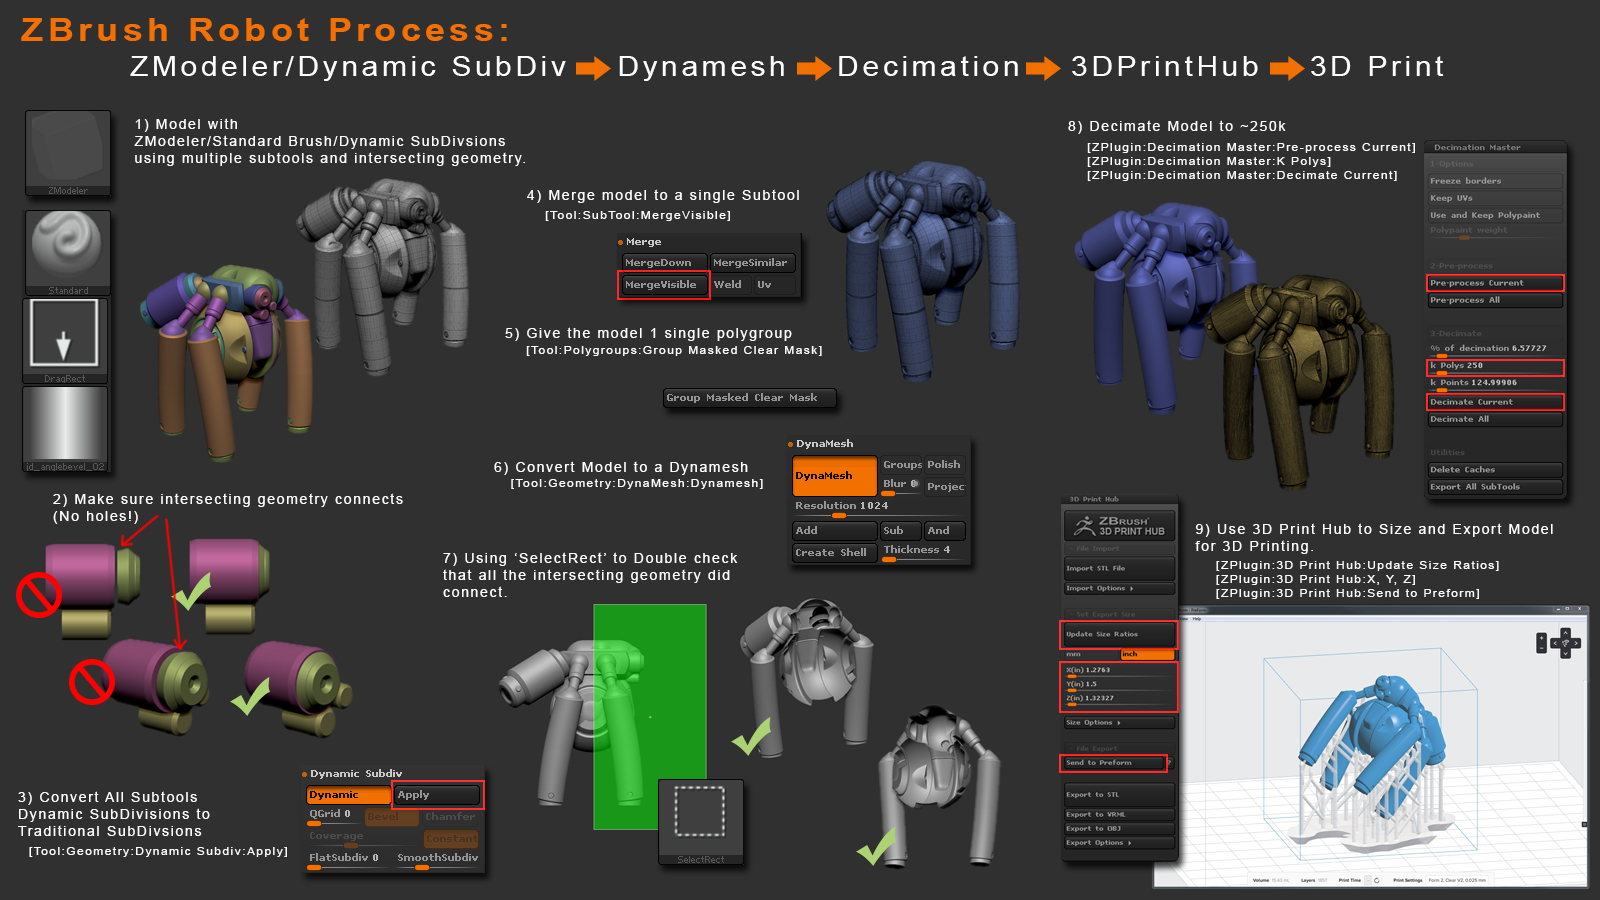
@KC-Production: Thanks for the kind words! Yeah I have been having fun playing with it, I have some ideas for expanding it that I am messing with as well :slight_smile:

@Frenchy Pilou: Thanks!

@SolidSnakexxx: Thanks!

-Joseph

Great stuff !

Just got round to checking the thread and process. Awesome stuff Joseph!

@Kanga: Thanks!
@Polyjunky: Thanks! Gonna have to do one with fur and use your ZRemesher Guide Brush process :slight_smile:

I have been experimenting with taking the images and generating them in Ink. Took the final image and split it into solid colors then ran it through my cnc machine. This gave me wood blocks to print from :slight_smile: Now I am a 100% novice at this process; been learning a lot just doing these tests (example: the image should be mirrored, and whoa registration… )

Anyhow just sharing a quick example, waiting on a smaller v-bit for making the engraving passes :slight_smile:

CarvedAndPrinted.jpg

Cheers,

-Joseph

Attachments

CarvedAndPrinted.jpg

Joseph
nice work - high tech wood cuts - gotta love it

From our old printmaking days
An easy way to solve the registration challenge is to punch the end or edge of your paper with a 2 hole punch. An old school notebook paper punch would do.
Then put corresponding cut holes in your CNC file for each image and use some little dowels slid into those holes to do the alignment for you.

There is a guy on eBay with very good and inexpensive carbide 30 degree engraving bits. I have the link if you email me, didn’t know if its ok to post it here.
I haven’t had much of a chance to use the CNC, but as the weather is getting colder I’m hoping the time will be available.
Bob

nice, thank you for sharing this!

It’s March again and for some reason I have decided to participate in the March of Robots and create another 31 robots using ZBrush + Keyshot + Printed on the Form2 :slight_smile:

The March of Robots is an Instagram sketch challenge hosted by Dacosta! aka Chocolatesoop (https://www.instagram.com/chocolatesoop/.) The goal is to draw a new robot illustration each day for 31 days (My drawing skills are sub par at best so I go the route of creating the Robots in 3D.) More information on the event can be found here: https://marchofrobots.com/

Each of my submissions to the event are creating inside of ZBrush. I have been sculpting them out in the evenings taking ~ 1.5 hours from start to final color version in Keyshot. After the model is created I send them to Formlab’s Preform using the 3D Print Hub (Pixologic :: Download Center) and print them overnight. Printed versions are 38.1mm / 1.5" in the longest dimension.

I will be posting these in groups of 5 here on ZBC :slight_smile: The robots can also be viewed on my Instagram: https://www.instagram.com/piggyson/


March 01

March 02

March 03

March 04

March 05

-Joseph

Attachments

They’re back, better than ever! Please consider recording a demo of your process of creating one of these guys, from start to 3d print. I’d really love to see it! (and I bet lots of others would too!)

@slothkins, @MealeaYing: Here is a quick image breakdown of the process :slight_smile:

The main thing for 3D Printing is to make sure any intersecting geometry is solid and intersecting correctly. Then after the modeling is completed I merge all the subtools together then convert them to a Dynamesh. Dynamesh will weld everything together, get rid of the internal geometry, and generate a watertight mesh. After the Dynameshing is done I just check to make sure that it is indeed solid then I decimate it down to around 250k. After that I just export and print.

Shapeways/Sculpteo both check with a lot of scrutiny to make sure that the print doesn’t fail (since failure is money and time lost for them.) I find that some of the restrictions often times will print fine on a consumer level printer.

RobotBreakdownr.jpg

-Joseph

Attachments

RobotBreakdownr.jpg

… valuable and generous post Joseph, a very complete set of many printing tips all in one infographic.
This post alone can help anybody, whether their 1st print or 500th.
You are amazing.

Cheers,
Keridan

@keridan: Thanks for the kind words! Glad to hear the information is of value :slight_smile:

Here are the next five; same process as in the image tutorial. All robots are printed at 33.1mm/1.5in in the longest dimension. They take roughly 4-5 hours at the highest resolution on the Form2.

-Joseph

Attachments

Here are the next five :slight_smile: Halfway though the month!

March_11.jpg

March_12.jpg

March_13.jpg

March_14.jpg

March_15.jpg

-Joseph

Attachments

March_11.jpg

March_12.jpg

March_13.jpg

March_14.jpg

March_15.jpg

THAT was awesome.
Thank you!

@MealeaYing: =)

Next five! Getting close to the end of the month :slight_smile:

March_16.jpg

March_17.jpg

March_18.jpg

March_19.jpg

March_20.jpg

-Joseph

Attachments

March_16.jpg

March_17.jpg

March_18.jpg

March_19.jpg

March_20.jpg

1 Like

Next five :slight_smile: Down to the last week of the Challenge.

-Joseph

Attachments

1 Like

For some reason I didn’t get an email update on this thread even though I thought I was subscribed? Anyways - great bunch. Do you have a collected group shot for the whole month? Would be great to see!

@MealeaYing: Yeah the planning aspect is something I attempt to do at the start; it doesn’t always go as planned thou :slight_smile: If I am just going to do something for rendering I can end up modeling sloppier, use camera angles to cheat things, and not worry about watertight meshes. The Robots on this thread where I was using surface noise would never be able to be printed; and I would basically need to start over on them if they ever needed to be printed.

@slothkins: Working on reprinting the first 16 in the Grey Resin then I will be creating images of all of them together. I probably won’t start the image process till next week; gonna take a break and go to sleep earlier this week since March is finally over :slight_smile:

Here are the final robots for the month!

March_26.jpg

March_27.jpg

March_28.jpg

March_29.jpg

March_30.jpg

March_31.jpg

-Joseph

Attachments

March_26.jpg

March_27.jpg

March_28.jpg

March_29.jpg

March_30.jpg

March_31.jpg

2 Likes

Here are some images of the final month of the robots I created for the Instagram Sketch Challenge in the Grey Resin. Each of the robots were created entirely in ZBrush then printed out on the Formlabs Form2 Machine. I will post some more images of the models after they have had a light coat of Grey Primer as well.

-Joseph

Attachments

2 Likes

That’s so awesome :slight_smile:

I’ve tried to download your plugin but the link to gumroad is broken.
it says page doesn’t exist. can I find it somewhere else?
Thanks in advance