ZBrushCentral

Rouhollah Toghyani's ZGallery

it seems we are limited to 6 attachment per post. alright another post then :slight_smile:
lets see our system at work

this is first set of hair combed and clumped to my fibermesh guides

clump1.jpg

second set are combed with guid curves and clumped to first set of hairs

clump2.jpg

and third set of hairs again combed with guide cerves and clumped to second hairs

clump3.jpg

finally adding flyaway crazy hairs and some randomization to combing and clumping weights. hairs width corrected too.

flyaway-randomize-width.jpg

hope make sense. if there is something not clear please let em know. thanx and happy fibermeshing, cheers :slight_smile:

Thank you so much, thís was very helpful!

I’m also using MtoA and Yeti for hair. Would it be possible to see a screengrab of your yeti graph for inspiration?

Great works, love all of them :smiley: and thanks a ton for the hair breakdown i was stuck on this for a week …im going to try ur method :slight_smile: keep up the good work !

Dude, this is one of the best use of Fibermesh I have seen so far, and the character looks great too, makes a big smile on my face :smiley:
Thanks for the break-down!

hehehee love it

The bear maker is another nice addition to your gallery of interesting characters. Very fun.
A question,how do you import fibermesh as guides? Do you know if it works in MODO?
Anyways fun work and character.

looks awesome!
Thanks for sharing.

Looking forward to see the making of.

very nice method. Do u make the clumps of hair in maya or zbrush? also can you share the amount of splines u export for each pass of hair. which groom brushes did you use for the styling?

Thanks

thank you all guys for your kind words. i shared a breakdown of hair in previous page. just a single fiber mesh for hair, tow for left and right bread and another for eyebrows. for eyelashes i also use fibermesh but use them as meshes and no hair there. grooming fibermesh for further using as guides is somewhat tricky. maybe you noticed all groom brushes make your strands scraggy by default and curves extracted from this fibers aint suitable for using as guide. so you need to smooth them by smooth brush but by default smoothing shortens your fibers. the fix is changing Auto Mask fibermesh curve in Auto masking pallet in the brush menu. change the curve like this:
automask.jpg+

in grooming you frequently have to change this curve and Preserve Length slider for all brushes you use. DO NOT clumping on fiber mesh leave that to hair system. when you happy with your fiber mesh export them as .ma file and import it to maya. another way that I prefer is to goz fibermesh directly to maya and using a script to extract my curves, the benefit is i can specify number of curves and a tolerance for deleting tiny curves that are useless. now I am pretty sure I’ve to write a making of :wink:

congratulations!, the beer maker are very cool

also thanks for the great fiber mesh tips ,very useful, I´m wondering how you clumped one hair system to another, are you using the default nHair system?

thanks

Very nice !!!:+1:

You are the hair master!! Awesome work, really appreciate the breakdown:+1:

thank you Rick. in fibermesh pallet there is options for exporting curves. for maya i export as .ma and sometimes using a script i extract curves from actual fibermesh geometry in maya. I’m not a Modo user but maybe you want to test formats available for exporting curves in zbrush, anything modo supports.

thank you dunkel. right now i’m using yeti but the guidelines is the same for all packages and plugins, clump to clump

I still would like to see the render setup, material setup, and llighting setup in maya !! :slight_smile:
awesome job again

great job!!! and thanks a lot for sharing this breakdown

I enjoy studying your work, in that there is so much closely observed detail. Thank you for the fibermesh tips. You get great results.

this is a great insight and tip, thanks for sharing.

Looking forward to more tutorials from you.

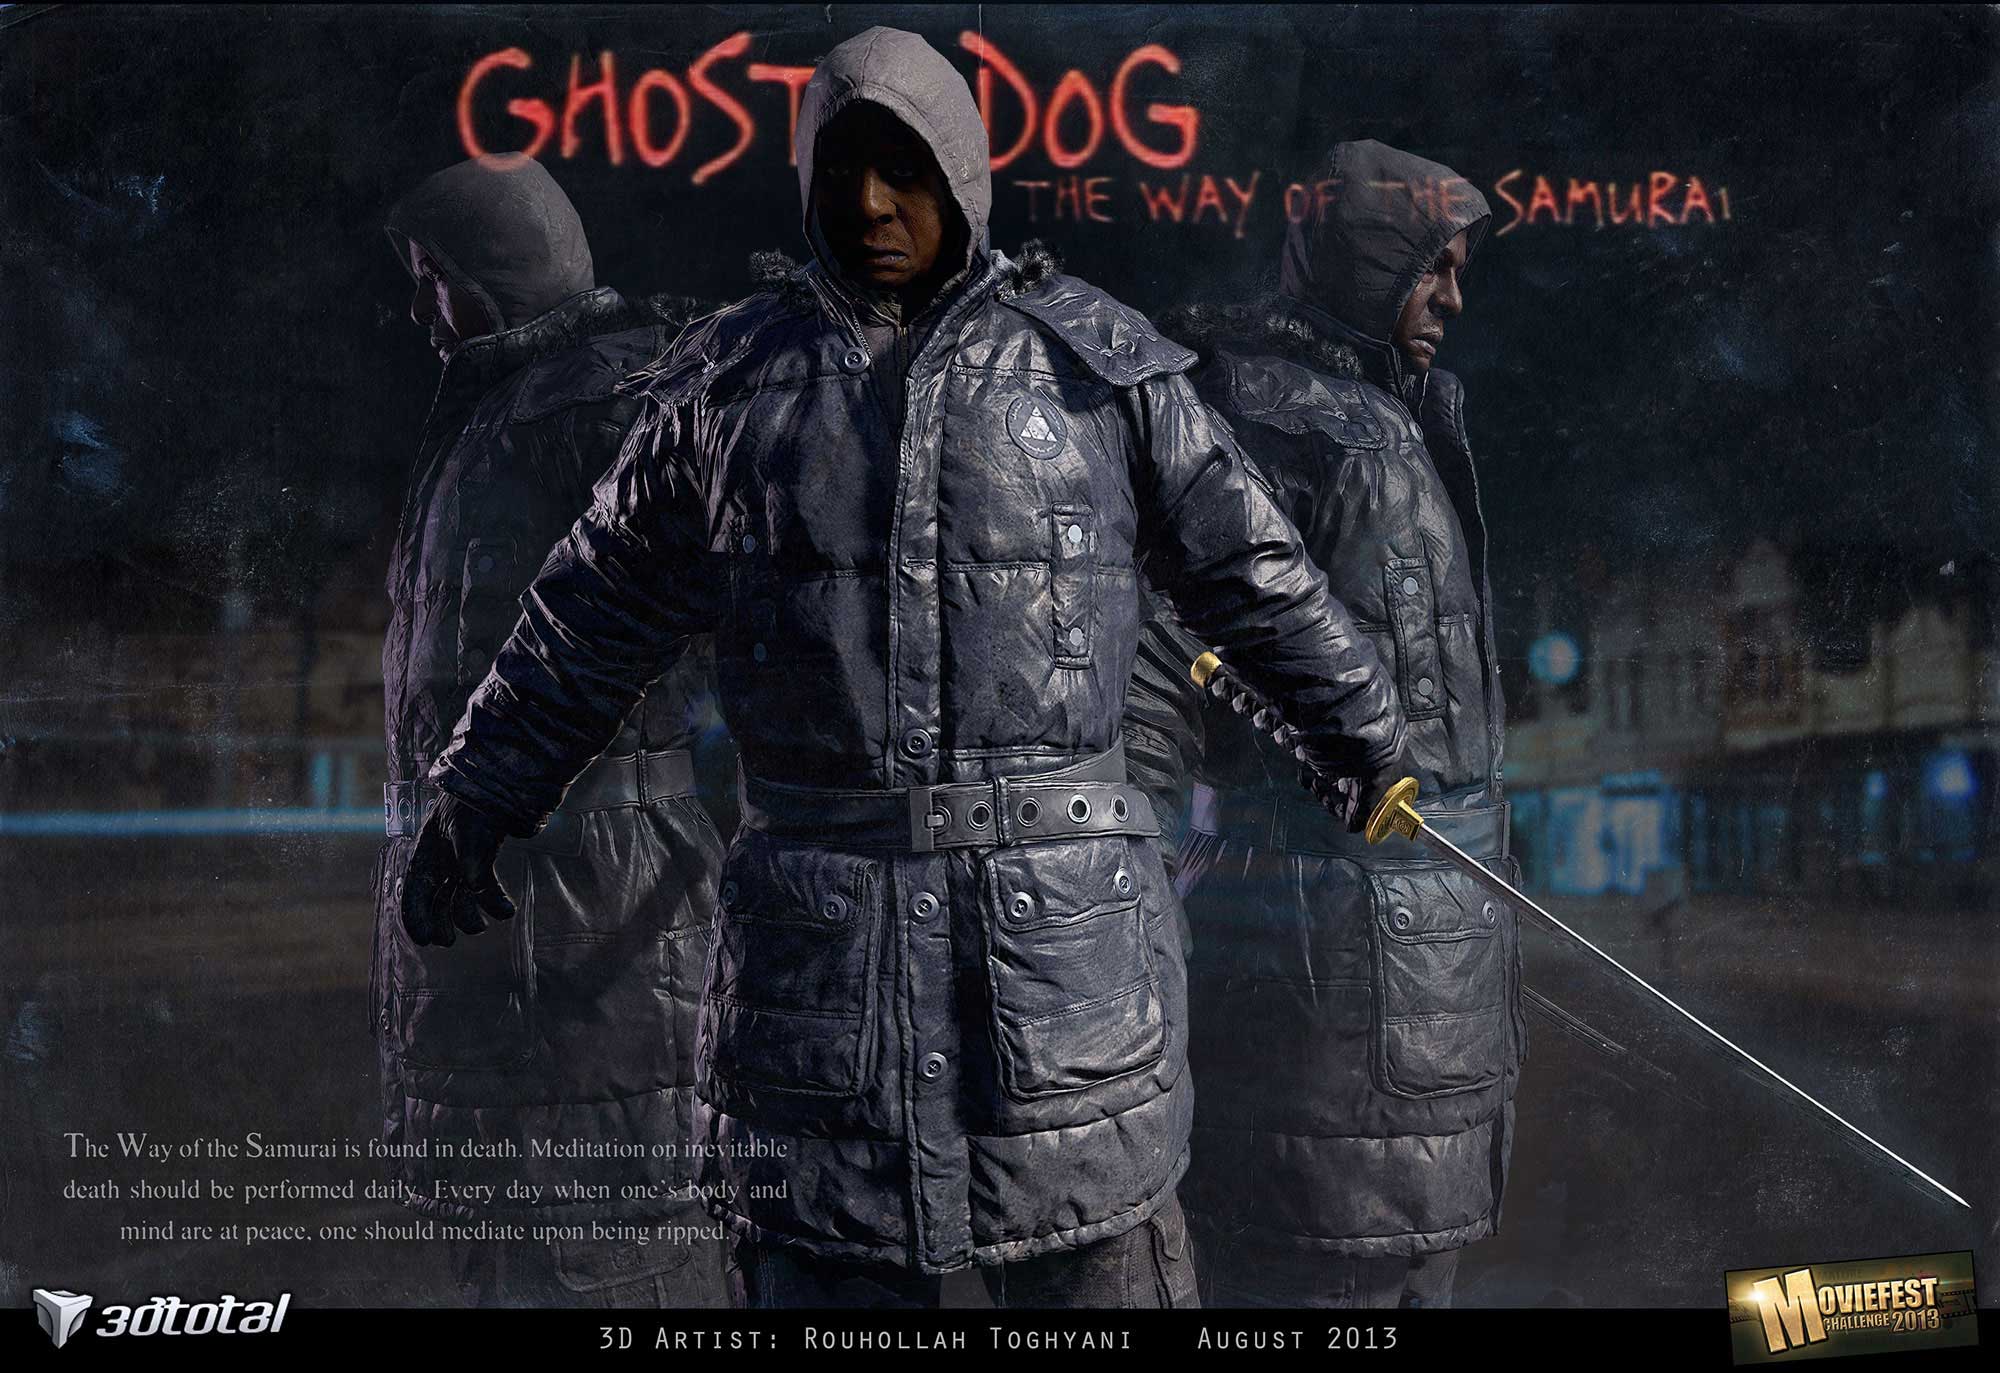
hello all. I got some free times and decide to participate in Movie Fest challenge by GameArtisans.org. as a member of 3dtotal team I was benefited by great feedback and comments from 3dtotal forum, thanx guys. challenge was all about choosing a real actor from a movie and make it a game character. I’m a big fan of Jim Jarmusch’s movies, so I picked Forest Witaker as Ghost Dog in a movie with the same name, Ghost Dog, the way of the samurai. whole process tooks me 2 weeks to done. and here I want to share the results with you, hope you like it. any comment and critique is much appreciated. thank you

real time renders in Marmoset Toolbag. High poly renders in Keyshot.

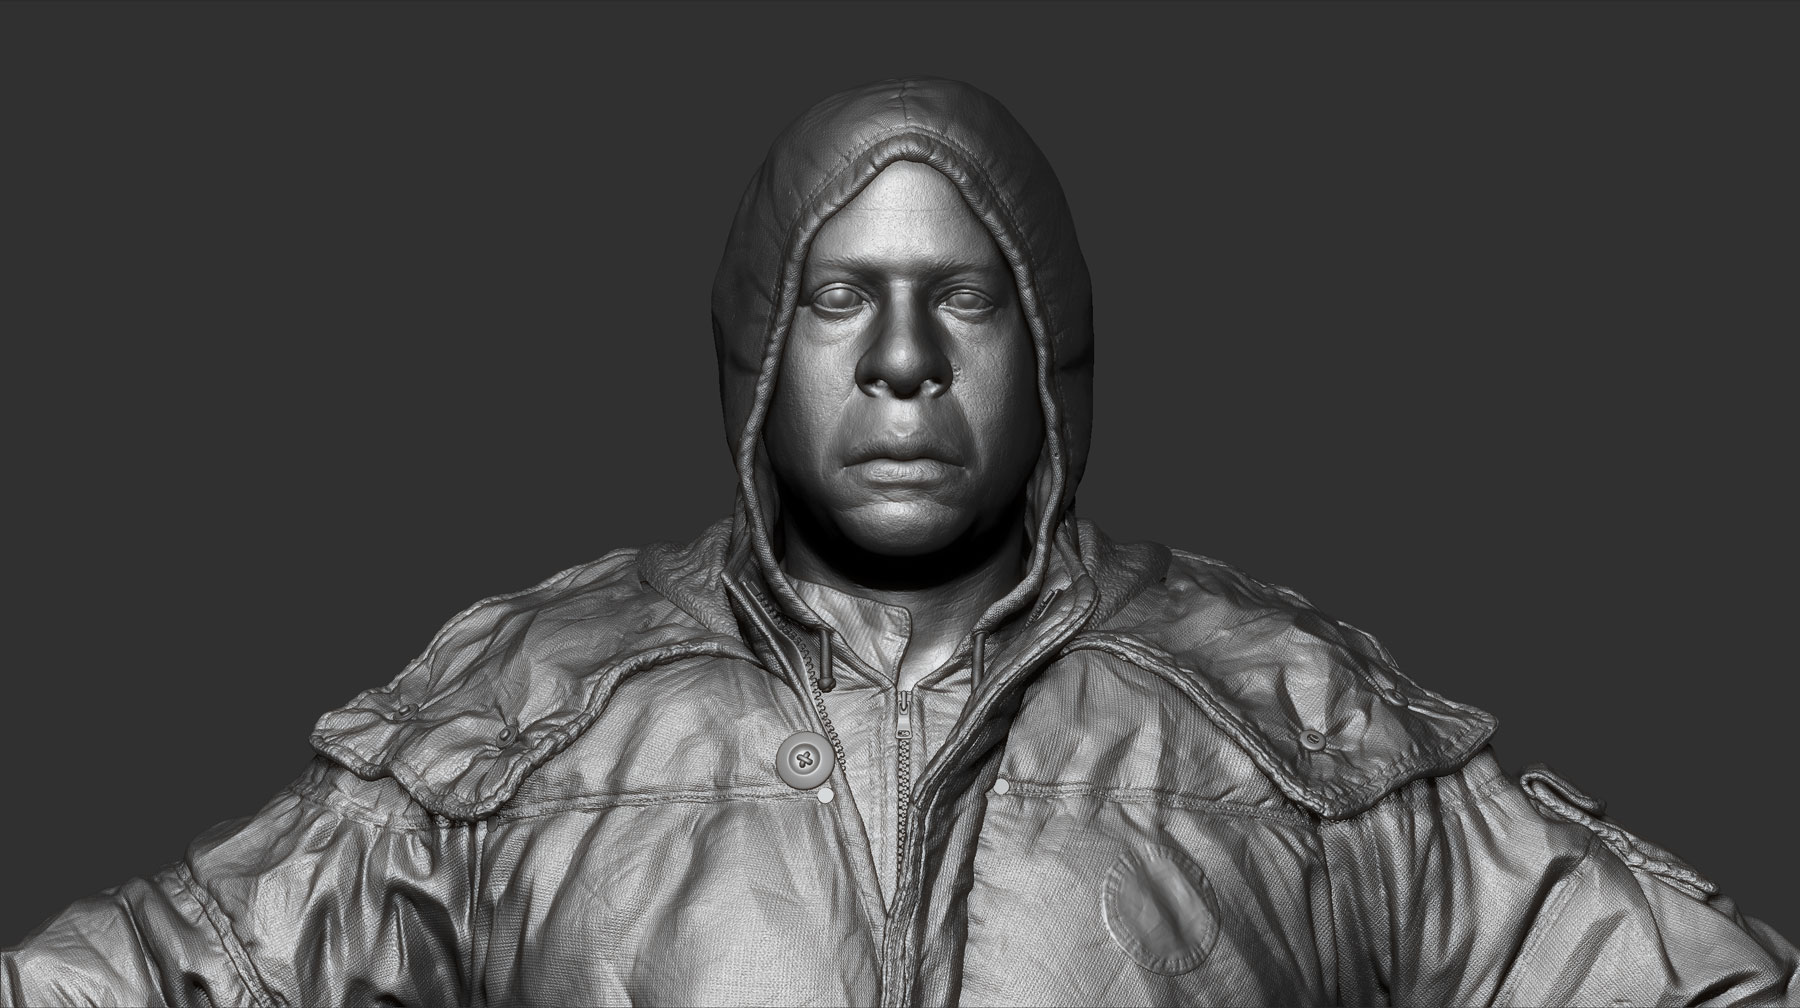
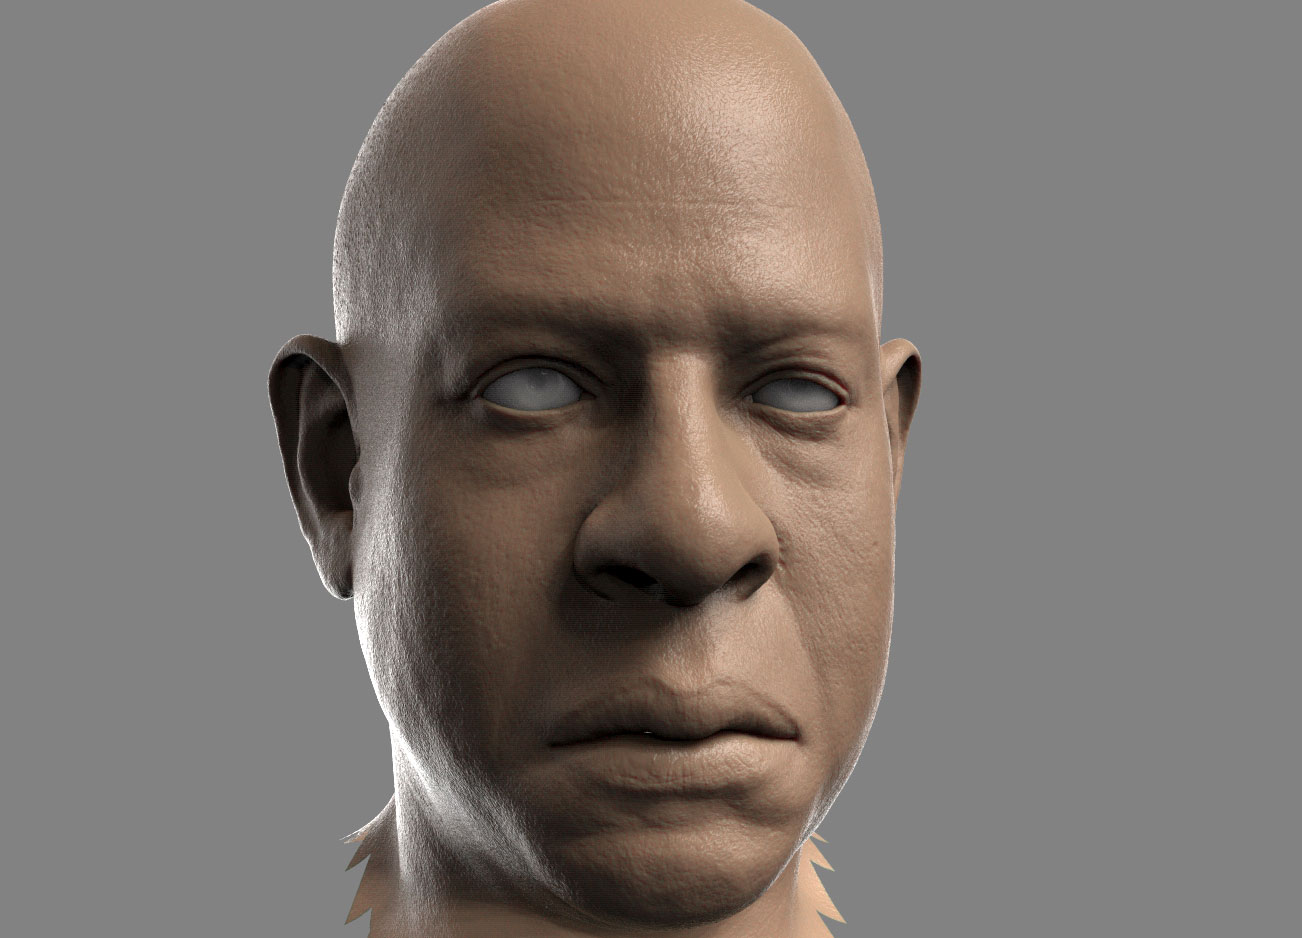
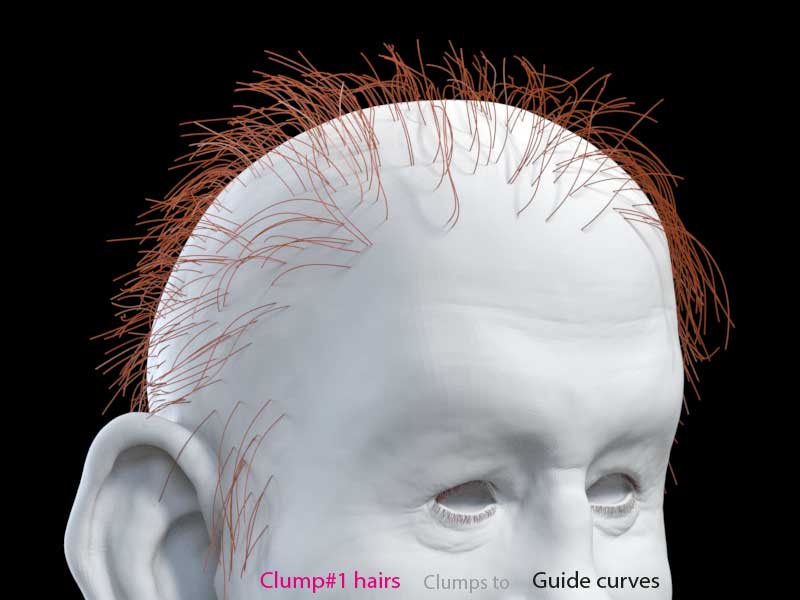
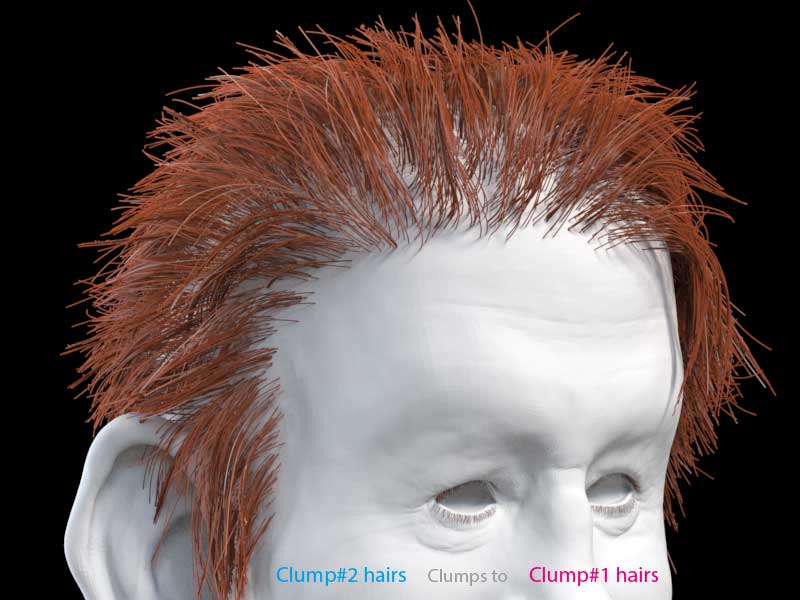
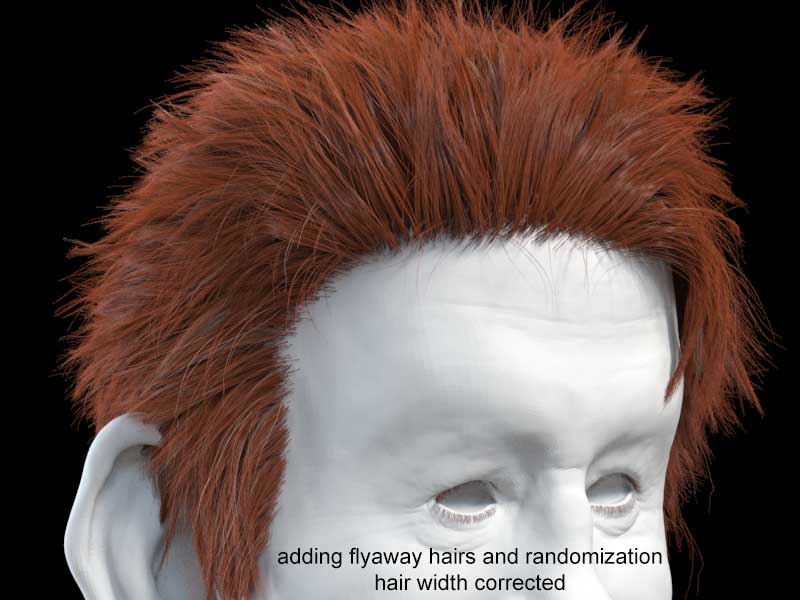
start by Forest Witaker’s head

head.jpg

I changed clothing from original one in movie, somewhat more winter looking
highres_render.jpg

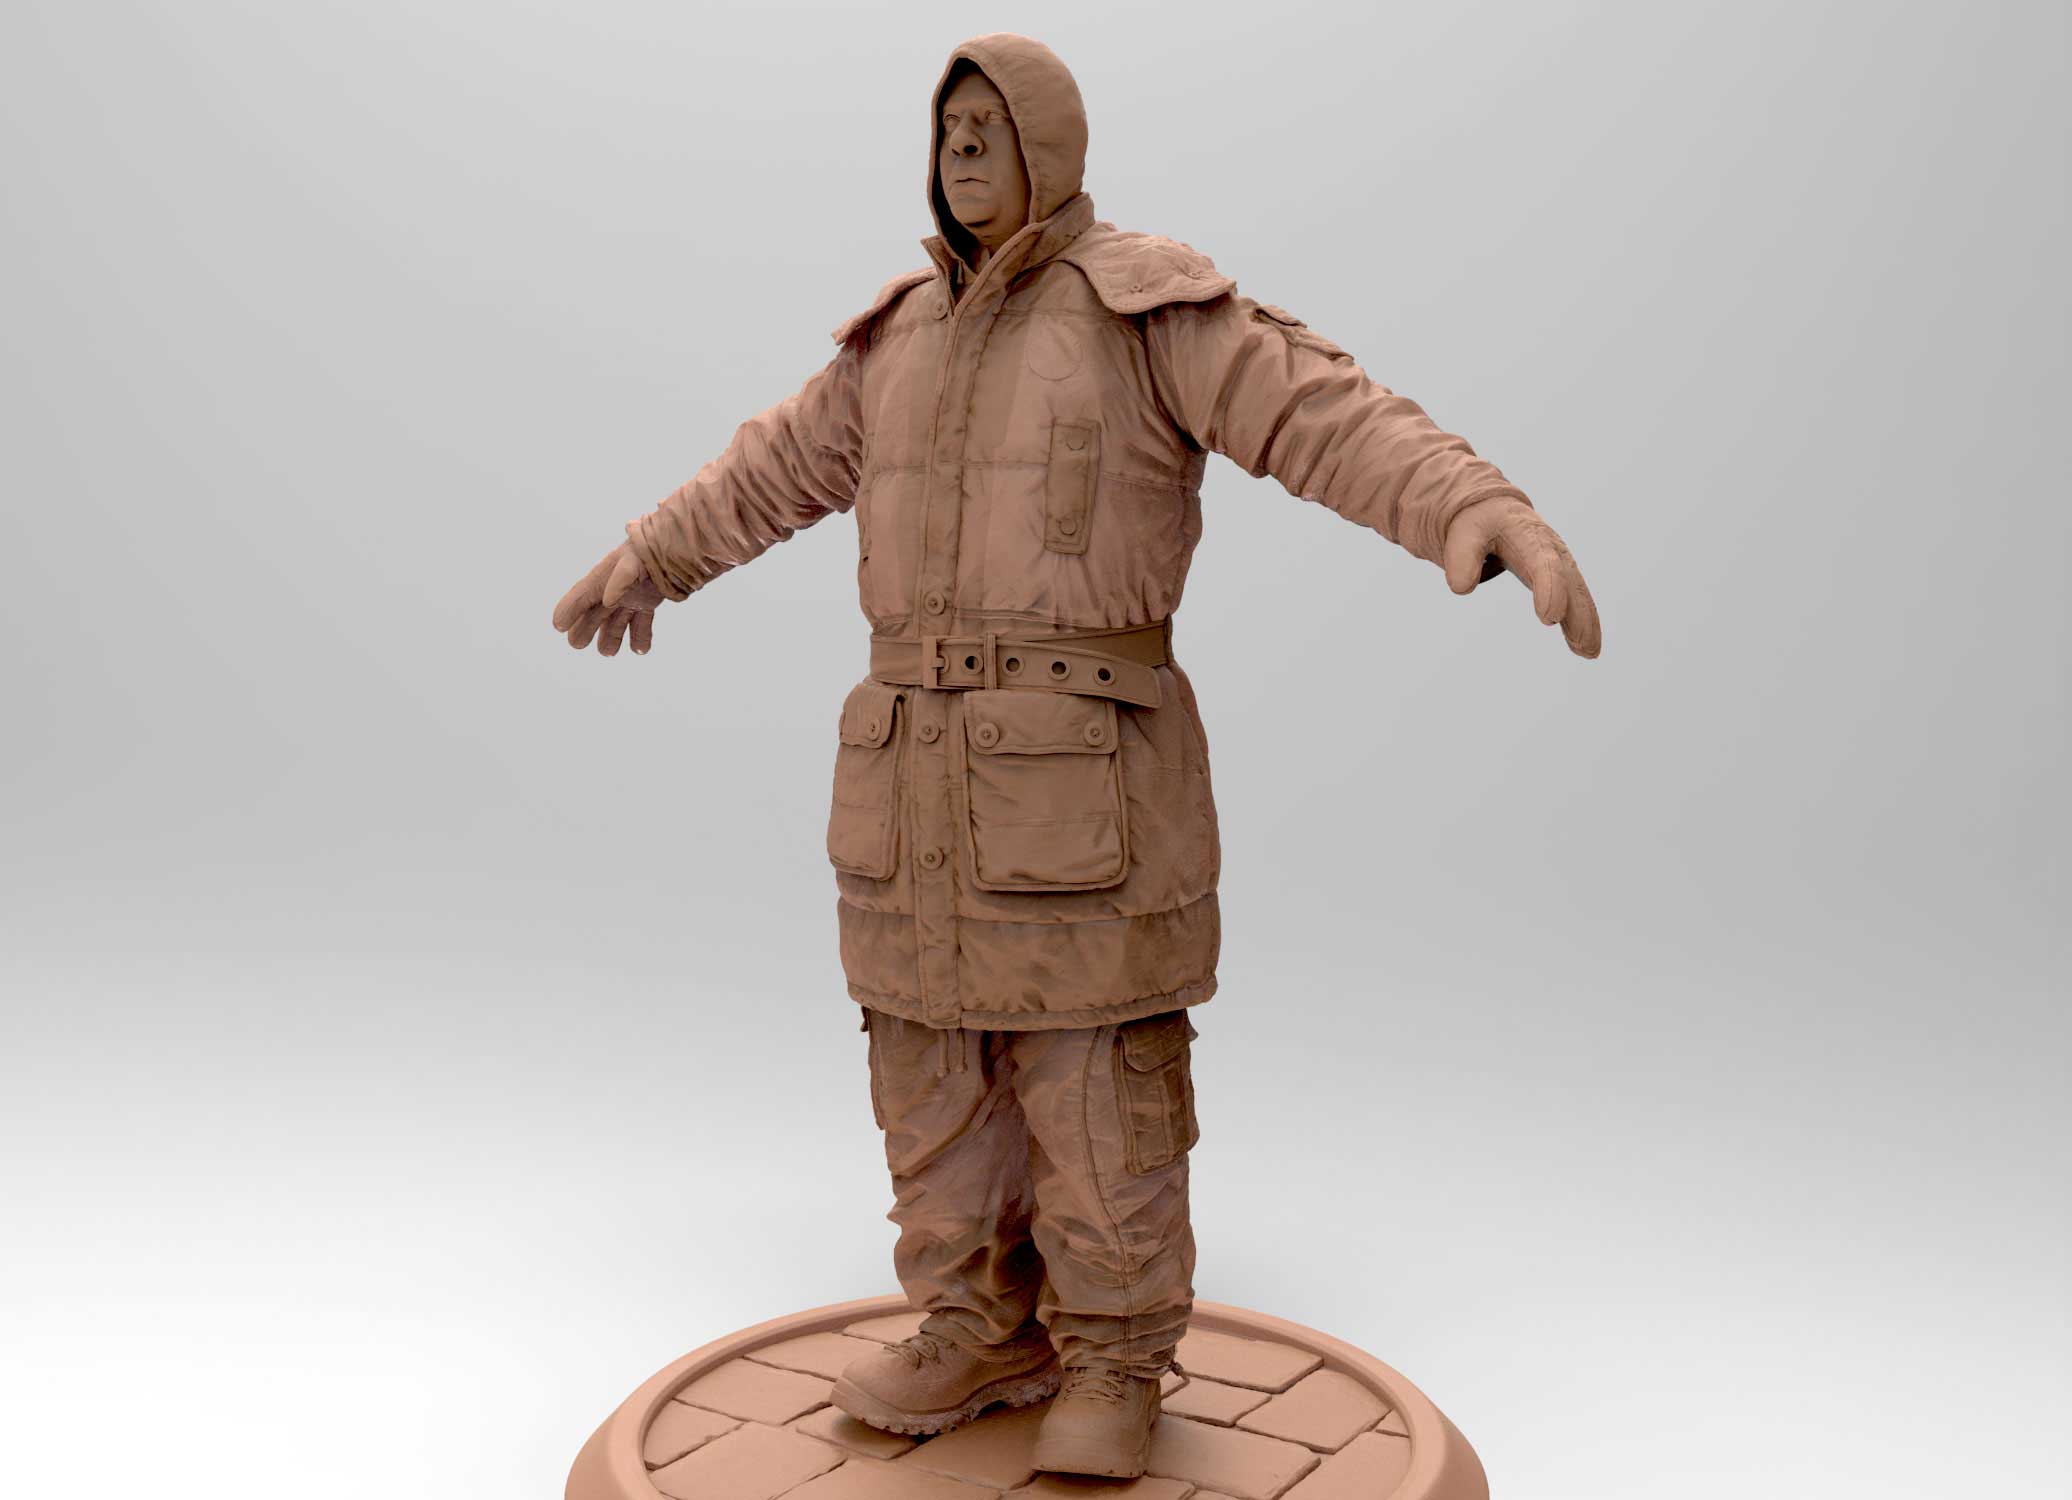
another great addition to zbrush, ZRemesher helped me for a quick resurfacing and some manual modifications for final lowpoly game model. whole model during one day was finished. 16000 tris
ghostdog_construction.jpg

texturing done in Mari and normal maps baked in XNormal. realtime renders using Marmoset with 2k maps
ghostdog_presentation.jpg
ghostdog_beauty.jpg

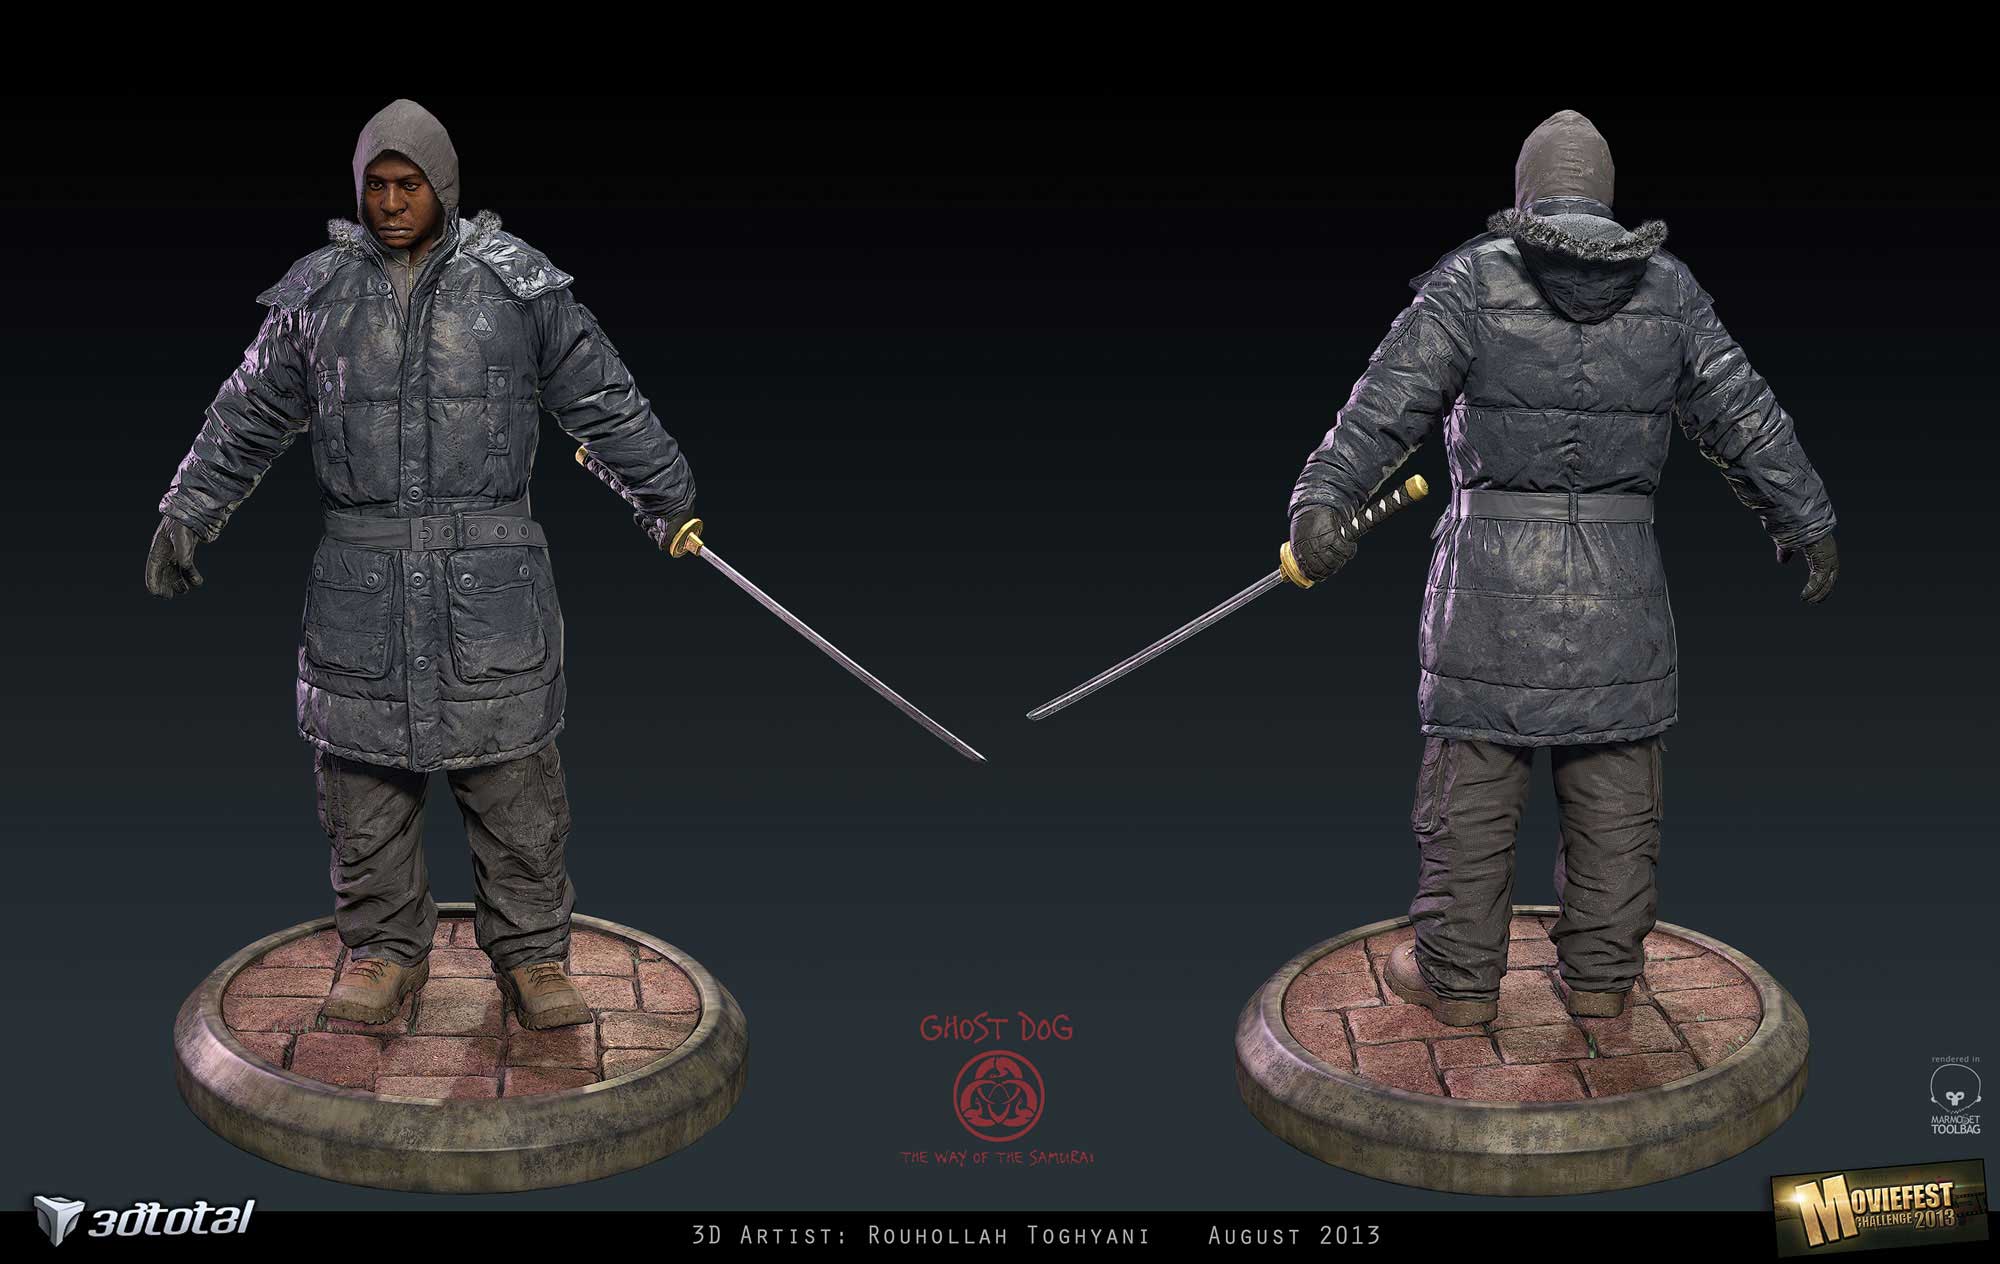
and realtime turn table<iframe src="//player.vimeo.com/video/73565467" width=“900” height=“466” frameborder=“0” webkitallowfullscreen="" mozallowfullscreen="" allowfullscreen=""></iframe> Ghost Dog - Real time from Rouhollah Toghyani on Vimeo.

some zbrush screen grabs from highres model