Well I have folowed the tutorial posted by Scott Spencer, but this is the result I got.
haha I know I know… at first I fealt bit shy to put it here lol. But I was hoping someone could help me fix this 
ok well thanks everyone and have a great day

Well I have folowed the tutorial posted by Scott Spencer, but this is the result I got.
haha I know I know… at first I fealt bit shy to put it here lol. But I was hoping someone could help me fix this
ok well thanks everyone and have a great day
arian, what application are you using? thats the first thing i need to know to help you, by the looks of your outcome you need to take the displacment into photoshop and then you need to, CTRL+A, then CTRL+T, then right click and hit “Flip Virtically”, then save it, and it should show up correctly.
I have just downloaded this as i too have been searching for the last damn year trying to figure out how to do it lol, i finally fount out how to do it in 3dsmax, and the results are well… FANTASTIC! here is a pic.
Has anyone achived a good result on zbrush to maya - maxwell render workflow_?_? 

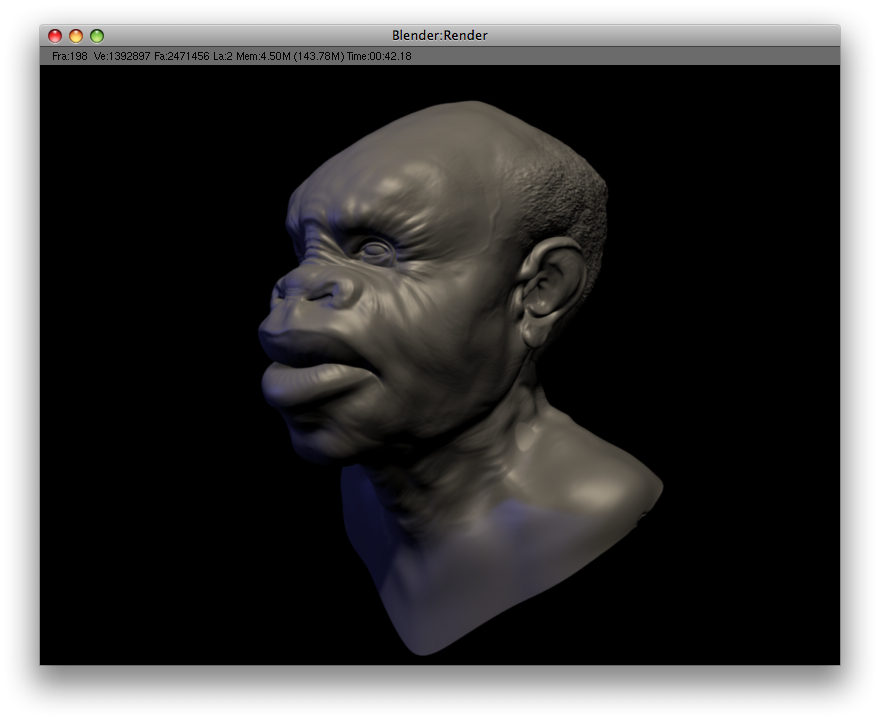
Here is my test with Blender 2.49!

First image is rendered with sub surf 4 and another one is with 5. Not too much difference on quality, but much slower to render.
My computer specs are:
Apple Macbook
Intel Core 2 Duo 2.4GHz
2Gt memory
You can find rendering times from upper right corner of attached images.

Nice, however I see a big difference. And still you need to go further, you are losing a lot of detail. Go Blender. 
Sorry to create a sidetrack. Someone at C4DCafe said that a renderer called 3Delight will not render alphas at all. This could put the whammy on my plans to use it to render ZBrush objects with alpha brush details. 3Delight is a Renderman compliant renderer (Pixar).
If anyone knows more about this, please post.
Uummmm, well 3Delight is utilized for an awful lot of films. I’ve used it off and on on projects (tv shows, features) since it’s inception. It’s very fast and high quality by a fella (or two) that are very talented in this area. Another to look at is Pixie. Both basically the same, but each has strengths. Of course quite a few RIB based renderers exist to play with.
Can 3delight render alpha details created in ZBrush?
Well, i am rendering displacement with maya /mr since maya 7/8 and i figured out how to reach the result i want.It’s all about some experience with it.
First of all you have to be careful what iterations you gave in the mr subdivision approximation node, i mean you have to start with lower numbers and see in output window what is the number of retesselated triangles during render time…it should be around the number of quads x 2 ,you had in Zbrush. So in minimum /max subdivisions (spatial mode) you shoul use 1/3 for the begining and increase if in output window you haven’t reached the number of triangles from Zb.Also you have to experience with creating a displacement starting from a higher subdivision in Zb …2 or 3 for example.
You should try with diffrent multi displacement map settings ,i mean with scale: Auto or Ad Factor or Off.Also do not forget to work with R32 and to convert the Displaacement .tiff file in .map file because Mr loves memory mappable files.Hope it helps.
Here is one more image. Now there is 6 levels of sub surf. You might see slightly more details now? I tried to put 7, but I had no enough memory 

shokan, 3Delight, Pixie, et all, are technologies based on Renderman. They can render anything. You are going to have to learn shading language or find the necessary shader or tools. Plenty exist. If you utilize Maya follow the link in my signature to Liquid. We’ve been exporting Maya scenes to Renderman, 3Delight, Pixie, etc., for years. I’ve been combining Zbrush with these tools since Zbrush 1.5. Perhaps a little session with the great God Google can provide you with the necessary information.
In this thread alone I’ve covered stuff and in others as have many other people.
http://archive.zbrushcentral.com/zbc/showpost.php?p=179237&postcount=284
http://archive.zbrushcentral.com/zbc/showpost.php?p=215412&postcount=341
http://archive.zbrushcentral.com/zbc/showthread.php?t=33112&highlight=Pixie+3delight+maya+liquid
http://archive.zbrushcentral.com/zbc/showthread.php?t=24941&highlight=Pixie+3delight+maya+liquid
I hope you take a look at http://www.highend3d.com where some very talented Renderman API people exist. Not sending you away from here, but information is information.
hey nexusbird.
I am using Maya software and yes I did flip the normal maps verticaly. do you have any other idea what the problem might be?
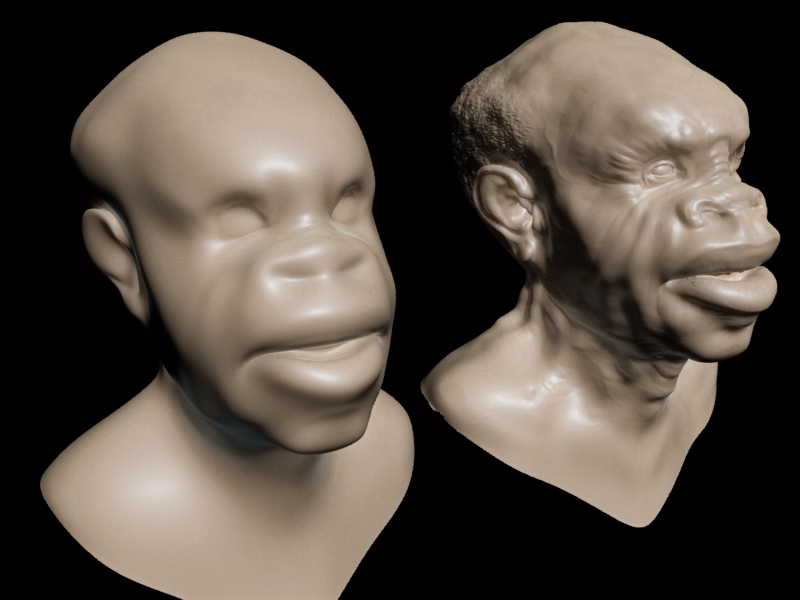
Can someone please help me. I’m getting desperate here :(. I’ve tried everything and followed both of Scott Spencers tutorials. But i’m getting really weird results and I can’t find anything to solve my problem.
This is the result I got when I tried to add the displacement maps for the creature posted on this thread.
And I followed the tutorial from Scott posted on youtube step by step myltiple times.
Also there’s gnomon tutorial by him with this creature
And this is the result I got from it
I don’t know what is left to do. I’ve tried to do everything and I still can’t solve the problem. I did hours of googling and followed the tutorials countless times trying to search for any error. And everytime I get this weird results.
Any help would be appriciated.
p.s do you think maybe the problem is in my video card.
I have ATI Radeon cards and I know they are meant for games and not CG stuff?
I can upload the maya scene if anyone wants maybe to see how the maps appear on their computer. But the file is pretty big because of the .map file (64 MB).
Software used: Maya 2008 and of course Zbrush.

Looks like the map isn’t attaching. Either due to it’s format or you missed a step. So you get super bloated head because no area on the map is defined as higher than another. Thus all areas are affected or not affected, former seems likely here. Depending on your map as well, you have to shift the values to allow for negatives, Maya doesn’t handle that right out of the gate without tweaking. Just guessing, I’m not very knowledgeable.
This is probably too little too late but I think you’ll get better results from mental ray. Also I’ve noticed that in the file texture fro the displacement map you should turn on Use Alpha as Luminance. In some cases this is on but you still get bloating. It might be a bug but sometimes if you turn it off and then turn it on again it fixes the problem, at least in Maya 2009.
Here is a quick write up on Maxwell with Zbrush 3.5 maps.
Sorry to bring up an old thread, but I thought it might be helpful to have in the knowledge base.
Took some doin,
But I got her figured out.
First things first, your geometry must have soft edges. Furthermore it should be subdivided at least enough to account for profile curvature, otherwise you will have faceted silhouette and if you “smooth UVs” in your map creation, it won´t line up right. So depending on your base cage, divide once or twice, remembering to smooth UVs.
Your displacement offset (the 50% point) with Zbrush 3.5 32bit maps will be .74
This is what you could call the “alpha gain” in Maya. With Mental Ray in maya, it is just set to .500
Why .74? If you take a 32bit map generated from Zbrush, and sample the pixels in monitor space (8 or 16 bit mode, not 32) it’s a value of 74%.
So our mid point is solved. Maxwell knows where the grey value / surface origin is.
Now the height, or scale. Unfortunately this also works differently. It may be due to the built in scale numbers in Zbrush 3.5, or some other factor, but a height number is going to be unique for each surface.
How to find it?
Create and export your 32 bit displacement like normal, put it in your textures dir… then, just create on in the displacement pallet in Zbrush, lower res so it is faster.
Clone it then look at the alpha palate for the AD factor. Whatever that number is, move the decimal point two spots to the right, and you have your height number for Maxwell.
Took me a good 6 hours of twiddling, but I finally got her. Works bullet proof.
The body had an alpha depth of 0.0143, so that resulted in a height of 1.43 (scale of a 100, probably due to maya’s scale factor for scenes in centimeters).
The jaw had an alpha depth of 0.9189, so a height of 9.189.
Remember, “height” or elevation is a %. So 9% of the jaw is not such a big number compared to 1.43% of the body. The numbers seem strange at first, but work if you think about it.
Hope this helps.
that was nice of you, obz. : )
the marshmellow man is always funny. and the look of terror on the faces of everyone that sees it for the first time. heeheehee. never ceases to amuse me. dont worry, bud. happens to everyone.
Cinema 4D R11.5 Demo

hi all…i have serious problem with displacement map ( 3dsmax 2010-vray)…t takes hours to rend and can’t get even 10% of the effect…i use vraydispmod and no light in scene and no GI…last render take me 40min for a **** result
…my disp res is 2048x2048 16bit
i have an intel 4core i7 (2.67ghz)-6gm RAM -win vista 64bit
some help? =(