Does anyone have the sword files? The link doesn’t work.
link doesnt work…helppppppppppppp
yep, would be pretty nice, all the links are dead
Dear pixelator,
The links are dead, could you repost them if possible.
Sincerly yours,
Zoanoid
Hi,
Go to the Download Center on the Pixologic website (http://www.pixologic.com/zbrush/downloadcenter/#zmodels)
You should be able to download from there
Maya7/Mental Ray
I followed scott spencers tutorial and i dont seem to be getting a very nice image 
ive set the alphagain to 2 and the offset to -1

I seem to be getting alot of noise that isnt present in the nicer renders ive seen… what could be the cause of this>?
Hello,
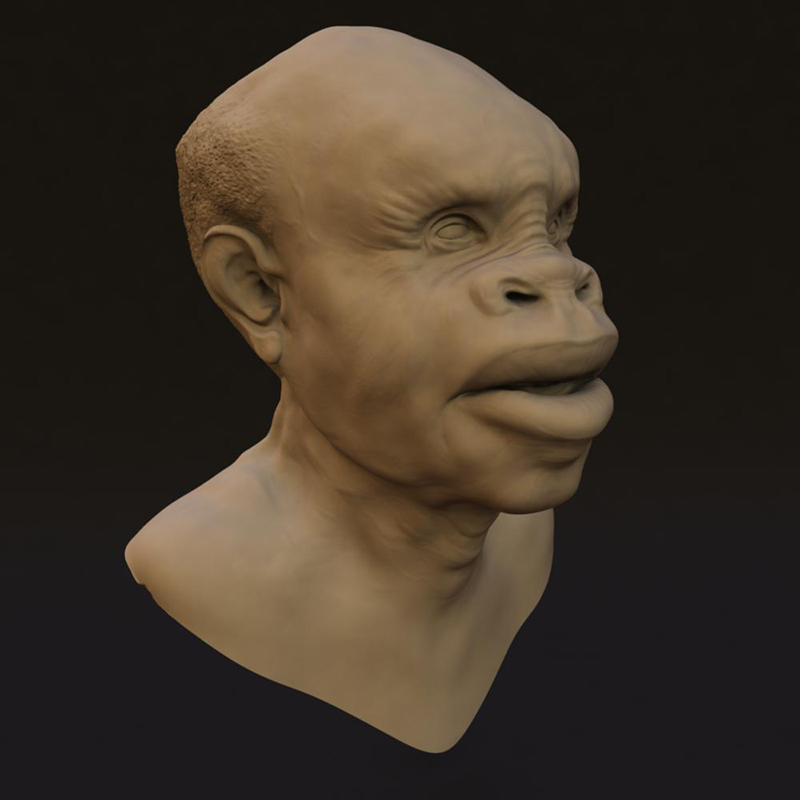
I write a little commercial tutorial for the VRay displacement map. For displace map example i will use the head model in this thread. I can? Obviously I put the pixologic name like author of this model in my credits.
Thank’s

OK Here is my attempt. Max 8 and VRay. However I have a question, does unit size in max affect the way displacement behaves. For some reason I have to make amount and shift really high to get more pronounced definition. I tried bumping up the contrast in PS but that distorted too much from the original. Also looks like some definition is lacking from the eyes.
Thanks,
F
thank you people- very helpful
I’m pretty new to 3D in general and just applied my limited knowledge to trying this in 3DS Max. I’ve managed pretty good until this one, I’ve got, modelling bump maps and all kinds of stuff pretty much down.
Then on this I failed miserably, which was kind of disheartening
I’ve downloaded the object file, and tiff. Imported them both OK in max. Tried both displacement modifier and material displacement and even a mental ray material, but for some reason the displacement of the physical model is all to whack?
I can’t seem to get the displacement parameters correct, when I try to change the displacement values as some of forum members have done, my model just bulges out of shape. I this something is misaligned somewhere.
If it’s pretty easy (step by step) to do, would someone mind posting me the exact steps they used. I’m using 3DS Max 2008.
I just need a result. Otherwise my head will quite possibly BLOW! 
Thanks!
3D Max 2008 - Scanline Renderer (Actually I lie, I used V-Ray, but it didn’t look much different in the default scanline renderer, and I didn’t use V-Ray displacement, just a straight render).
Left Side
http://img30.picoodle.com/img/img30/5/12/12/f_RENDER1m_41ce61a.jpg
Right Side
http://img31.picoodle.com/img/img31/5/12/12/f_RENDER2m_ddd9bb3.jpg
I went for more depth to the “Strength” parameter to give him an older look.
I imported the Object Mesh included in the zip file (which has moved now to the general download section of ZBrushCentral website).
Added a MeshSmooth modifier and set the itterations to 4 (I changed the itteration render values only - to speed up the viewport).
Then I added a displace modifier and added the TIFF file to the MAP BITMAP (Selected Bitmap from the list of materials and selected the TIFF). I had to click the V-Tile flip in the displace modifier to get the displacement map to align correctly with the model. I also set the displacement strength to 2 and the decay value to -0.06.
Also, I dragged TIFF map from the displacement button to a slot in the material editor to create a new instance of it that I could edit.
Under the Output option, I clicked the Enable Colour Map to enable editing of the graph. I changed the left graph slider to about -1.75 and changed the right slider to just under the 2 to give the tiff map much more definition. My other options on the “Output” section were Output Amount 1.0, RGB Level 1, Bump Amount 1.
Thanks for this thread and the model, I’ve learned tonnes just going through this.

Awesome.
The actual displacement with the shown settings was only about 1:30 on a Dual Core AMD @ 2.4Ghz and 3g ram with 2 directional lights and raytraced (1 ray) shadows.
Added some FG and HDR to pump it up a bit. Render time went to 9:15-ish.
Used maya 8.5. Maybe if I brought the filter on the file down a bit more detail would be brought through (duh) but this doesn’t look half bad.
Attachments
HI, CAN ANYONE TELL ME EXACTELY THE STRING ( EXPRESSION!) THAT SCOTT SPENCER WROTE ON HIS VIDEO TUTORIAL UNDER THE alpha offset NODE???
THANKS
“= - name of image file.alphaGain / 2 ;”
Space may not cuase trouble, but if does, eliminate them, and try again…
THANKS MAN!!!
rybeck got it, but I dont use the name of the image file, I use the file node name in the epression.
The expression is
= - filenodename.alphaGain / 2;
Hey, Scott,
You are right about that!
I don’t use maya as much as I used to, and indeed I was hesitate to use ‘name of image file’…
Thanks for correction…
By the way, I am counting down to get your new book coming soon~:)
Rybeck
I just pre-ordered it.
thenks scott for the correction, one more thing guys, i downloaded the head for the displacement test, but i think i cancelled the displacement file for maya, DO ANYONE STILL HAVE THIS FILE??? so i can make my test???
thanks again
marco
I dont remember Modo one so here are the results for Modo 301.

