ZBrushCentral

Rendering ZBrush Displacement-Maps In External Renderers (May 9th: 2nd file added)

Projection mapping in Max 7 is a technique for people who can’t export normal maps directly out of ZBrush.

That’s an oversimplification, I’ll grant you. It’s very handy for transfering your UV coordinates from a working model onto a broken one, and it’s got some other very practical uses as well. But as a tool for normal map generation, you’re asking us to import either the full-geometry version of this model and try to work with that in Max, or to achieve the same through displacement mapping. Then, we import a low-poly version of the same, and bake normals from one to the other. It’s a lot of extra work, and you’re going to lose some fidelity in the process. Meanwhile, it’s like two mouse clicks to export your normal map from inside of ZBrush.

Then by all means, try it. And post your results if you’d like to share. Otherwise, drop it – this isn’t a request thread.
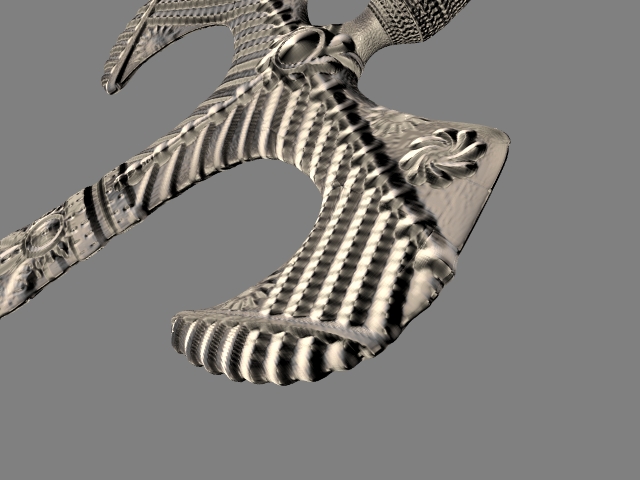
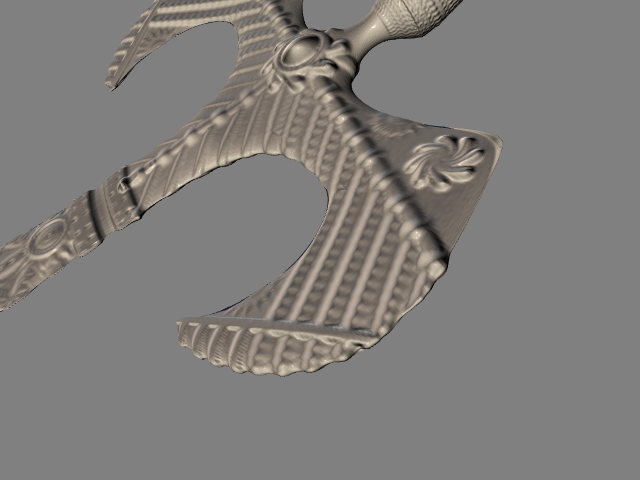
Not many offerings here from 'Wavers, so here’s another…

LightWave 8.01, rendered using FPrime 1.02.

-: Deux :-

hey looks good, mind telling me how you applied it, I might have a suggestion or
two from a few of my LW/ZB tests. I think I can get you sum’more detail.

Rogue

Hi,

I thought I’d add my experiments…it’s my first post so forgive any mistakes. I’m not sure if the sword archive I downloaded some time ago is from this particular thread or not, but well, here’s some mapping results. I think the map was produced via the GUV maping.

Lightwave 7.5b, P4 3.0ghz

Picture 1:
UV bump 250%
smoothing 180 degrees
texture amplitude 20
no normal displacement
bump1

Picture 2:
UV bump 100%
smoothing 89.5
texture amplitude 4
displacement 100mm
luminance 0%
Normal displacement via Lynx plugin
bump2

Picture 3:
as Picture 2 but displacement at 400mm
bump3

Attachments

bump1.jpg

bump2.jpg

bump3.jpg

The result using Displace modifier with 400mm is amazing , but which Lynx
plugin is that you have used with Normal maps ?Sorry to ask, I guess , if :question: a lot
of people have used and comented it already on this forum

That last render has some sharp details, but the rounded gem in the hilt is deforming way out of proportion. Perhaps a higher luminance % will balance this better?

Someone was succesful with Brazil r/s v 1.x? Seems weird nobody post a result yet… I’ve tryed so much things… Completly not working:angry:… Someone, help me please!

Nomiakasu… I just discovered your post… I’d like to know, if possible, how you achieved this, and maybe also the version of brazil rio you used. Maybe I d’ont make something right… Thanks! And happy hollydays everyone!:D:D:D

Hi emihich,

I used the Normal Displacement plugin found at http://lynx.aspect-design.de/plugins/normal_displace_info.htm. Apply it in Layout under object properties - deform (from memory, I think that’s right). Add the displacement map as a texture (I just copied it straight from the bump channel).

Hi Ctrl-Z,

Yeah, I did notice that. I might give it a try tonight if I have time. I did do a render at luminance center at 50%. The results were ridiculous, so I didn’t post it.

ok i can see im a little late to the party here. i cannot seem to get xsi to correctly display the displacement map. i have tried all the methods shown in the forums and the one from the practical guide.

Could someone that has successfull gotten it to work post the xsi scene file so i can figure out what the heck i am doing wrong?

thanks

NS

Rogue

Sorry for the late reply, I’ve only just had notification from the forum that a reply was even made to my post…

Anyway, the render was made just by using the supplied displacement map as a bump map only. Lynx’s displacement plugin couldn’t be used because FPrime doesn’t seem to support polygon displacement from plugins. I did set it up with displacement mapping and rendered using LW’s renderer, but I’m finding lots of shadow and lighting errors when using LW’s own renderer so for the time being I’m sticking with FPrime and bump maps only.

Cheers,

-: Deux :-

yeah, I was gonna mention the dsip on the bump, really picks up some detail, alos a normal map gets even more.

But Fprime workd great, thats mostly what Ive been using, I guess don’t set order to last, the one just before, motion, I believe.

sometimes, I have to refreash FP a bit, also move the model, to get it to respond, but by all means get that sucker working, its the best.:+1:

24-654173

Attachments

24-654173.jpg

I havn´t seen that many Mac users here using LightWave so here´s my try.

On PC I used Lynx´s 16bit grayscale TIFF-loader. I set the image as a backdrop in LightWave and rendered it out as a HDR-image.

On Mac I loaded the HDR-image and added 3-4 pixels Floating Point Blur to the image.

Then I use Lynx´s Normal Displacement Plugin with the HDRI-image.
I only loose some of the finer details but it works ALOT better than a 8bit RGB image and you get no “banding” because of the the HDR-image and the FP-blur.

I think it´s better to render out the finer details with bump map anyway so this is a ok workflow for me until we get a working 16bit grayscale TIFF loader for Mac / LightWave…

This image took 45 seconds to render on a PowerBook G4 - 1,25 GHz.

/ Meshbuilder

  • Sweden 3D Artist -

Back again…

Now I have found a better way to do it on Mac with no loss in quality and I didn’t need a PC to do it… :slight_smile:

Open the 16 Bit greyscale Tiff in Photoshop, convert it to RGB but make sure you keep the information in 16bit.
Now save the image in cineon format.

LighWave can read this image format but it will make it darker.
Don’t worry, you can easily fix this by changing the gamma and contrast level with no loss in LW because the image is 96 bits.

My settings:
Contrast: -0,75
Gamma: 1.75

And I got evan better deformation now than with the HDRI and floating point blur trick and I didn’t need any PC.

I hope this will help Mac - LightWave users that want to use Zbrush…

/ Meshbuilder

  • Sweden 3D Artist -

when i follow your lead, i am not presented with saving in cineon format, is that a user added export plug-in?

cheers

I use Photoshop CS… Are you using an older version?

In CS after you turn the image in to RGB from B/W and “save as” you can save the image in cineon format… (.cin)

yeah, the one just prior to CS…crumbs…; ^]
i haven’t found need to upgrade just yet, maybe this is will push the camel…

Hi there,

Trying to get this thing looking right - it still appears bloated to me. Using XSI 4.2 Foundation, and as you can see with the screenshot, I’ve tried using a change range node, or two scalar maths (two different methods from different posters) but I still feel it’s puffing out (0 = no displacement, 1 = full displacement) It’s particularly apparent around the nose / lips… Cheers for any help! (or tell me it’s fine) :wink:

Surely very helpfull, but I can’t find what is the “cineon” format
Thanks

You need Photoshop CS…

Maybe you can ask a friend to convert it for you if you have an older version… :slight_smile:

Yay!! I finally figured out how to get really good displacement maps in MAX!!! With default scanline settings. It works great, animates great, looks great and is faster than SH$$$$ yay!! Oh excuse me i have been struggling with this for the past few days sans sleep, food, blah blah blah. Cool, well here is the pic! PLEASE if anyone has questions ask me and id love to share the steps and settings! ooooOOooooweee :o EE!!

Displacement

Attachments

Displacement.jpg