Im going to try to make a one sided one using a Plane3D reduced down using the initialize pallet, this should be interesting!
As it turned out that came out worse!
I tried your ztool again with all the same steps I had in post #93, but this time I lowered the Threshold slider in ZWelder to .002 before clicking ‘Weld Current Object’ and it looks like it did a decent job of welding. Same as before, I subdivided twice then used the Smooth brush.

ZBer, I have one that works, if you turn Weld up all the way in the import panel, but it comes out dented and strangely uneven.
The most interesting thing is what you get for polygroups in the end!
Give this one a try, I got it to work nearly flawlessly, but with some slight denting.
LastDitch.zip (11.2 KB)LastDitch.zip (11.2 KB)
I didn’t have much luck with your second one. No matter what I did, I kept getting the same thing.

well crap!
I used a cylinder, what did you use?
Heres mine:
Attachments
That last one I had the threshhold all the way up by the way.
Same old crappy results with it any lower…
I found ANOTHER problem, this one is in my object (LastDitch) and I THINK its what caused the problem, its the polygroups, Im going to try to fix it, wish me luck, I need it!
Ok.
Here is the deal I think:
I think it WAS the polygroups.
The edges that butt up against each other need to be OPEN.
The same edges need to be the SAME PolyGroup.
If they are not ZBrush seems to go bat**** and do the thing where it randomizes spin in unacceptable ways.
If they are open and the polygroups are correct things seem to work with one exception; extreme angles. I did a cube and the only place it broke was the corners.
I still have some dents which I think are welding related but Im not sure yet…
Heres the new mesh:
SeriouslyLastChance.zip (10.7 KB)SeriouslyLastChance.zip (10.7 KB)
|Ok…
|
That only sort of worked, its still the Spin Edges problem (I think) and that leaves us screwed…
If for example you want to do an alpha the Spin Edge thing is sort of ok, but if you want to make a dress or something its NOT ok at all.
In order to even think of using Spin Edges you need to start off outrageously low rez, not something that can be done with complex cloth I don’t think.
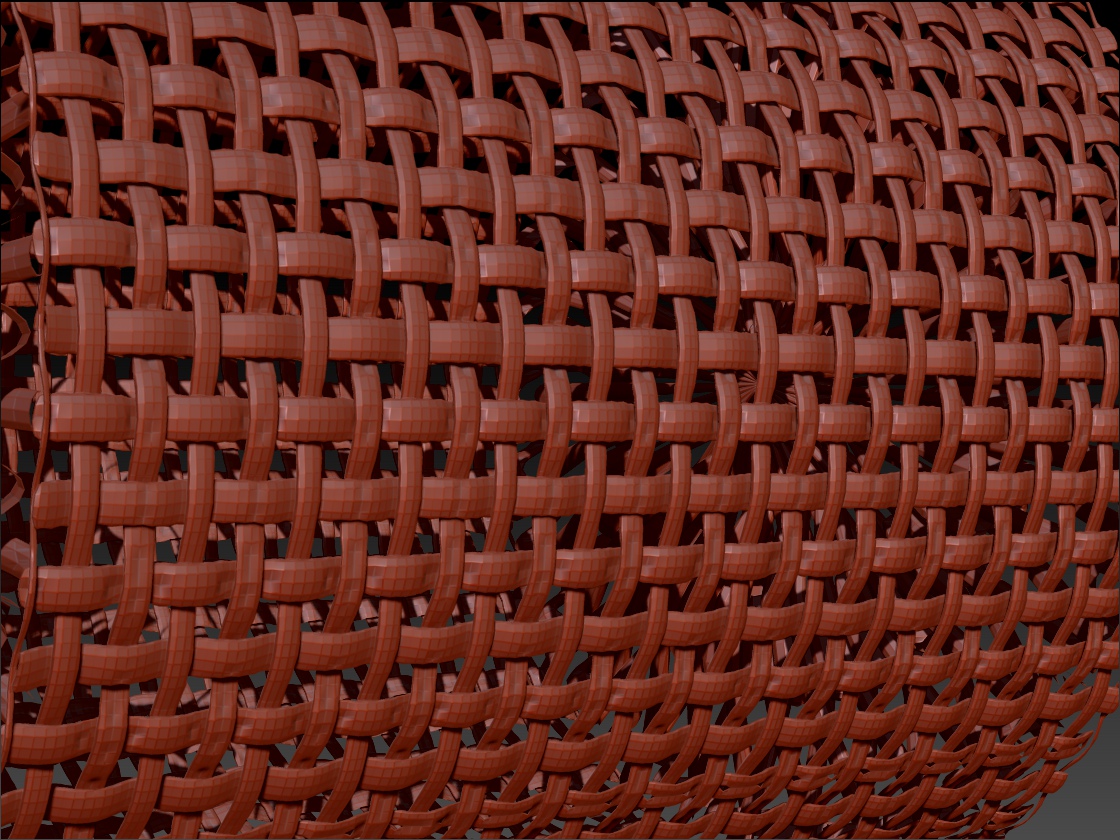
The other thing here is burlap is ok, silk is sort of out of the question and that makes me want silk even more than I like it outside of ZBrush.
Ignoring the fact that large amounts of silk are not going to happen we need an AutoSpinAllEdges Button!
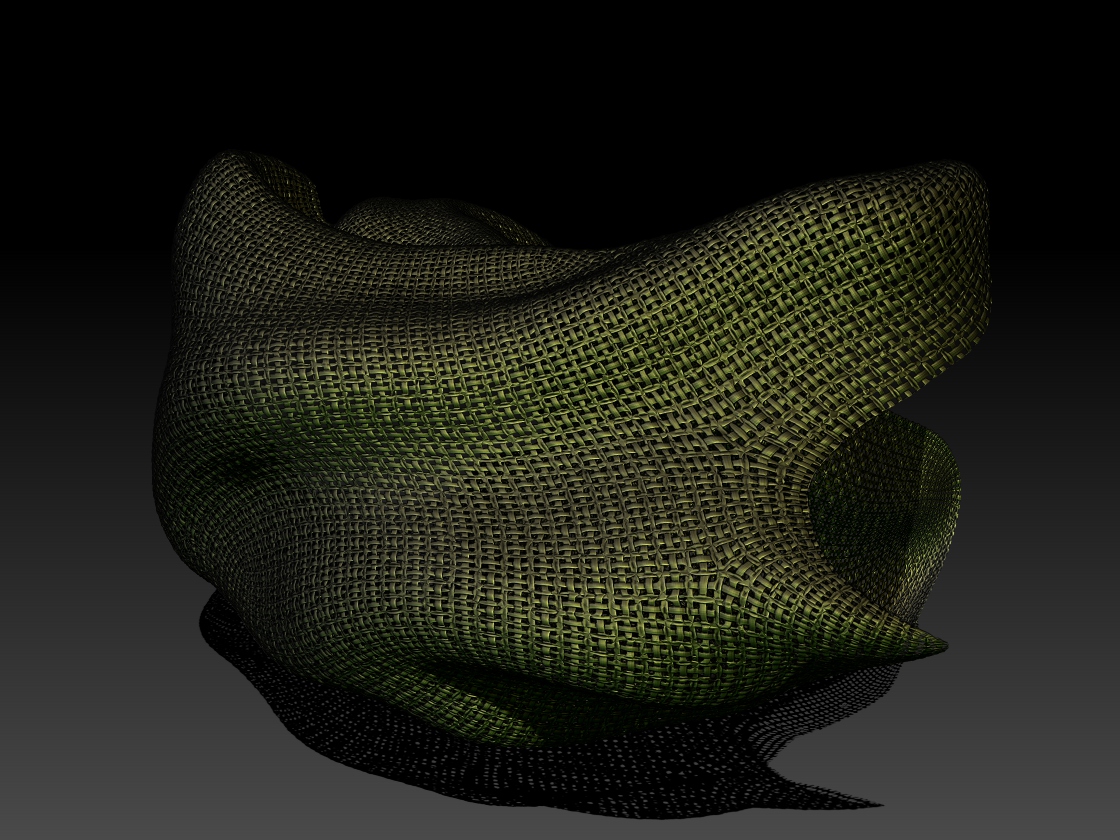
There is another interesting problem that I sort of crept up on, what happens when the topology suddenly changes like with Dynamesh or ZRemeshed objects is you get these sudden areas of total chaos where even if you were to spend a year spinning edges you would have a hell of a time getting it to look… welllll… possible.
What’s great about this is that if you don’t care that it isn’t possible it looks GREAT.|
Attachments
By Jove, I think you’ve got it. Smashing good show. The “SeriouslyLastChance” ztool worked perfectly after I ‘Spin Edge’ and ‘Align Edge’ then used ZWelder. Subdivided twice.

NICE!!!
ZBer that perfect!!!
I can’t seem to use Spin Edges as I get no preview that is visually useful, just a faint green dot here and there.
I think though to have this be a useful thing (making cloth) one needs to start off with an object with properly spun edges.
If I can get the preview thing to work I will make a whole set but so far I can’t do that… yet. GRIN!
I think Im going to start a MicroMesh repository since THE POWERS THAT BE didn’t answer the question about using the InsertMesh one…
I just need to make up a fancy looking title graphic like Aurick came up with!
Got any MicroMesh examples you would like in it (the graphic I mean)?
Thanks nickz! That issue has been driving me mad for too long. Ugh wow. 
Hi guys.
I have created insert-curve brush and it work great.
But if i divide this mesh once i have this:

why it starts to separate ? is there any way to avoid that space between the pices of curve brush ?
already tried zWelder and it didn’t help.
I’m doing a custom IMM brush to create feathers.
I found that I have to crank the SubDs up to about 6 in order for the texture to stay looking good after I convert it to polypaint. (If I don’t convert to polypaint, the textures just disappear when I merge the feathers.)
My problem is that these three feathers are now over 1 million polys. If I decimate or Zremesh, the feather image disappears.
How can I make these things low-poly, and also keep the feather image crisp on them?
Thanks 
The pic says it all. A subtractive IMM brush? is this possible?
Thank You…
If you hold ALT while inserting the mesh, it should become subtractive.
alternatively, polygroups can be made subtractive after they are made.
I made a insert mesh brush ,but when i draw it ,why it more small then my brush size.and i open the icon of weld and res but why they still separate.
Attachments
Is there any way to restrict the effects of these settings to the center links so that the end caps are not distorted and/or warped which is what would be desirable when making cables with prongs for example. Personally, I was using IMM curves for multiple types of clothing straps ideas. Fantasy type stuff with leather straps, buckles, rivets and such. Problems I have been having revolve around getting the ends manipulated into place…getting the lengths just right, and having items like buckles which should be rigid warping or twisting at the ends. Being able to pin/lock the ends helps, but I wish that pinning stopped the pivoting motion on the pinned end.
I also think for similar uses, a better way to position the ends (i.e. some sort of chain end transform tool would be very useful. As I often found myself reverting to careful application of the move brush to try and nudge things to get them just right. Another thought was some way to trim IMM curves right where you want them only without actually cutting off the ends… essentially just removing “excess” links from the middle to achieve the desired length.
If I’m not finding existing features please point me in the right direction… also interested in workarounds or different workflow approaches that might be useful.
Other wishful thinking ideas include slice like brushes that add geometry/polygroups without breaking the mesh.and a way to use pen pressure to control curve fall off. Oh, and of course who wouldn’t want a handy cloth/hair simulator and control curves to help in styling fibermesh?
Apologies for going a tad off topic.
Try turning “stretch” on in the modifiers… also might want to play with the “curve res” modifier depending on whether you need the links to curve smoothly or not