All these loops - extrudes. Manually? One by one? Or I missed something.
BTW, symmetry in blender works perfectly. (more than perfectly I could say, you can even link it to another object-mesh)
Mirror and weld in zbrush is related to sculpting environment.
In blender, enter Dynamic Topology and there you’ll see a similar mirror and weld tool. But, irrelevant to any box-modelling procedure.
You can’t say “it sucks”. But you can hate it, as much as you like. You won’t be alone on this:lol:
Hi Mealea,
Love the stuff you’re doing now, beats the hell out of what I was doing with ShadowBox… 
Am I allowed to post images on here of what I’ve done using your tutorials - It’s been that long since I’ve been on here I’ve forgotten forum etiquette…
Hope you are keeping well…
J
the one above the last one would benefit from another light behind it to create a rim light and enhance it… just a thought…
that last one would look awesum in a alien planet scene… FAB_TAB:D
CANDY…!!
alt click is on the button.
Ah thanks Mealea, that’s nice of you
I’m ok thanks, how are you ?
Anyway, I looked at your tutorials for extruding panel loops and it gave me an idea. Years ago, before
the ShadowBox stuff, I experimented with displacing highly subdivided ZBrush meshes with seamless Truchet Tile image maps…
The results were beautifully displaced meshes, but the thing was, they were all in one piece, there was no way I could create polygroups, nevermind separate them…
Well, now I have, thanks to newer versions of ZB and your tutorial !!
They aren’t brilliant admittedly and the ZBrush renders don’t do them justice, but they less than 2 million polygons and
decimate to half that with no discernible loss of quality for use in external renderers.
So, thanks for the ispiration !!


These were the image maps used, only these are only 300x300 as opposed to 2048x2048…
Google ‘Sebastien Truchet’… 
J


So it sucks. Really, I can’t do much about the broccoli…
However, use this blend file as a template for your box modeled creations.
After finishing, please apply the modifiers before exporting. (or just check this on the options under obj exporter).
Similarly, in zbrush, there are some options under exporting. Having by default groups checked, zb will export all groups as separated objects, which might not what you love to see.
BTW, when we use GUV or other UVs, we can ask zbrush to repeat the textures 2x2 3x3 etc. what’s really takes palce is that zbrush resizes UV islands by 2 or by 3. Very nice. Can somebody tell me, when I ask for displacements, preview is fine, but when real displacement takes place… no x2… but if I export and re import this obj dislacement will follow this multiplication… of course zbrush never sucks. No app sucks after all.
BTW, you can create better loops in blender than in zbrush, but have to learn how, first. I posted a lot about it (in BA forum)
The upside down way…
The next time you will ask from an app to create symmetry on a centered simple cube, try to understand what you’re asking. Be reasonable. 
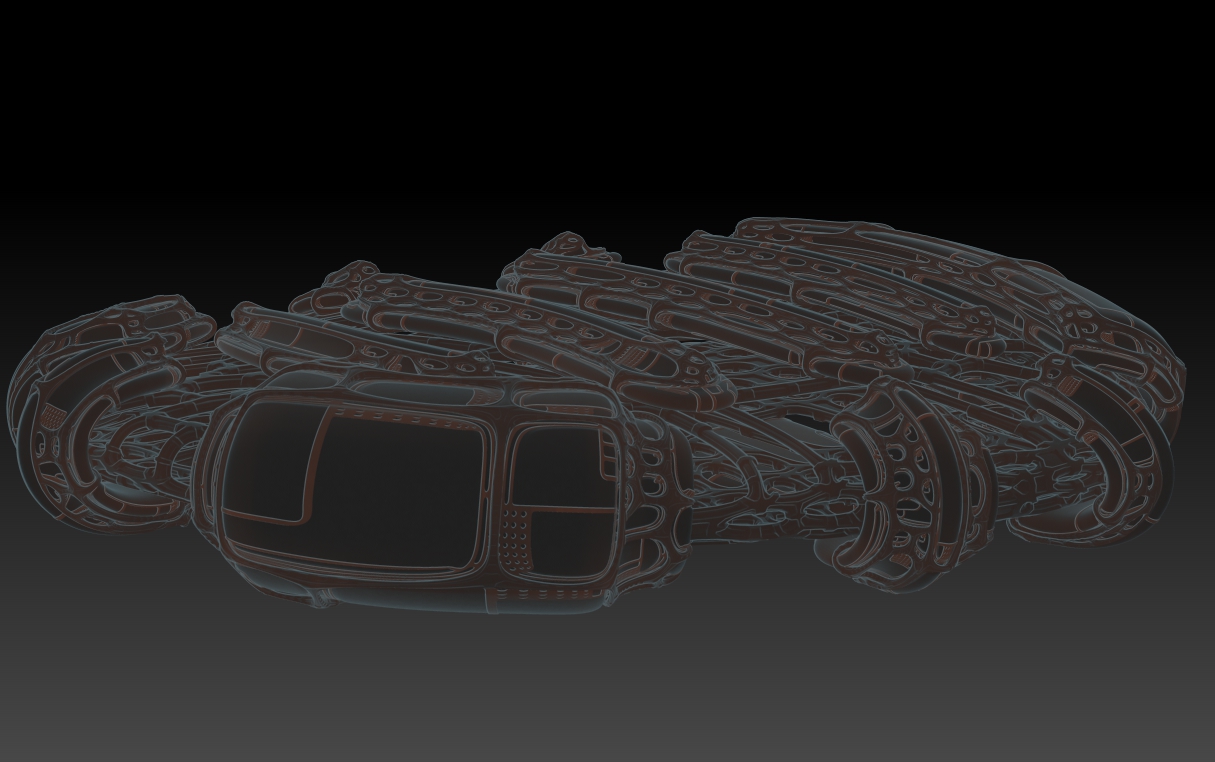
Mealea, your recent posted art is created by using real geometry. Real loops, extrudes and more loops, extracted loops.
I mean, displacement maps can’t help you at all. They will transfer hi res displ information if you subdivide a lot and use alpha or other brushes.
If you subdivide to have nice smoothed forms, you don’t have to export this. Export the lower poly and subdivide in blender.
Half a million poly isn’t much for blender. I exported 5 millions last night. I have 24 GB of ram installed. Just keep it in mind. A 6-8 GB ram should be enough for all the blender jobs.
Tip, add a cube in blender.
Edit mode. Subdivide vertices once. (on the T -left panel, right?). Select all the vertices (vertex mode select) on the left face, leave the middle vertices. (we have a lasso in blender BTW). Delete them. Now on the right, modifiers, add the mirror modifier. Check the “clipping” too, it helps. The merge limit is a magnet in the middle seam. It will weld all common vertices in the middle.
That’s it. Work in mirror mode. Apply in the end, if you like, but you may find it mirror useful when UV ing.
Please don’t expect blender to automatically do this job for you. To add a loop in the middle of cube, delete the left vertices and add the mirror modifier. Such an auto mode has some limitations.
See why: In the mirror modifier there is also a Mirror Object input. Meaning, on a complex obj scene, you don’t need to add a cube in the middle of xyz axis and turn on symmetry. Input the name of this other obj and mirroring will happen in the co ordinates of this obj.
BTW, another tip.
If you import something huge as size.
selelct it. [S] for resize tool, type 0.1, enter. You have the 1/10 of the size.
Wonderful stuff, and a nice colorful render.
But, this casted shadow on ground plane tries to spoil everything.
Just back light:
Using the default lighting, this happens constantly and happened on my old computer under other versions of ZBrush:
Attachments
I like the back light one, I have no idea why this happens but it keeps me from playing with lighting and it makes all of the Standard Shaders no fun.
So its off to the troubleshooting section with this stuff.
i see … mmm…
which actual shader are you using?
and i will test it on one of my models with back lights. but it will have to be tomorrow… i cant keep my open ANYmore…!!
Its a whole bunch of them, I tried Quadshader but the best offender is one I made, what I should do is give you the project file right? And the custom shaders?
MURMPH…
Its confusing as being unable to keep “my open”.
hehehehehehehehe!
Go to sleep and I will see what I can do ok?
. EYES
man i thought i wrote that… must have been more out of it than i thought.
Mealea
If I send you a private message will you be able to read it ?
J
Hey There…Welcome back Mealea…Always fun to see you play:)
Maybe try out the Marcus Civis LightCap Light on / off toggle plugin that is posted in the link above…might be useful to what you are doing …who knows 
Glenn
AH-AAH fantastic, i’m honoured u used that background for a displacement…interesting result too , seems ruined and more real
I’m not sure if I understand how you create all this wonderful loops-extrudes effect. Not the basic idea, this I know how.
What you tried, to make an alpha from a posted image, please avoid it.
You need a 16 bit PSD, at least. Trust me. A 32 bit exr is the best but not supported in zbrush. Funny, zb can bake and export such maps. Never importing them.
Just to understand it better, please, try these. The displ map. These are 16 bit tiffs, convert them to PSD files first. If you like to play with AO and displ, assign them to a mesh. First have a GUV unwrapping. The displ to the displ paletter, the other (the AO,) to the texture palette. Then, turn on displ as bumps. Under the UV palette you can ask to repeat 2x 3x… meaning that the UV islands are resized by 2 or 3.
Then if you fill happy, try to subdivide the mesh and apply real displacement. (unfortunately, this 2x or 3x goes to trashes, if you export the obj and re import it, it works… a major Z bug) (or I missed something, I doubt it)
I like it too, its weird though, its like its inside out or something, Im going to try on more of the objects to see what happens…
What Im doing for the loops you definitely know, Im sure of that.
Using his image as a displacement map worked BETTER then yours, I don’t know why… More detail maybe?
I don’t have photoshop so I can’t just make PSD files aside from things I export from ZBrush by accident… stupid problem and I do it all the time.
I don’t know what .EXR is or how to make them, Im guessing its a blender thing? More stuff to look up and learn…
Mostly if I need total high rez I export as Tiff files anyway so thats not a problem.
Things with displacement maps are hard to move, take a LONG time to render and so its sort of hard to just screw about to see what happens, sometimes I get good results sometimes not… its sort of a matter of luck, I got lucky with Lvxifers image I think… it worked great.
Im going to try yours again, this time without the AO as a texture, that adds color and makes it sort of dingy, I need to see clean lines before I go coloring stuff in like that…
More on that as soon as the sun comes out, Im low on electricity and Im making hellacious use of it.
The Mayans would be appalled at my abuse of the sun.
Oh yah…
One last thing before I shutdown:
Try his image as a displacement map but hit “new texture” in the texture map pallet, keep mode on and set to somewhere around 0.0100 give or take in the Displacement Pallet.
I think you will like what it does!