ZBrushCentral

NickZ Beta Blast. (8 movies added page 32) April 2013

5 Stars all the way!

The image turned out awesome and the tutorials are extremely helpful (I put a shortcut on my desktop for them :slight_smile: ). In fact they helped change my workflow for my latest character and it’s speed up my development time conciderably.

Thank you
Jamie

nickZ, i cant say how invalueble your videos have been, ive followed your work since I joined these forums. The skinning on that character is great, i love how it moves.

What are those moon-like object revolving around? I am a big space enthusiast and i love your ideas. What are those pyramids in relation to your world? you probably have a story behind it that id love to hear :smiley: .

and also with you,

-mikeporetti

So beautifull illustration,I like a lot the look.
Alien worlds always is so interesting and inspiring,
Thank you for sharing,
Arturo

very beautiful :+1:

Thank you so much for the videos. They have openeyed my eyes to all the possibilities this program has. Keep up the great work. You are making a lot of us a much better Zbrush artist.

great picture! And thanks a lot for all what you shared.

Sorry for the long delay, I have been busy with the family during Christmas and New Years. Hope everyone had a good one!

Blaine91555 - Thanks for the compliments.

Denture Cream - I’m sure I will find some way of using the sculpt. Perhaps in the next illustration?

Drummer - You should give it a try, it is pretty cool to see you work in real-time.

Pride - Yes, I tried to make him have a God like quality. He is a false god though. Yes you should read into the beLIEve. Many will believe in the lie, do not be deceived! Thanks for the props bud! :slight_smile:

CQ - thanks!

brettSinclair - Thanks for the props, I really starting to dig your work as well.
I thought about the SSS, I think I just kinda chickened out. I have messed around with it a little but I think I need a little better understanding of the various components of the shader to fully utilize that shader.

smeagol - Thank you for your kind words.

Mikeporetti - Thanks, I’m glad I could help. The moon like objects are just that, they are moons. I is actually the some moon that is revolving around the planet. The pyramids are related to the pyramids found here on earth, they might have the same builders, I don’t know. The pyramids are more of a symbol for a power structure. I’m sure you have seen it before, just look on the back of your dollar bill for the answer.

Dharmastudio - Arturo, thanks for the kind words. I’m a big fan of your work as well!

nightwoodwolf - Thanks! :slight_smile:

DAnconia - Glad to help! :slight_smile:

ke - Not a problem… more to come.

The last part of the 3D Using One Source lecture had to do with 3D rapid prototyping.

I mainly talked about all the great work that Scott Spencer and Jim McPherson have been have been sharing with the ZBrush community.

Just in case you haven’t seen these treads take a look here:

Click Here For Jim McPherson’s Dragon

Click Here For Scott Specer’s Halloween Boy

Don’t forget to check out this Venom thread as well:

Davide’s Spiderman Venom

This is in my opinion the future of digital sculpting. When rapid prototyping becomes more of a common place and prices come down on the printers, I think a whole new world will open up for the digital sculptor.

Currently there are a few restrictions on how you print your piece, look at Jim McPherson’s post here (250 meg size limit per piece)

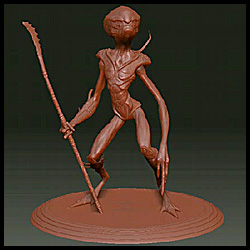
Now that you know a bit about the RP process, I was going to talk very quickly about the process of posing your model inside of ZBrush so you could build a RP model from your Hi Res ZBrush model.

Since I already hade my 3D model in Maya, and it was weighted up and I could animate the model it was real easy for me to steal the pose from my illustration that I made.

I then exported all of my base meshes (head, arms, torso, legs, arm guard, leg guard and staff) in their posed position. I then went into my ZBrush model and made a layer for each one of my sub tools and then imported in these new models to build the pose for my model. Once all the pieces were imported in then I just stepped up in my sub division levels to get my final hi res model in the new pose.

Here is the final results:

[attach=90498]RP_pose.jpg[/attach]

Here is a 360 turntable render:

[veoh]v1561717rY4HJt8d[/veoh]

Right after I finish this project, Marcus Civis, Anne - Lise and Pixologic finished up a project of their own - Transpsose Master.

Click Here To See The Transpose Master Thread.

This is a great tool and it will make everyone’s life a lot easier for posing your Hi Resolution mesh inside of ZBrush.

I hope you all enjoyed this thread, don’t hesitate to ask any question and I will do my best to answers your questions.

Peace,

NickZ. :slight_smile:

Attachments

RP_pose.jpg

This is just a WIP. I have a lot of work to do on the hands, feet, mouth, teeth and the back of the legs and the forearms. Thought I would share what I have so far.

[attach=90499]AthleticMale_WIP_1920_1080.jpg[/attach]

Peace,

NickZ. :slight_smile:

Attachments

AthleticMale_WIP_1920_1080.jpg

the torso seems a little wide. Is he middle aged?

JdesseGraffam,

I think you are right. His mid section was making him look a bit older than what I was going for. I was thinking something around 33 years of age.

Here is an update to the model. I would love to get your thoughts on the changes.

[attach=90500]AthleticMale_WIP_1920_1080.jpg[/attach]

Peace,

NickZ.

Attachments

AthleticMale_WIP_1920_1080.jpg

Hey Nick.

This looks great!

Is there any chance of a closer view to get a good look at the anatomy?

Brent,

Thanks, I will start working on tighter shots soon, like the feet and the hands soon. I’m just working on the over all body right now. I think I am getting pretty happy with things and I will be moving on to more detailed areas tonight.

Peace,

NickZ.

P.S. Your work has been rocking here lately. Keep up the good work! :slight_smile:

This is really good. As for his midsection it still too wide sideways, with that much definition. And it looks like he’s tilting back. The spine may be too exagerrated. Any close up of his face?

Coming along Nick. I be quick here. Suck in the abdomen slightly, while also making the appropriate spinal adjustments. The chest bulges out past the tip of the nose, which seems awkward. Maybe the feet should be a little wider to support the large frame. Hope this helps.

Hands, arms, thighs, calves, neck, and head look great. Of, course this is all t-pose talk, and history shows you know what you’re doing. I’m sure it’ll look stunning when finished.

Guys,

These are all great suggestions. I will be fixing some of these problems soon. Here is a close up shot in the mean time.

[attach=90501]body_front_WIP.jpg[/attach]

Peace,

NickZ. :slight_smile:

Attachments

body_front_WIP.jpg

This looks great so far. My only crit, if you like, is that the model looks almost skinless, especially the back. Is that intentional or are you going to soften it down later?

On a side note, I love your timelapse videos especially the alien female.:wink: I’ve learnt so much watching them.

pap87 - “My only crit, if you like, is that the model looks almost skinless, especially the back. Is that intentional”

Yes sir it is, I will be knocking that back at a later time, I’m just trying to lay in all the muscle structure right now. When everything flows correctly then I will build a “normal” version. Thanks for looking! :slight_smile:

-NickZ. :slight_smile:

Hey Nickz,

Thanks for all your effort here, it has really inspired me to push what zbrush can do for my game art and anything else I hope to do in the future. I do have a quick question, on page 10 of your alien workflow you mentioned these maps “c[color=LemonChiffon]olor, diffuse, spec and reflection limit maps”

I was wondering if you used zmapper to generate anything besides the normal map and what settings you find useful for rendering in maya. I know you polypainted your model and then projected the colorized version onto your retopo’d and reUV’d mesh (awesome btw) but I would also like to see if you have any innovative methods for any of the other maps such as Ambient Occlusion or a cavity map to overlay in photoshop.

I noticed in the polypainting of the legs video it looks like you had some kind of cavity painting in the cracks of your mesh (much like the dirt feature in cyslice) can you give us some info on how you managed that?

Thanks again for all your help!

Kicker

Luminous Anubis - Thanks for the kinds words. That is awesome that I could help in some small way!

I actually used Maya to bake the normal maps. If you want to bake fake AO, ZBrush materials and Cavity Maps might I suggest using this great tutorial by Sebastien Legrain (I love this guys work!)

http://sebleg.free.fr/tutorials/zbaking.html

Cavity painting, this is a very cool feature that Pix added. Just go to the masking section in your tool palette and find the mask by cavity button, hit that and then invert your mask (Ctrl I) and then pick a color and fill your entire model with color>FillObject. This will fill all your cracks with your selected color.
So if you wanted to do a down and dirty cavity map you could start off with a pure white model then use this method to fill all your cracks with black and then convert that to a texture with the tool>texture>colTex button.

Hope this helps,

NickZ. :slight_smile: