Im trying to use this to make front and side planes so i can make a model from refrence pictures but i cant figure out how to do this.I remeber in 3.0 there was this script where u had to make the refrence pictures into one picture and it would make 2planes with the refrence on them is this what i have to do here to? im talking about the scull tutorial from pixologic. Anyways could someone tell me how to do this thanks.
hey im tryin to make 2 refrence planes one for side and one for front views but i cant figure out how to do this can someone help me out please
thanks
EMKO2,
I am planning to add a quick way of doing this but at present you need to follow the tutorial here:
http://www.zbrush.info/docs/index.php/Tutorial:_Sculpting_A_Skull
HTH,
sorry for the duble post i could see my post after i posted it and i thought i didnt post it so i did it again and it did the same thing and now today i check and i see them strange.
Still little confused. Does ur plugin work like ImagePlaneX ? where u have both side and front views in one picture ? or are u saying to use ImagePlaneX because i cant find this in 3.1
can you use the modeling with image plane technique if you dont have any uvs on your imported tool, and you apply an AUV or a GUV? I cant get that to work. I would really appreciate if you can make a video tutorial on this topic 
hey guys,
this seems like a great script. Although documentation about the script is good and I watched the video tutorial for ZBrush2, I have a hard time to get it work the right way! First of all what really bothers me, when I want to move the parts of the plane, the view switches to wireframe mode so I cant really see where im pushing the textures. Second while I push and pull, I cant see my cursor widget (red circle). And the last thing: as soon as I drop out of PM, the projection just happens on a few spots of the model.
Can anyone help me with this? Would be great!
Thanks
Marcus,
a small question, sorry if this has been asked already:
I want to store my object position, but when I press shift to click the button the menu collapses, and nothing is stored. Is there a way around? I’m using 3.1, and have your latest version.
Thanks again for this great script, I’ve used it much already. Looking forward to the update with screenupdate; would be cool! 
Hi EMKO2,
Apologies for the delay in replying. The plugin is not for the Image Plane X technique, though you can still do that in ZB 3.1. I am adding this functionality to an update which I hope to be able to release before long, perhaps next week. I’ll include full instructions.
Hi joyster,
You can model using reference images without UVs. I am working on an update which will give clear options and I’ll do a step-by-step to go with it.
Hi Visor66,
Thanks for the comments. First check that you don’t have ‘Dots Display’ switched on in the Transform menu. This may be what is causing the wireframe view. The cursor will only appear as a red dot, I’m afraid, because the plane is a parametric object (but that means you can move it like that). For Projection Master, check that you have good UVs and try switching off ‘Fade’.
Hi Plakkie,
Thanks for your comments. Either put the Texture menu in the right or left tray, or make the RePos button part of a custom interface by Ctrl+dragging (after switching on Customize in the Preferences palette). That way the button should stay available for Shift+clicking.
HTH,
Ah, right! Why didn’t I think of that myself… Thanks!
HI i wonder, in the video with Ryan Kingslien he masks from the texture. He first uses Image Plane 2 to apply the texture, then in the second video he sculpts with it. I know how to mask from cavity and mask from alpha, but how do you mask from your color texture in zbrush 3?
if i can mask from my color texture i can then use inflate and smooth in the deformation menu to get the detail, just like Ryan did.
To mask using color from a texture you must have UVs enabled and a UV mapping method assigned. Then select the texture you want to use and press Tool:Masking: Mask by Intensity. You can vary the intensity used by changing the Masking:Intensity slider but normally you would leave this at 100.
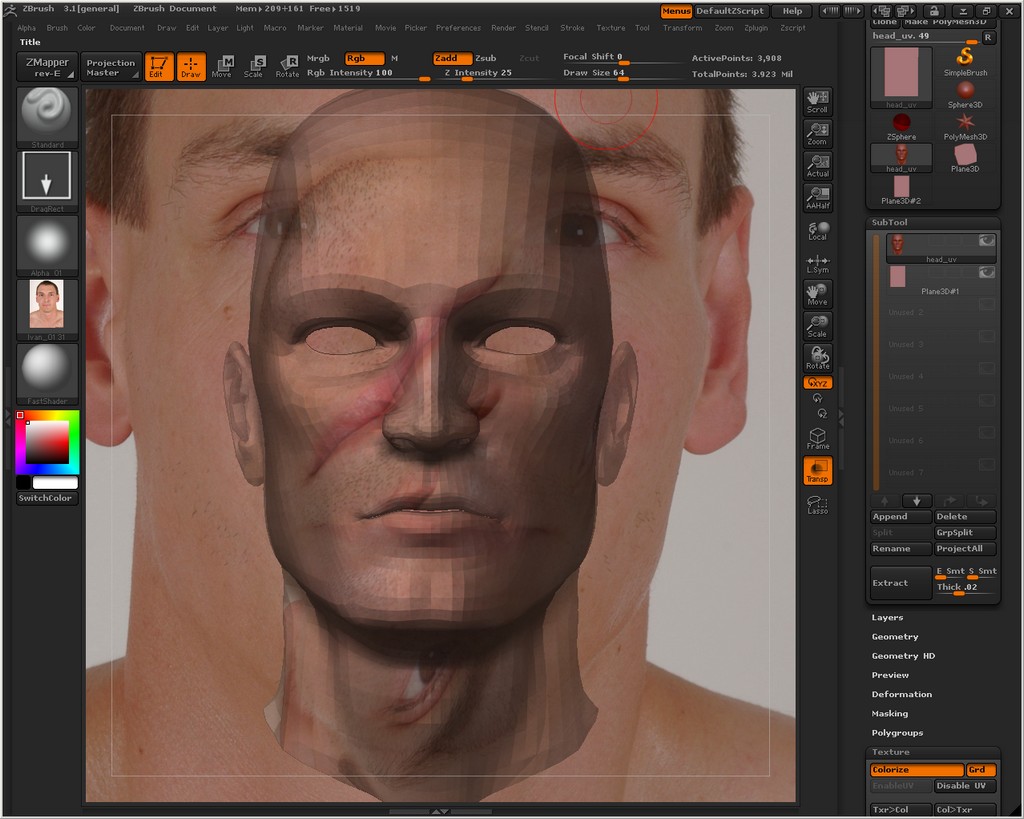
This is my first time using Image Plane 3. I’m following the tutorial to the letter but when I get to this part of the tutorial I’m not getting the results I should be getting–>In the Tool:Subtool subpalette, click Append and choose the Plane3DCopy from the popup (Note it will have a number such as ‘Plane3DCopy1’). There may be several Plane3DCopies - choose the last one in the bottom line.
Select the new Plane3DCopy subtool then apply the photo reference to it by choosing the Image in the Texture palette popup.Switch off all subtools other than the Plane3DCopy and the target mesh.
Switch on subtool transparency by pressing the Transp button in the Transform palette. You should now be able to see your photo reference through your target mesh.
I’ve tried several times now and keep getting the same thing. I’m not getting the “Texture palette popup” as it says in the tutorial, so I just go to the texture menu and choose it.–>
Attachments
Well, turns out I was selecting the wrong “Plane 3D”. I was selecting the one with a number, like the tutorial said, it was called Plane3D#1. The one that worked is just plane ol’ “Plane3D”. :rolleyes:
Have run into another issue…great plugin btw…the only thing is how do I save it out to use in another program as a texture map!? I’ve looked high and low in the forums and the tutorial and nowhere does it say how to save it out. Does’nt really make sense to me that it could only be used within ZBrush. Maybe it’ll come to me in my sleep…gnite.
Really? Urgh, the naming of tool copies must vary.  Glad you got it sorted.
You can export the texture from the Texture palette. Just select the texture that you have transferred the photo to and export it out. If you’ve been using polypainting instead, then you’ll need to assign UVs to your model, then transfer the polypainting to a new texture at the highest subdivision level.
Hey Marcus. So I can turn on texture while using the plugin? In the tutorial it says to make sure that texture is turned off. I did use the transfer to texture option and it worked.
Thanks
Sorry, I was a bit vague in my reply. When using the plane as a subtool with a texture applied you use the ZProject brush to transfer the photo using polypainting. For this to work, your main model has to have UVs disabled (otherwise the same texture image - your photo reference - will appear on both the plane and the model). When you’ve done transferring the photo using ZProject/polypaint you can re-assign UVs and do a Col>Txr to transfer the polypainting to a new texture that you can export for applying to your model in an external program.
HTH,
OK, I get it now. I did actually got it to work last night by enabling the UV and transfering it somehow by hitting random buttons in the texture menu just to see if it would work. It must have been the Col>Txr button. I was just happy I got it to work and I could go to bed without thinking about it.
The only texturing I’ve done in Zbrush is with Zapplink on one project, but your plugin is more along the lines of what I am looking for and it has more uses to boot. Plus we have to wait for another update to be able to use Zapplink in the new version.
Thanks again for your help and a great plugin!
I’m baaaack…so I open up Zbrush and get the image plane all setup, but when I use the size slider in deformation the image plane snaps to a 1 inch by 1 inch image and then get an error window every time. It did it a couple of times last nite but that was because I moved the slider in large increments, now it does it in just 1 increment…all the time. I imagine it’s something with Zbrush itself and not the plugin. Since the new version I’ve had quite a few issues.