diablo, thank you. always happy when you visit my thread 
tm, danke! ja, das interessiert mich, und auch das thema vorurteile
knacki, thank you… yes, you are right, and, i try my best to help with that.
A heart warming piece made more so by the skill in which you have kept the life and sense of humanity in the gestural strokes.
Helping an original punk across the road?
38 years ago since The S*x Pistols released an album that didn’t require an Astrix.
That piece is culturally marvelous. The truly civilized anarchist!
Makes me think of the mid 70’s in the UK.
thank you boozie… ah, yes these asterixes … we have them now everywhere…
takai, thank you…hehe, yes, it might reveal my age this way…lol…
i am having lots of fun with the zmodeler… this little bike was done completely in zmodeler, that goz to blender, where surprisingly all the polypaint information, as well as the polygroups were transfered too  … rendered then with blenders cycles, after uv-ing a few parts for the decals…


looks really cool.I would buy one if you print it.
Agreed - really good job. I haven’t got that far with Zmodeler yet! If you don’t mind me asking, how long have you been using Blender and how easy is the Cycles rendering? I have seen a few people use it here. I don’t have Keyshot (my system overheated with just a few renders on an earlier trial version) and have been impressed with the Blender renders I’ve seen. HOWEVER, I have tried Blender for modeling many times over the years and always ended up getting frustrated and could not get a handle on the interface. I thought MAYBE I could use it only for rendering only. Thoughts?
It’s either a hardsurface motorbike or a symbolical desire for freedom.
Put a frog on it and make it jump over some toy buses.
thanks diablo! i have sent you a pm 
lensman, thank you.
oh, this sounds just like my experiences with blender … lol… blender is a very good app by now, and can compete with apps like max, i think, but blender is not at all artist friendly… i fell in love with cycles when i saw first time here at zbc a cycles render, in summer 2012. cycles was still in its babyshoes, so to say, but wow, the quality was insane already! so, i knew i would have to learn now blender, just to use it for rendering!
it took me several days(!) just to understand how to navigate in the viewport, and how to move the standard cube from a to b… lol… but, for cycles it was worth all the effort… i now can use blender for everything, but it took me quite a while. blender and zbrush make a perfect combo. … so, my answer is, yes, try cycles. you would need to know how to navigate the viewport, how to install and use goz (without goz, it is almost impossible to get the files correctly into blender) and learn the node editor for the materials (which is the only part in blender that is easy to understand, since it is made artist friendly :-)) and you need to learn the render tab. that is all… so, big yes, i would recommend trying and investing a week tor two to learn these things. it is really worth it. you would never get a free renderer, that can compare with keyshot in its results…
hey boozie, thank you … what a boozie idea, lol, fun to just imagine it
Thanks for that. I actually got Blender downloaded AGAIN last night! Seems I’m having a problem that another user had with 64bit Win 8.1 … it starts to open for half a second and then closes… So had to go and d/l the version before the latest and did get that to work. Now I have to get back to learning AGAIN
Now going thru the usual frustrations with Blender. One being when going thru tutorials in the Web if the person created it using an older version then there can be so many buttons and options that have either been moved or removed from the current version… grrr.
Now to your statement above “and use goz (without goz, it is almost impossible to get the files correctly into blender” - how did you get GoZ to work with Blender?? ZBrush does not automatically search for it - unlike Photoshop or Maya, etc., and I can see no manual way of telling ZB how to look for it.
ah, i am sorry, i should have said that, as i struggled so long with it too… here is the pdf shared by blenderartist user piericko that explained everything to me, with it i got goz running.
in short, it shows that you need to tell zbrush in the preference panel where your blender app is, and you need on blender install the gob addon, as explained in said pdf…
please, if further struggles occur, i kind of know they will, please let me know, i wish to help you get running for rendering in blender…
Thank you, that hopefully is just what I’m looking for!
“if further struggles occur, I kind of know they will…” hahaha
Well, Kokoro, I’ve had partial success. I can export a simple poly model to Blender no problem. The model is polypainted in ZB with no UV’s or texture map. I was hoping (based on how I interpreted your motorcycle post earlier) that the polypaint material would export over, too (as I understand it does in the new Keyshot bridge), however, I get no polypaint info at all. Was I expecting too much or is this in fact what you managed to achieve? Or am I missing something?
Edit: So, with UV’s and a texture map I could get it to work. Is this how you did it?
Edit2: I spoke too soon. I was rendering with the Blender default render. Once I switched to Cycles all the colour info disappeared. Looks like I am now going to have to import a texture… which is totally defeating the purpose of installing GoB…
no, lensman, i just used the polypaint of zbrush. for just the color, the motocycle has no uvs. i made a few parts uv for the decals, which i applied as textures in blender. the coloring is done in zbrush as polypaint and transfered via goz…
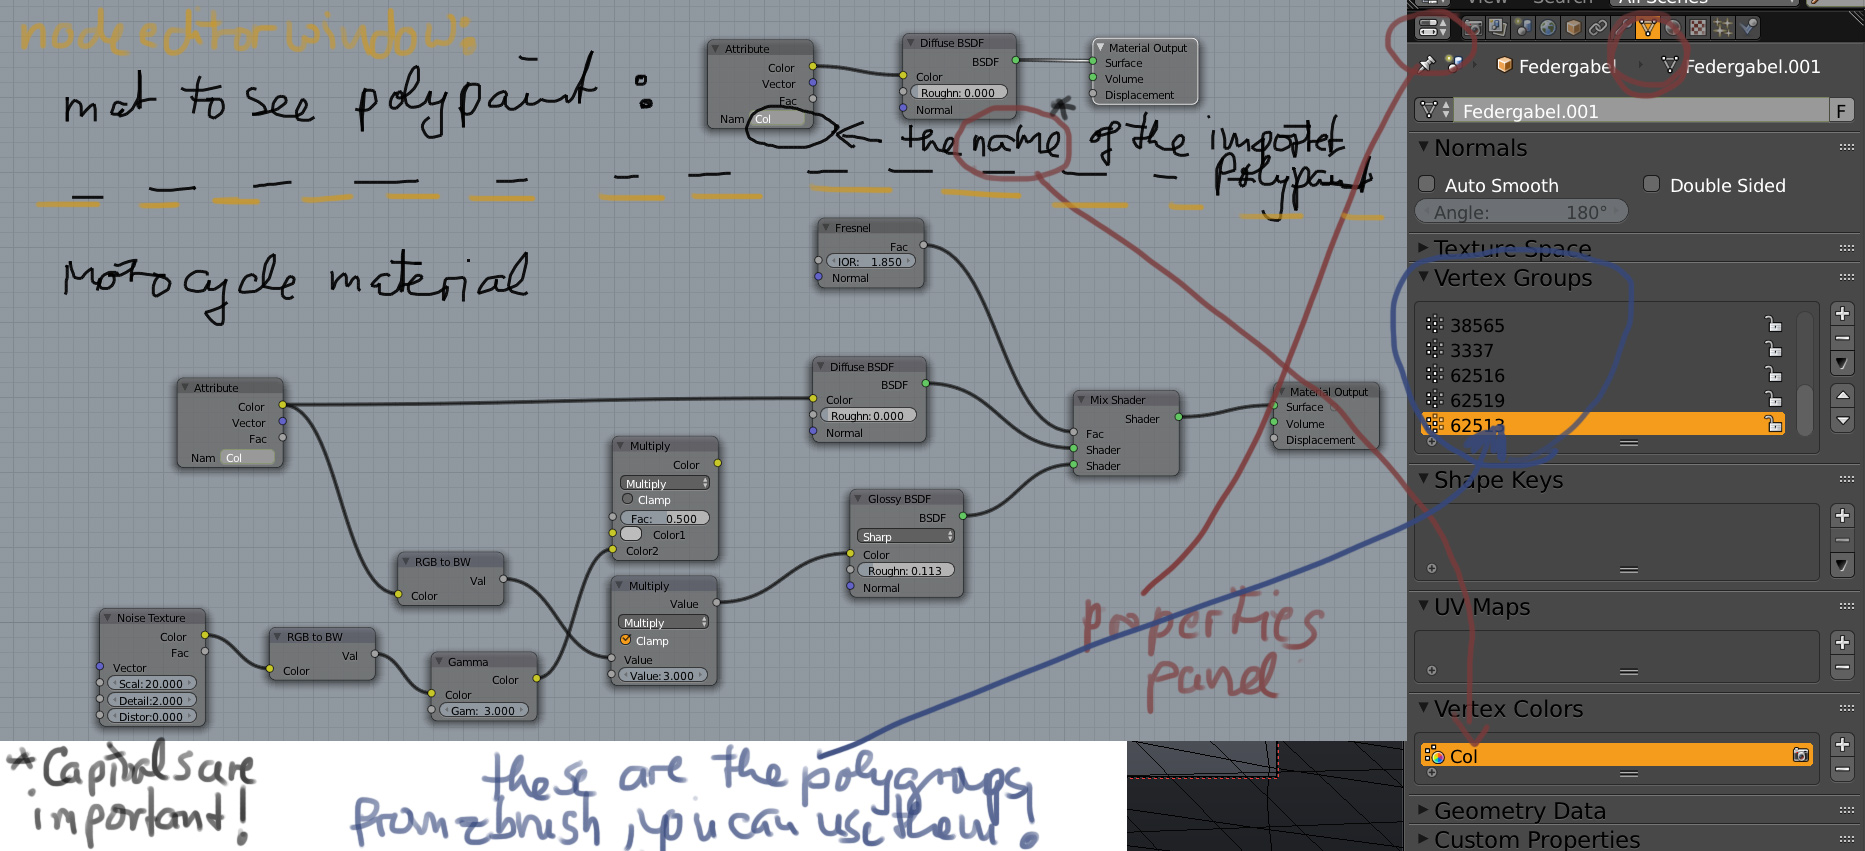
the polypaint does not appear automatically on the render, like in keyshot, but it is in blender for you to use. the polypaint is stored in something called vertexcolor, you find in propoerties panel, see image. the polygroups are in vertexgroups stored, see image. you can use them in a material, or you can use them in edit mode to select those vertices, but this is for more advanced uses. i would try first to get the polypaint visible per se. it needs a few clicks to set it up. here is how:
first, put on cycles render not blender render.
second, select your goz object in blender, make a new material, and open the node editor. put in three nodes as shown on top. below the yellow line is my motocycle material, which has specularity as well, i put it so you can try more advanced setting if you like.
and, to not loose your material, click the little “F” next to its name. this means it will be stored in the file, even when you not apply it to a model (“F” stands for “fake user”, since blender stores and saves only the parts of a file that have a “user”, meaning are used. this gives bad surprises when you forget to click the “F” sometimes…)
Attachments
Well, thank you very much for that explanation. Good to hear. I don’t think I would ever have figured that out by myself! I do like using the Node editor - so much better than opening and closing panels to hunt for that elusive command. Will be trying this tonight.
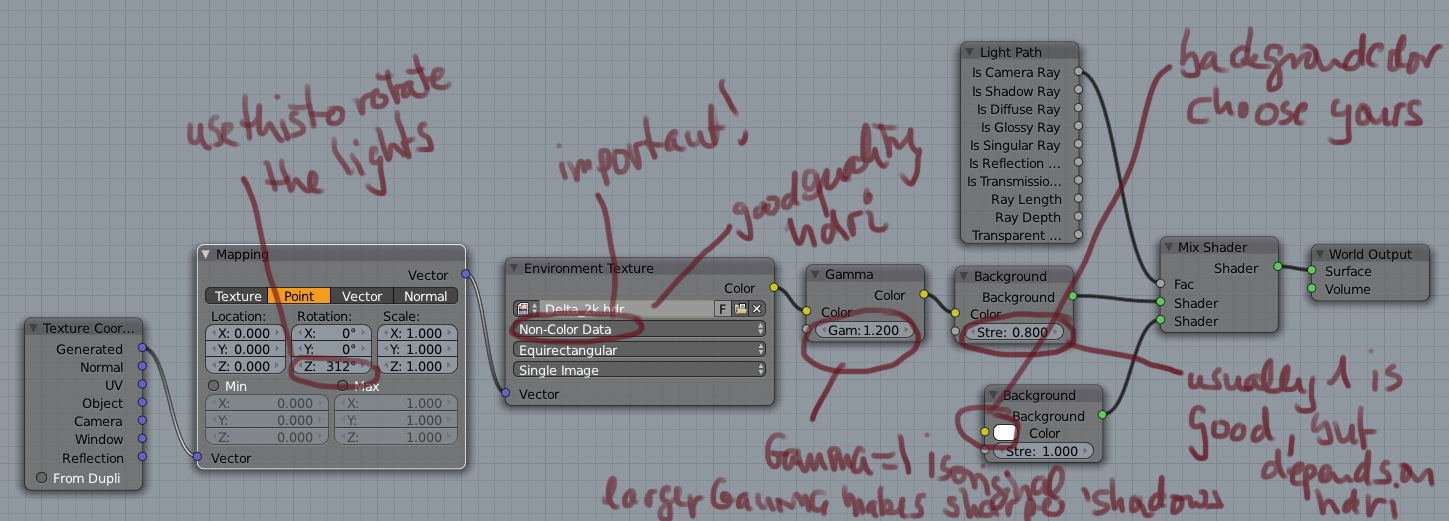
good… and as good renders depend highly on good lightning, the easiest to achieve that is via a good hdri. here is a node setup for this, as i used on the motocycle, to get you running in no time … after all, that is why keyshot is so popular, they provide all these things you have to setup properly already as templates to use… you do not need lamps then, just the world lightning. get and grab a good hdri, there are lots of free ones too (but need be saved as .hdri not .jpg as .jpg does not store the light information!), and you will get nice quality renders with this simple setup…
Attachments
SO helpful, thanks. I think I’m going to have to print them out to keep on my desk!
Worked great, Kokoro,  as this very quick image shows.
Now I have a LOT of playing to do. You kinda lost me with your motorcycle node breakdown, but I’ll get there. I just hope Blender can handle the number of poly’s that some models require. That’s the trade-off, isn’t it - easy to port over poly-painted models IF your system can handle it, OR use low-poly models with UV’s and textures!
great news! and well done … so now you are running, you can learn the finetuning to tickle cycles to your delight …
your render needs more samples btw, as it is too grainy (render tab -> sampling, i would recommend for the beginning to use pathtracing, as it is kind of hard to set up the branched path tracing correctly. under samples the entry “render” is the rendered samples, this you need increase. the other “preview” is for the viewport render). also in the world tab (in properties panel) there is a"settings" you can tick on “surface: multiple importance” here, and choose a map resolution like 1024 or higher (depends on ram you have available). this helps with render quality.
it depends a lot on your machine how many polygons blender will render. you have in render tab the options render -> device. when you have a cycles friendly graphicscard, here you can choose gpu (that is the graphicscard) or cpu (that is the processors). on my system gpu renders almost twice as fast. the drawback is, the complete scene has to fit into the graphiccards memory, and i have only 2 gig of that. big models to not fit in there on my machine. these i render on cpu. i had rendered succesfully a 15 million model in high resolution, on cpu of course, but i have 32 gig ram for render on cpu… and i had not the feeling that this was the end…
when you goz very large models, you will notice that the viewport slows down. here is a way to deal with that.
goz your big models into blender. go into the outliner panel (that is above the properties panel) and click off the eye icons of the models. the models disappear from the viewport. but as long as the little camera icon next to it is on, it will render.
now goz the first subdivisions of your model into blender, so the low poly versions, click off their camera icon, so these will be visible in viewport, but will not render, and use them to set up the lightning. once finished, hit render and enjoy…
have happy rendering and thanks for sharing your first render, makes me happy to see it