Thanx Moochie,
No there is no one picture.
Just alot of experiments.

Here’s the above model with a few more details…

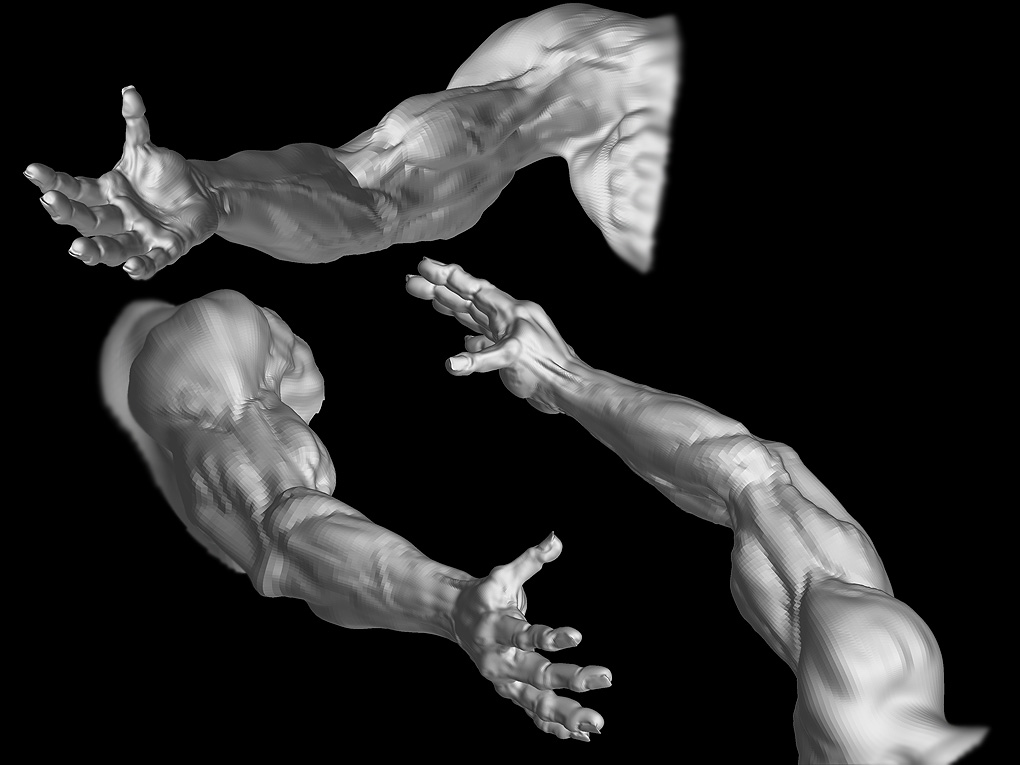
Here is the left-arm of the CRAWL guy…
Hello Odhinn  ,
,
Nice work you got here… I really like your organic modeling/scuplting…
Great mechanical concepts also but i think there’s a lil touch that could add to enhance your skill/style… Some bevelling 
Keep up the great work!
Cheers,
Kev

Got both arms done…
[attach=17326]Redeemer_test_rightarm.jpg[/attach]
Right arm details…
Attachments
ohh man odhinn, that’s really, really good

great work there, i see everything looks good.
however in my point of view thumb looks a little bit out of place,
because it’s hard to place your thumb in this posision without using your other hand…
Very good stuff, full of action! I like it, but keep in mind to keep the muscles under the skin. In your last post the biceps seems to escape from it.
Abyssis:
Thank you for the nice comments. It’s hard to find time to work on this because of work. Hoping to get to the Czech Republic sometime soon myself.
-KDi:
Thanks fo the support bro.
The thumb is used to support the body weight lying down on the ground. I changed the angle to show details. This is still the same crawling model which I rigged in Maya.
Bas:
Thanks alot.
I screwed up the bicep on the left arm. The length is wrong.
I touched it up a bit last-night but because of the angle it’s in you can’t see it. I could fix in Maya by cutting the arm and re-attaching the vertices but I prefer to take it a little further and then add armour and move on to something new.
Thanks for crits Bas.

Finished the legs and back…
Another killer update
Still a pleasure watching your thread evolve into near perfection
Ron

Thats really kind of you Ron, Thanks alot.
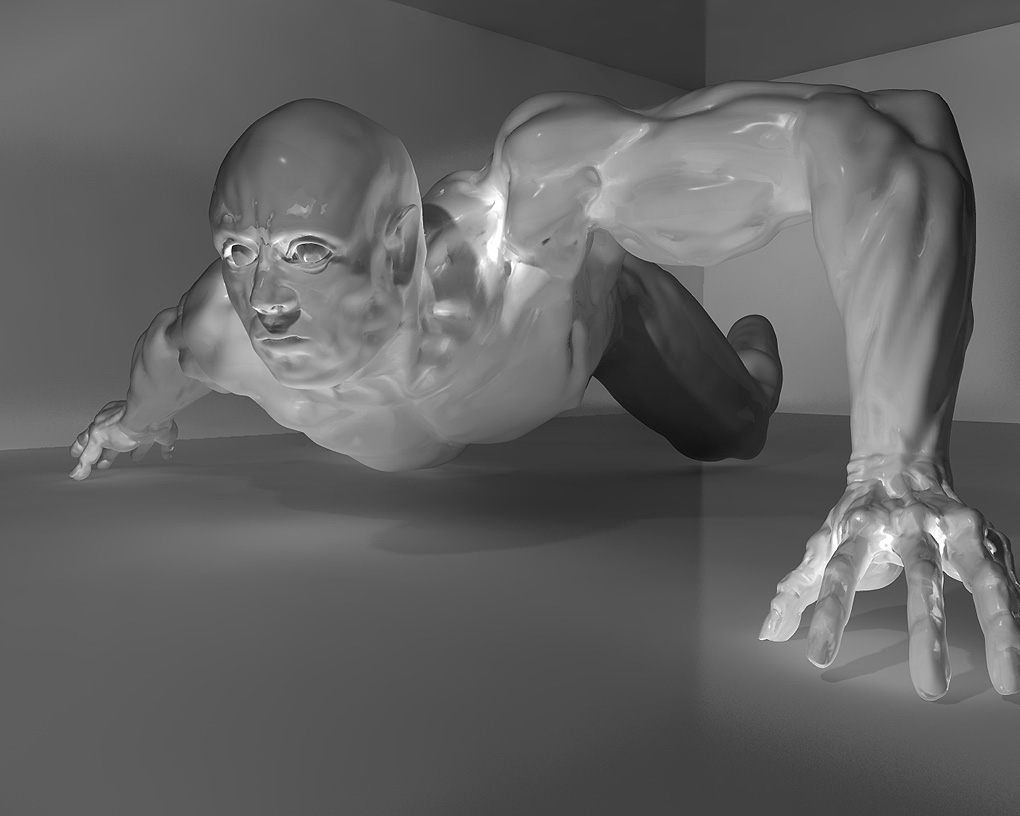
This shot isn’t very dramatic so bear with me…
I put the guy back into his original pose.
I am experimenting with the “TURTLE” render plug-in for Maya.
It is just the default light and the settings I’m still figuring out.
I had to try something new and everyone raves about TURTLE in the Maya world. It is very fast , I can tell you first hand because I messed this model up huge in ZBRUSH (deleted my lower rez) so as a result I exported a 400,000 face OBJ. file into Maya. I’m stuck with it’s size now and it’s my own stupidity.:mad:
Anyway Mental-Ray won’t render this many faces it just crashes…
When I think how wicked Global Illumination would have looked I feel sick.
TURTLE has Final-Gather and Global as well as caustics so here goes the long walk into trying to salvage a decent render from this monster size file.
Sorry for the rant, I’m just really pissed.
You have a very good eye for expressions and anatomy. Bravosmall_orange_diamondsmall_orange_diamondsmall_orange_diamondsmall_orange_diamond
Sorry for your problem. I think XSI can handle objects with polycount quite bigger than maya. Especially XSI 5.0
i pretty like the latest render… especially the lighting

Vlad74 & Pinkarman:
Thanks for the nice comments and support guys.
I spent the rest of the day and into the night learning global-
illumination in “TURTLE”.
wonderful piece of software and i’m happy with my initial results.
Have you still got a displacement map?If yes you culd lower polycount of your model to something around 10.000 polys or better to 40.000 polys then soft out edges and use a displacement map, you should get very close… Bad luck with deleting lower resolutions, you cant even imagine HOW many things did i lose this way  but every work is an expirience which you have got now out of this work, so dont get pissed if you wont make this work, think how much did you learn during this project
keep it real!
This is some really good stuff. It has a ‘Michaelangelo’ (sp) flavor.
The right Deltoid, Bicep and Tricep are demanding a bit more attention (mass)… break out the books and take a look (Hey! That Rhymmes! [sp]).
If you like you can send me the model and I run it through the polygon reduction in my XSI4.2 a few times. That did the trick when I deleted lower subdiv levels which happened a few times.
You can use rapidshare.de to upload the mesh if the files size is larger than a few megs. It would take me 5 minutes to reduce it for you, so it’s no biggie.
Let me know if you are interested in trying that out. Your model would certainly be worth trying it!
Cheers
LemonNado
[attach=17458]REDEMPTION_finalgather.jpg[/attach]
[color=Yellow]This shot was done in Turtle using Final Gather. I turned down the light intensity to .6
-KDi:
No displacement map bro, I laughed when I read your post ( I guess great minds think alike) I tried to create a disp-map last night for over two hours with the high rez model and Zbrush would crash just as it completed it. I managed to get the model to 7 million polys and I was excited to create wicked details. But it didn’t happen. I will post a pic after this post to show you the real problem which seems to be a stray edge attached to the model. I isolated the edge and it’s face in Maya and managed to delete them, but exporting it back into Zbrush still encountered the crash.What I’m saying will make more sense when you see the pic. Thanks for trying to help me bro.
THRAWN:
Wow, what a nice thing to say. It’s not true… but you made my morning. Mr. Angelo is one of my alltime favorites.
About the deltoid… since the guy is sprawled out on the floor and his right arm is stretched the deltoid muscles elongate a bit and don’t have the same fullness as flex.The triceps are huge on my guy, actually too exaggerated but that’s the way I model. The angle of the shot makes them look narrow. I’ll post a back shot so you can see.
lemonnado:
This forum never ceases to amaze me with the generosity of it’s members. Since I can’t create a displac-map for the highrez model there really is no point making the lowrez. When you see the problem on the next pic give me your opinion.
AURICK if your reading this I really need the advice of our Guru.
lemonnado, thanks again for the offer. Your a good guy.
Attachments