Steve thanks for the info. Unfortunately the zip files at that link (dated 08/01/10) are showing an “invalid zip archive” error message when unzipped using WinZip or WinRAR. I had the ones loaded from 06/10 installed already but it was limited to shader nodes.
@ oR_Creeper: Hmmm… Try the links again. I just clicked on all four and was able to download and extract them each using WinRAR.
Wow…fast response. I figured it out…FireFox works better than IE. 
Got them now. BTW, thanks for being a beacon of hope and inspiration for us Lightwavers. You rock.
Awesome! Glad to hear you got it worked out. 

very nice info here. thanks for sharing and generally being so helpful. you are a great representative of the lw community, even on the zb forums im sure this thread will serve as a great reference just ilke your lw/zb pipeline guide for lw’ers (and zb’ers in general).
Wow, really liked the tuts!
Got one little question: How do you use the spotlight image as a reference image? I can’t get an image from spotlight as a background image. It obscures the sculpting object i am workung on. What’s the trick with this?
@ undeadmach1ne: Thanks! Glad to hear you found the info useful! Let me know if you have any questions. 
@ HigashiKan: Thanks! To use Spotlight for your reference material, simply lower the opacity of the image in Spotlight by clicking and dragging over the transparency icon. It’s similar to using an Image Plane and then lowering the opacity of your model, however unlike an Image Plane, you can’t place the Spotlight behind your object. It will always be on top of it. If you need an image to be behind your object, you can use the Image Plane object as a subtool or the Image Plane utility (in the Texture menu).
Steve,
thanks a bunch. I did everything right except DPKit
I also wonder how it works if I’d like to get animation from LW for fine tweaking in Zbrush and than back to LW
Seems like an interesting workflow with lots of potential…
Thanks so much again man for all your efforts bringing LW and Zbrush together
LightWave MDD files come into ZBrush just fine. There’s a bit of a bug when they loop (it causes a “hiccup”) but other than that, it’s pretty seamless. Just make sure you import the MDD in the Layer palette, then place a keyframe on the timeline. You can then add additional layers to work on top of the MDD data.  I don’t suspect many people will do this, but you’re right in that it has some very powerful workflow potential.
@Steve - don’t mean to appear thankless or demanding, but… 
Is there any plan to update the ZBrush to LW Pipeline with the new capabilities in ZB4? I tried using the Multi Map Export plugin for displacement and AO and it was “no joy” in military parlance - I was unable to get any displacement to render using the ZBrush Displacement tutorial files in LW 9.6, a new model I am working on with level 7 division detail, the same LW displacement nodes from the tutorial, and new Displacement and AO files out of ZB4 with the MME plugin.
I am running LW 9.6 with the new DP Tools (thanks to you) on Vista Ultimate 64-bit. My video drivers and LW are up to date. I am able to get the Displacement tutorial in LW to work fine. Apparenetly I am doing something wrong in ZB4 and MME. :o
Thanks for ALL YOU do!
im just curious if you have tried using lw with goz? i know there is no lw specific button, but i read that goz supports any software that can work with .obj files, and was wondering how smooth it goes.
also, good point oR_Creeper, i hadnt even considered that yet…
@ oR_Creeper: It’s my understanding that a LightWave version of GoZ is in the works. Whether that will appear for the 9.x cycle or be exclusive for LW10 is anyone’s guess.
As for MME, make sure you have the following options set in the Displacement options: Adaptive, SmoothUV and 16-bit Scale. Then be sure to press the “Get Scale” button. If you don’t, ZBrush will pull the scale (essentially the light to dark ratio) from the Scale slider, which defaults to 1 and will likely not produce good results.
If that doesn’t work, try giving me a detailed breakdown of your process and I’ll do what I can to help you fix the problem. I just tested MME using the above settings and it worked like a charm.
undeadmach1ne: GoZ is a file format and right now, LightWave doesn’t support it. (We should have a GoZ version for LightWave soon, though.) In the meantime, you can get the same net effect by exporting and importing your OBJ files manually. All that the GoZ button does is automate this process and then save in the more feature-rich GoZ file format.
Using the OBJ files technically allows you to work between LightWave and ZBrush seamlessly. I’ve tried this and found I got mixed results. For example, I was able to load the Demo Head, sculpt some high-res details, go to the lowest level, export the OBJ, load that into LightWave, extend the edges around the neck to add more polys, then export that and bring it into ZBrush. It worked like a charm. The object updated with the new geometry and kept all of the detail. But I’ve also tried doing a major change to the geometry (basically swapping out one head with another) and that failed. So there’s a limit to how well this will work. There’s no way to tell if this will work better once we can actually load GoZ files into LightWave, but I suspect it will not. Some changes to topography and point order are just going to cause problems.
Cheers!
Yes, it works!
However, there is a slight problem with mdd playback rate. When I load mdd from LW, i have everything set to 24 fps in both lw and zbrush, mdd speed set to 24 as well (I always thought this setting is speed rate not fps), export mdd back from zbrush, deformations are slightly different. I can send tests if you like, but I’m not really sure where the problem is.
thanks for clearing that up regarding goz. i thought it was an automated export to wahtever software you wanted, with all the correct settings (like if your software wants the maps all to ‘flip v’ or doesnt like adaptive being turned on etc).
cant wait to see how things go in the near future with the goz support and lw10 on the horizon.
thanks again for the info.
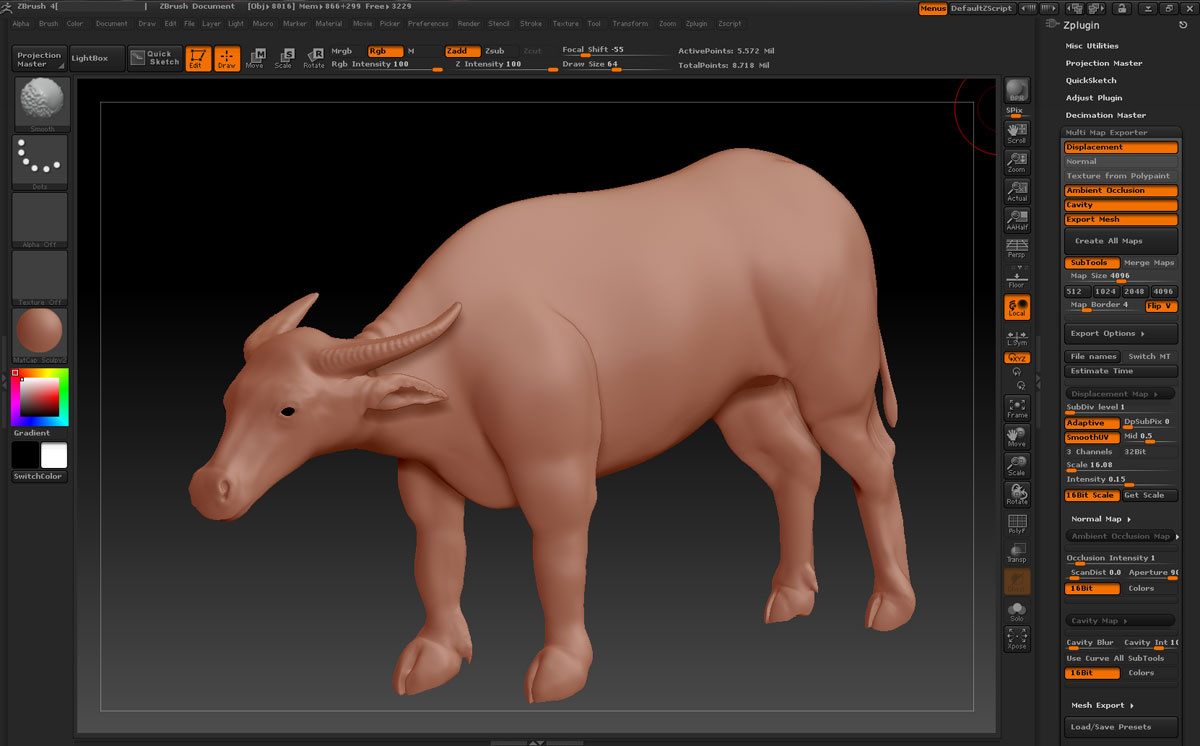
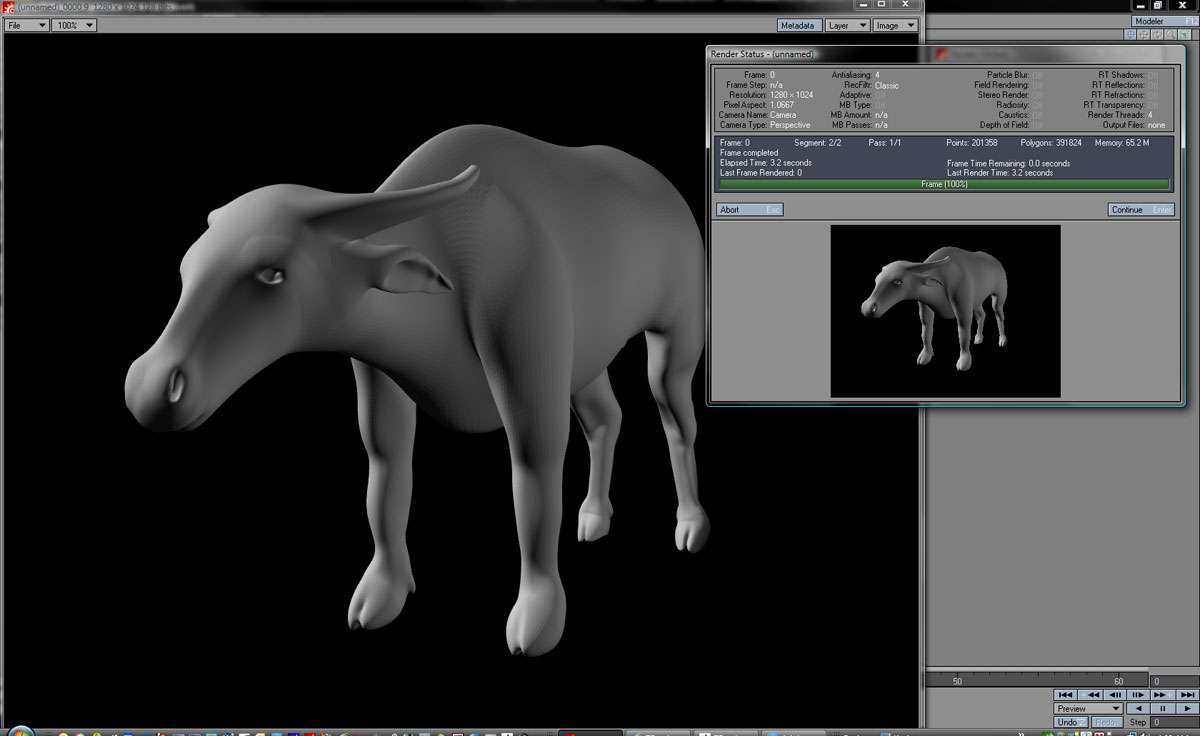
[attach=210359]carabao_zb4.jpg[/attach] [attach=210360]carabao_lw96.jpg[/attach] OK…here we go.
In ZB4
- Built model in ZB4 using ZSpheres - see attached.
- Created mesh using “Make Polymesh3D”
- Modeled mesh up to level 6 detail.
- Added two polysphere subtools for eyes and subdivided to level 6 - not really needed I just wanted subtools to be same level as rest of model.
- Filled colors with MRGB then saved as tool at Geometry level 1.
- Lowered Geometry to 1 then created UV Map - 4096, AUVTiles, everything else left defaults. Overkill, trying to be safe for when I do texture this later.
- No texture created since I have not done any painting yet.
- Launched MME and used your defaults - included AO at 16 bit and Cavity map at 16bit. After ~4 minutes all three subtools/model and all maps were created with no apparent errors.
In LW9.6
- Launched modeler with default single light setup.
- Loaded OBJ from step 8 in ZB4.
- Toggled G-Toggle Subpatch - model smoothed.
- Under object Properties I clicked Geometry tab - set Subdivision order to “Last”, Display subpatch to “4”, Render Subpatch to “Per Object Level” and "Render Subpatch to “4”.
- Clicked Deform tab - checked Edit Nodes box, clicked Edit Nodes (unknown error called “$Message Table Error” was all over node editor, first time ever to see this was tonight, not present last night).
- Copied node setup from default Displacement file inclued with LW - Image (loaded YaddaYadda-DM.psd) from ZB4 export location) linked from Luma to Subtract A, Subtract Result is connected to Multiply A (Multiply B setting was tried with 1000, 100, 15, and .25 with no effect), Multiply Result connected to Scale Scale. Spot info Normal connected to Scale Vector. Scale Result connected to Displacement Input.
- Render Defaults set at SXGA (1280X1024), Multiplier 100, Antialiasing 4, everything else is defaults.
- Camera properties set to same size as camera - all other settings are defaults.
- F9 to render - results attached.
Attachments
I noticed one difference between the default ZBrush displacement file/node that comes with LW9.6 - the Subdivision Order setting under Geometry for the head was set at First vs mine was set at Last. However, when I set that my model explodes (see attached).
The displacement heda was in the same scen in this second try and it renders fine.
I have no idea what is going on and I feel like a total noOb. 

Hi oR_Creeper, have you made sure your model is using the right UV map in the UV Map slot? also try and dial down your Multiply amount.
Yes, and did that.
I think a bit more work is in order (no UV pun intended) before I tackle this. I guess I should do a little cleanup and retopologize and set up some polygroups to simplify UV generation in UV Master.
Thanks for the 'puts. I love this forum and the helpful folks. Seriously. 
@ akademus: It’s hard to say what the problem might be. I do know there are issues in ZBrush with importing MDD files, and playback speed is one of them. Even MDDs recorded in ZBrush often exhibit playback speed issues. So there may not be anything we can do. But if you’re okay with it, please do send me a test file. I’m currently working on a freelance gig and probably won’t be able to do anything with it until the end of the week, but I’m happy to look at it and see if there’s anything I can do on this end.
@ undeadmach1ne: You’re welcome! Glad that info was useful. Hopefully we’ll see some cool things when the LightWave version of GoZ is ready.
@ oR_Creeper: Here are a few suggestions.
-
Instead of AUV, use the new PUV. In my experience it produces the best results. This won’t necessarily solve your displacement issues, but it will make any maps you have slightly better.
-
In the Geometry tab of LightWave, don’t set the Subdivision order to Last. Set it to After Motion. Then, in the Deform tab, set your Node Displacement Order to “After World Displacement.” If either of these is set incorrectly, your displacement map won’t show up. (I suspect this is the problem you’re having.)
-
Make sure you’re loading the TIF file for your displacement. And if in doubt, check the TIF file by loading it into Photoshop (or simply double clicking on the thumbnail in the LightWave Image Editor). You should see a greyscale image that’s mostly mid-grey, which areas of darker black and areas of lighter white. If you don’t see this, there’s a problem with your map.
-
Your Multiply node’s value is tied to the object’s size in LightWave. Standard objects are between 1 and 5 meters. If your object is 50 meters, you’ll need to crank up the Multiply setting. If your object is 50mm, then you’ll need to dial it way down. My node defaults to 0.5 and I often find myself working at 0.1.
-
Remember that if you’re using a displacement map, you have to allocate roughly the same amount of geometry you had in ZBrush back in LightWave. So if your object was 4 million polys in ZBrush, you need to set your Display and/or Render Subdivision level up to match. But keep in mind that the 32-bit version of LightWave has a 2-million poly cap. If you exceed 2-million polys in your object, LightWave will crash. (The 64-bit version shouldn’t have this problem.) Since it’s not efficient to use that much geometry, you will likely find that a combination of a displacement map and a normal map (or a bump map) will yield the best results. If your object doesn’t need to have its profile changed, then you can often get away with just a normal map.
-
Worse case scenario, skip MME and generate your displacement map from the Tool | Displacement menu. Make sure Adaptive and Smooth UV are turned on. (These also should be turned on in the MME settings as well.) If you can’t get the map to work from the Tool | Displacement menu, then it’s not a ZBrush issue. But as I mentioned before, I think this is an easy fix and you’ll find that changing your subdivision order in LightWave will fix the problem.
Cheers!
@Steve - thanks for the tips. I am a tad slow in the head, hopefully I won’t be up again tonight hours past midnight trying to get this to work.
FYSA my displacement map from MME was a PSD format vice TIF.
Again, Thanks for the AWESOME help.