Thanks for all the great tips!
In the image below I want to get rid of the orange blocks so that something like an arch remains. I feel that this should be really simple by just QMesh-dragging them inside. But that’s not doing it for me- depending on the settings I end up with either only one row of cubes removed, a group of single-sided quads remaining, or something that’s not correctly aligned with the previous edge loops. So what’s the right way of removing them?

Let’s say my edge loops have gotten a bit off track as in the image below. I found a somewhat lengthy way of fixing it (mask loop, clip, unmask) - is there an easier way of correcting edge loops so they all lie in the same plane again?

1.for the first item:have you selected the right target? flat island/flat inner?
2.for the second one look Spindel post# 69
Ludvigs - You could try an auxiliary object like an already centered disc or so.
Didn’t try it with array mesh so far,but works great with duplicated
subtools.
That does seem like the best workaround, I’ll see how that works out. Thanks jmeyer 
So, I’ve gotten a fair handle on the Zmodeler tools, and hard surfaces are coming along slowly but surely. Except for this:
Square shapes connected to curved meshes. I realize this isn’t a Zbrush specific issue, but a Sub-D one. Still, with the advent of Zmodeler, I’d say it’s a relevant issue. It seems like the only thing I’m failing at creating well at this point.
The simplest example, though I find this comes up in a lot of models:

This is one of the better ones (though not the best) I’ve come up with at a decently lowPoly basemesh. Even here, you can see I’ve ended up messing up the cylinder shape while trying to even out the pinching (started from a 2x2x2 cylinder). Can this be done, and still kept somewhat low poly? I only other way I can see is a very high res mesh that makes the pinch really small. Thusly(sic), you can ignore it if you zoom out and squint a bit
 Not an ideal situation though.
Yes, we could just insert the box into the cylinder, but then, no nice bevels in the intersection (not that the ones I posted are pretty). It’s also not always convenient to intersect meshes in models.
If anyone’s sitting on a good topology for this, I’d love to see it. I could then figure out some of the quickest ways to Zmodel it, and give my OCD something else to worry about :rolleyes:
1.for the first item:have you selected the right target? flat island/flat inner?
2.for the second one look Spindel post# 69
http://www.zbrushcentral.com/showthr…er2-0%29/page5
- I am trying to remove the polygroup in the center, so I picked “Flat & Polygroup”. Dragging it in a little bit removes the outer cubes but the resulting edges are curved in instead of being perpendicular. If I keep pushing some more it kind of removes the polyloops but leaves some single-sided polys hanging.
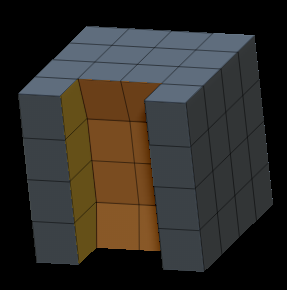
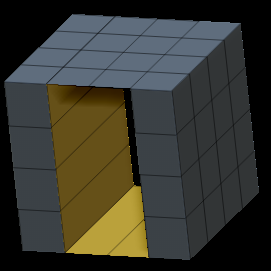


Instead what I was hoping for is either one of these two results:

- Thank you. That is the technique I have been using. It’s fine for a small number of fixes, but when I was trying to adjust 20 edge loops it became rather tedious; just hoping there was a better solution.
Ludvigs,
You tried creasing or beveling the edges where they intersect before subdividing?
Has anyone had any luck with zRemesher to spit out perfect or near perfect facial topology? I think I’m on to something and thought I’d share to get others who may have better ideas on the same page.
Anyways, you wanna start by making polygroups for each section and go into zRemesmer and turn on “KeepGroups”. Leave smooth groups on default setting, turn off “Adapt” (this really messes wit the result for some reason). You can either choose to use curves or none, it either makes a big difference, or not at all depending on how you set it up.
![QTv70Yw[1].jpg](http://www.zbrushcentral.com/uploads/default/original/4X/7/4/d/74d9b14ff3eb66f8ab745046c8b2d84ef46d309f.jpeg)
Left to right - Original hipoly mesh, zRemesher with curves, zRemesher without curves.
Still trying different polygroup set ups too. cutting up from the middle of the eye/mouth may also yield better results too.
![SPZ00Ib[1].png](http://www.zbrushcentral.com/uploads/default/original/4X/e/8/1/e817b6011638fd1091b1d851bb8dd114589723f9.png)
Also try running zremesher a second time with poly count set to same. This has improved the topology in my simple meshes.
Thanks for the tip Andreseloy…
Cross22
I found that:
1.If I do step x step a get nice result
2.Have you try align edges(i did not know to use it right now!i dont have success…sorry)
Ludvigs
I will make an exercise with your issue but for the momento i think is better in the first time to not use the crease, i prefer to used it when i think my model is near finish
Floreum
I have read/or saw in some videos that the ALT option plus…
have to do with some topology issue.
Treece
very kind from you,always is a pleasure if i can help in something
Pendraia
your welcome, and thanks to EZHexagon for his attitude to share some inside in the ZMarvelous-ZModeler tool!
You tried creasing or beveling the edges where they intersect before subdividing?
Yes, it does work somewhat if I have enough resolution in the low-res, but that is not always practical with complex hard surfaces. The image on the right is with a creased solution. The other is with beveling the creased edges. All the various ways I’ve come up with to Add edges/bevel/crease, have yielded some sort of pinched or weird result.

Is it just me that’s bothered by these things? Am I thinking about this in the entirely wrong way?
I will make an exercise with your issue but for the momento i think is better in the first time to not use the crease, i prefer to used it when i think my model is near finish
Does this not mean you won’t be able to see your subdivided result before the model is finished? I may have misunderstood you. Beveling at least, I feel is best to to at the very end. I try to preview it with creasing, then add-edges/bevel, but it gets a bit clumsy for me at times. I’d love to see what you can come up with 
It may well be I’ll have to consign myself to dynamesh for these things, but I at least feel I have to try:p
I’m no expert at Zmodeler and definitely not with low poly modeling, but after one of my projects to learn Zmodeler here are some things that worked for me.
These are just the tools I used - not trying to say this is the way to do it.
1 I picked a project and tried to only use zmodeler to build it. I picked Hellboy’s gun because I found some good reference on the web.
-
I built each part with what I could figure out intuitivley. In other words some pieces started off as just a cylander or a box. Until the whole gun was built.
-
then I rebuilt each piece sometimes ten to fifteen times. It didn’t take long. Each reiteration became better.
4 I watched some videos about particular parts of zmodelere that I was having trouble with. Then rebuilt again.
This took about a week. The main problem I had with aligning points had to do with I was trying to build stuff like in blender. In blender I can just type in numbers and points line up. You can lock off an axis very easily.
You can align in zmodeler but it is very dependent upon what you are trying to do. I had to try move infinite radius or slide or align edges - I got a feel for which one as I built them. Again it is not easy to explain but by the time I built the final version of the final piece - the chamber of the gun - it only took a couple of minutes and I intuitively used the transpose lines to move things into place.
Things I had to remind myself to do -
Use masking. Zbrush can mask individual polygons now. Then use the transpose tool. Use the shift key to lock off the view. Every situation will be different - but after doing this it just sort of clicked how to use the transpose tool to align things quickly and perfectly straight. The transpose tool lines up so nicely with points now. It’s amazing.
Turn off perspective.
Again this is hardly perfect and my explanation isn’t that clear - but I found that by seeing it as a process rather than as a set of operations (click here, move here, add this point) it is much more flexible. In other words it is more of a feeling for which tool to use than hard and fast rules.
One thing however - I found that the move brush in concert with zmodeler is great for getting COMPLEX models right. Sometimes the move points option of zmodeler does not work the way I want because it is hard to get the right viewing angles - using the move brush instead can have more accurate alignment. Doing it by eye while moving points can be frustrating.
In the final model here I did zremesh a few things (the chamber was two pieces - I dynameshed, zremeshed and spent about a minute to finish the piece).
I have not found a good way to weld two sections together - although I did weld some polys and delete some here and there I found it was better to try to build the model so as to avoid welding large portions together. In the relatively simple center block of the gun I had to do this under the arch. I could not find another way.
If you want to see the final keyshot renders they are in my gallery here.
Attachments


There’s a lot of great info here. Hopefully bit-by-bit it will sink in. So I’m now following this thread.
Great Zbrush Modeler tutorials on Youtube. Apologies if it’s already been listed on this thread.
www.youtube.com/user/musashidanmcgrath/videos
Many thanks Danny (McGrath) for posting these on Youtube. Excellent videos and definitely nice to see slower videos.
Recommendation to everyone who maybe learning Zmodeler.
Thebest12 wrote: … Ryan did look kind of lost. Did you see in video.
Yes I agree. My impression was he rushed the video to get it out before anyone else. Now that he has possibly had more time to study the ZModeller, his future videos will be up to his usual high standard.
In this movie at 1:30 the tool suddenly works symmetrical. I can’t seem to figure out how to get it to work with symmetry? In the toolbar you can see the ‘normal’ symmetry setting isn’t highlighted either…
Edit Nevermind, I figured it out. I thought the X key didn’t work, but my symmetry was off centre…
Thought I’d put some thoughts out there on creasing.
At first I imported it to 3ds Max and creased the edges manually there. Good show, but no real way of getting them out of Zbrush, though exporting Polygroups as selection sets through FBX is helpful.
Maya though, will happily take your creases using GoZ. Had some issues, but re-installing GoZ seemed to fix it, which suggests it was on my end. The only gripe I have with Maya so far is that it seems to kill your Polygroups 
Yea, so what’s so cool about that? You still need to muck about with the beveling, right? Well, With OpenSubDiv we no longer need to bother with that, just use semi-creased edges instead:). Nicely beveled edges using crease sets without actually having to bother with beveling :D!
Any thoughts on this folks? And more importantly, do you know a way to get Maya to keep your Polygroups? I want to go back and forth, dammit!
<iframe width=“854” height=“510” src=“https://www.youtube.com/embed/6ZNiIxsdrWw” frameborder=“0” allowfullscreen></iframe>
array tips