First, let me say I haven’t read this whole thread, but the last few comments leave me to believe that not everyone is aware of the new 4r7 videos in the classroom.
Excuse me if I have intruded with already known info.
Dj
blah blah blah
You know, the people that dismiss a new tool because it can only do 75 new things instead of the 100 things they wish it could do depress me too. But I am baffled that someone would take the time to come into this thread, and make not one, but several posts complaining people were here learning and discussing the finer points of specific functions.
The videos are a great resource, I’m sure, and everyone should watch them. They should be linked here. But different people assimilate information better in different ways. And you can’t ask a video a question, or discuss nuance. Personally, I learn best when I’m helping other people explore the issues and questions that they have, which might teach me something. It’s one of the reasons I answer questions on the Q&T board.
I’ve been covering really basic stuff to make sure everyone has the fundamentals for future pieces, but I’m going to ramp it up here shortly.
In short, if the thread doesn’t offer you anything, your time would probably be spent better elsewhere. And what do you care about how other people spend their time? Why does this entire community lose their minds every time a new release happens?
blah blah blah
Spyndel - no your tutorials are just spot on. Keep them coming.
Any addition to the tutorials Joseph is putting out is a bonus. As many have said on here already, we can all learn off each other, even the mistakes. Great community.
Would like to see some experimental examples, similar to MealeaYing’s thread.
I’ll add my 2 bobs worth that I posted on another thread:
Interesting workflow if anyone hasn’t tried it yet. Just experimental and can be kinda abstract.
Select an Alpha>Make 3D. ZRemesh it down to low polygon count and then use Zmodeler. Could give you all kinds of ideas. Especially if you do 3D Under Painting.
Not Nanomeshed or Arraymeshed yet, but could bring even more ideas.
Hats off to Thebest12 for starting this thread. 
Well, I’m sorry that the forum cops are enraged by this thread for some reason. Jovon is correct that everyone should read the documentation, and watch whatever videos Pixologic now has on tap that weren’t available when this thread started.
However, I’m going to keep posting things that occur to me from my experience with the new tools, and people are free ignore them if they dont feel they offer anything.
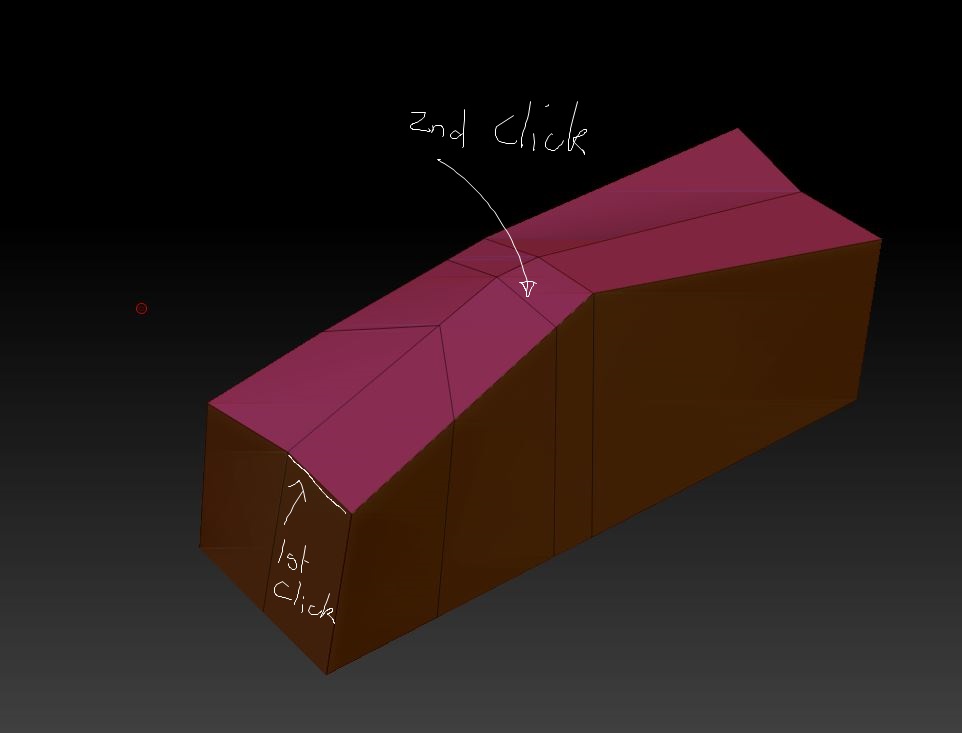
I wanted to talk about some of the different approaches to beveling edges, and when you might choose to do one thing over the other:

1 Like
Reading is necessary. PDF’s however are a drag from my perspective. Most every program I’ve ever run has had a  Help Menu which brought up a nice, indexed, searchable Help Entity/dialog box; Some with show me or do that for me included. :rolleyes:
Thebest12
Try the Edge Align tool mate.
Here’s another tip that might not be in the classrom vids. If it is, don’t tell me. I thought I was terribly clever when I figured this out.

1 Like
Great thread!
Does anyone have any clue as to how they made those nice Cathedral Arches from this page? http://pixologic.com/zbrush/features/ZModeler/
Its the pic above the Repeat Last section.
Thanks!
someone should make a goggle hangout room so we can watch each other.
@Chris3d
It’s tough to say without getting a better look at them, but they could have been either hand modeled or created with an array.
@Spyndel your ClipCurve (stretch Edge) methode works not really.
Watch after the ClipCurve your Backside of your Edge Loop.
The only methode where works good is the Point > transpose (methode). ;o)
And if is for someone helpful:
Preferences > Transpose or also Transpose Units. You can optimize your own transpose tool. ;o) For work more exactly with the transpose tool.
It’s more of a “flatten edge” method, and it’s not my method. Picked it up from a video.
I didn’t fabricate the screenshots. It’s possible you’re not understanding something or other. Would you care to illustrate how it’s not working for you?
Holy s***. Häääääääääh* lol, now it worked.
Really strange.
But I think I’ve found my problem:
If you move the point-(the shifted Edges) with: Point > Move (so you have moved the point manually/by hand) and the Edges are not set “correctly” straight down. And if you want now have again back the straight edgeloop/the two Edges with that point, then gives “your” method this result:

The Edges are now back stretched. But in the backside is the Edgeloop higher as result.
But if you move the Point (for receive the shifted Edges back) with the transpose tool methode before, you receive the right result with your Edges stretched method (ClipBrush).
So seen, it was my fault. Therefore sorry for that.
But in the same time it shows that this method works not always (if you move as an example your Edges with the: Point > move method before).
Well, after all, i’ve now in the same time learned what:
To be careful between if you move edges with: Point > move Or: Point > transpose. If you want later move your straight edgesloops back (with “your” ClipBrush method).
PS. Sorry for my english. I often have to edit my posts many times. Because often i write very bad english lol, if i want explain something.
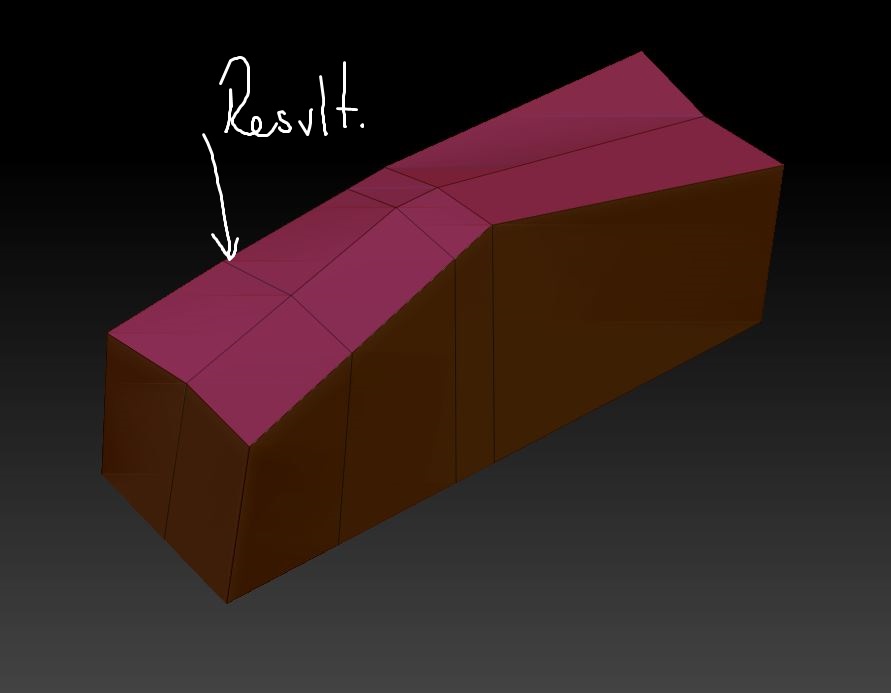
The clip brush just flattens the edgeloop. I used Edge > Slide > Edge Loop Complete to move the loop into the position I wanted. That moves the whole loop at once.
Sorry, it has an error crept in my post. I wrote Point > Slide. But i meant Point > move lol
Now i’ve edited my post again. Really sorry for that chaos.
EDIT
Hääääääääääääääh* So really strange. I once tried it again, but sometimes works, and sometimes not. No matter which point move method i use (point > transpose or point > slide or what else).
Sometimes works well and sometimes not really, after after the stretching method with the ClipBrush and Masking. Really, really strange.
I do not understand that. Really peculiarly… höööö* 
I wanted to spruce up my doghouse a bit, so I built a Nanomesh doghouse on top of my original low poly doghouse using it as a sort of frame. I doubt it’s 3d print friendly. I’d have to merge all the planks with the underlying frame to make it solid, but I just wanted to see those little cracks of light in between the wood. 

The basic process here ( Tip! You must sometimes use Tool > Geometry> Modify Topology > Align Edge to get all your Nanos going in the direction you want them to):

1 Like
Spyndel what are the step for use nanomesh? i still confuse with it,
thanks in advance
There are a couple different ways to get started with it, I think.
First, prepare your nano by angling the camera at it in the way you’d like it to appear on the target polygon (front facing, side facing, etc.)
Then:
- If ZModeler is active, you can make it into a nano by using POLYGON > MESH to BRUSH > Target:ALL POLYGONS and clicking on one of the model polygons.
OR
- Prepare your Nano, and in the Brush menu, select “Create Insert Mesh Brush”, and then “Create Nanomesh Brush”
Either way basically creates a new ZModeler brush with the Nano loaded. Select POLYGON > INSERT NANOMESH with the desired target, and insert the nano on the desired polys. Once placed, you can change their attributes in the Tool > Nanomesh menu.