Very nice work …
So, so good 
the concept is brilliant the modelling is brilliant a little more texture might be nice but hey thats just a personal opinion your model is still brilliant.
Tolu Abisola
Baby Dragon & Metahuman WIP
http://www.zbrushcentral.com/zbc/showthread.php?t=25203
Cardassian Woman
http://www.zbrushcentral.com/zbc/showthrea…ardassian+woman
Harpie
http://www.zbrushcentral.com/zbc/showthread.php?t=28783
Barbarian & Commando
http://www.zbrushcentral.com/zbc/showthread.php?t=30272
gorgeous concept!
He certainly has some perky nipples! XD Kidding. I love this model. This is the guy that got me to start playing in Zbrush.
Quoted from Pinwire:
"I’m trying to learn how to use z brush to paint realtime displacement and then output a map for render time. Lots to figure out right now. I’m not too crazy bout the ole z brush interface though. "
That’s funny… seems like you’re digging it pretty well now.
Good work man, really great work. Been following this thread for a while now.
Looking forward to seeing more not only with the character but with the process as well. Very nice so far.
Yolao - Thanks for the compliments. This guy is rendered in Maya with 2 area lights, 3 point lights, and an ambient light.
I have a frenel effect on the shaders as well. This gives a little rim of light around the model.
Javierloredo - Thanks! No problem sharing my work, I’m just glad I can! This creature actually did start out as a sculpture, at least the head did. If you go to an early post here
http://www.pinwire.com/postt57.html
On the top image in the lower right hand corner you can see a version of the head that I made out of super sculpey.
I just have to pimp my ride, here is a new sculpture that I just finished.
http://www.conceptart.org/forums/showthread.php?t=55805
Do you think that the Tortosaur and the Kill Cat could live in the same world??
This is the reason that I haven’t made an update to this project in a looooong time!
Thanks for the critique as well. One thing I’m struggling with is the fact that the model is very detailed and I’m happy with the look of things when I render very close to the face and neck area, but when I pull back for the entire creature the detail gets lost and it looks inconsistent with the rest of the body texture quality/intensity.
Here is another lesson that I have learned during this project. Paint the entire model first. Look at the entire model while you rough out some of your details the gradually start working your way in tighter and tighter. I think there should be 3 passes to a model, over all model pass, mid level pass and fine detail pass. This way you will end up with lines that define shapes and details on a larger scale for full character shots, then the tighter detail passes are used for the close ups. Next time around when I get to the fine detailing stage I will concentrate more of my efforts on the hands and the face and then detail the rest of the body until it looks good. On this one I just worked in patches until everything came together…well sort of.
Part of my mistake/problem on this project is that I started with just the head and then worked out from there.
For me I have had to learn the hard that the details don’t make up the big picture. That is a lesson that is generally taught in art. Work on the big picture first and the add the details later. I have to force my self to remember that in ZBrush.
GhostoofMacbeth - Thank you sir!
ZedHead - Thanks, I’m guessing you are thing there should be more texture on the neck and head area? Correct me if I’m wrong!
joostbouwer - Thanks bro!
kyphur - That quote was from a loooonnng time ago. ZBrush 2.0 rocks. Still things I would like to change but you always want to change SOMETHING about an app, overall ZBrush has opened up a whole new world for me, as I’m sure for a lot of other artist out there.
I almost don’t want to sculpt any more, just because there are so many things you can do with a computer generated sculpture. (make it move, walk and talk!)
Still having a real 3D object in your possession is very cool. That is the only thing that is missing for me from ZBrush. I’m sure one day you will be able to take your 10 million poly ZBrush model and easily get a 3D print made (some day it will be cheap enough to have on in your home for the price of today’s printer. What do you want to print in? Black and White, Color, 3D??)
Can’t wait for that day. Right now though all the 3D prints I have seen have a resolution to them witch is a real bummer, because it would be cool to have a ZBrush contest where the top 3 winners get a free hi resolution 3D print of their model. ZBush head quarters would get a print for their loby. Not sure why I just went off in that tangent but it would still be cool!
Peace,
NickZ.
Hey Nick!! Thx for posting some lines back. I went to the link of your last sculpture made with sculpey and let me tell you again nice work man. Im very into sculpting and im always looking for people that like to sculpt to. Now we have this great program that let sculptors to sculpt digital. But man, I really would like to share some techniques and work flows about sculpting. This is what I want to do for my career is to sculpt and animate. Right now im stuying animation but my passion is to sculpt. Thats also the reason why I like to get involved with artist like you, to share ideas and techniques and of course to learn from others and get better with my sculpting skills.
Here im going to post a maquette I started 2 days ago. The maquette it’s on the early stages were you work the mass of the creature to have it ready for detailing. Maybe you can share some critic or anything that you think could help me get a nice piece out of this. Im also going to post the sketch drawing which I used to make the Armature and a reference picture Im using to help develop my character. First is the drawing, second picture is the reference and then the grey sculpey maquette third.
Again Thx a lot and keep the good work!
Javi.


Have you guys checked out Scott’s site? He’s pretty big into sculpture too and he’s the one that taught me how to do maquettes.
Nick Z> Just saw your post on conceptart.org and that’s awesome. The only crit I would have is the uniform surface texture but that’s just nitpicking. Really nice though.
Hi Nicks,
Yes you are right i was thinking of the head and neck area. Im considering doing the same for my harpie head model, that is adding more texture detail to the head and neck area, but this is only my own opinion the only one that counts really if its a personal project is your own. It’s still a kick ass model and the detail rocks!!
Tolu Abisola
Baby Dragon & Metahuman WIP
http://www.zbrushcentral.com/zbc/showthread.php?t=25203
Cardassian Woman
http://www.zbrushcentral.com/zbc/showthrea…ardassian+woman
Harpie
http://www.zbrushcentral.com/zbc/showthread.php?t=28783
Barbarian & Commando
http://www.zbrushcentral.com/zbc/showthread.php?t=30272
Hello Nickz!
Nice Tortosaur ! 5 from me  I really like all the details that you have put on him especially all the wrinkles
Did u render it in Maya or Zbrush? How long did it take you to render it?
Just to have an idea of how long Mental Ray would take to render a character like yours. I have a basic character with a few details added on and Mental Ray’s taking over 10 mins a frame. I’m just wondering whether it’s normal or not…
Hope to hear from you,
Cheers!
Kevin
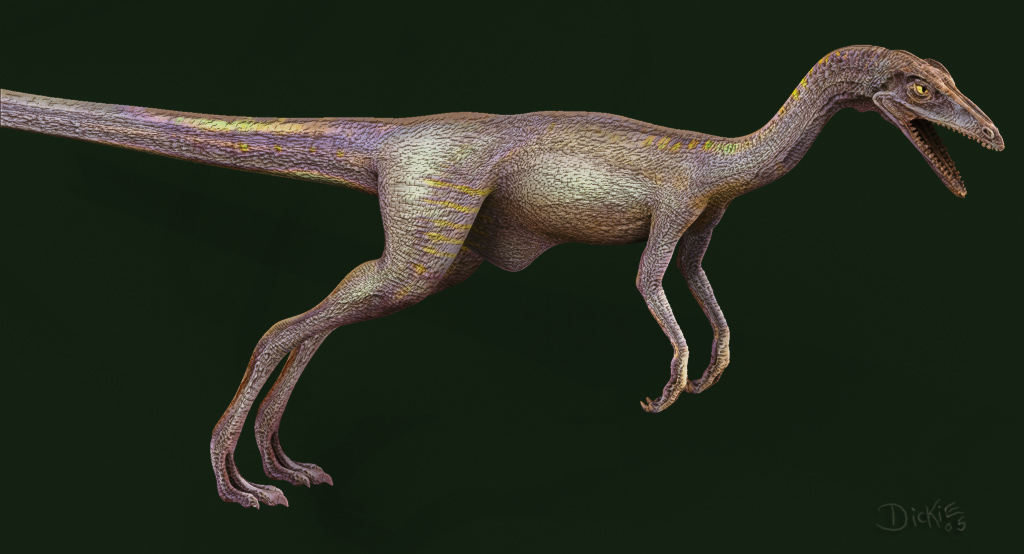
Javier: That middle image, the maquette you are using for reference was from Jurassic Park 2. The original design was done by “Crash” McCreery at Stan Winston Studios. He’s a GOD of creature design.
I worked at Dreamworks Interactive back in '95-'96 and made a lo-res compy for a game they did based on Crash’s sketches. I also made a higher resolution Lightwave model for myself, as I really liked Crash’s take on the compsignathus.
I imported The LW model into Z-Brush a few months ago. Tonight I saw your
reference and thought you might like to use my model for reference also. I took a tweaked out bump map I did in LW and threw it into Projection Master to use as a displacement and it worked nicely.
I present you my Z-Brush version of the Jurassic Park 2 Compsignathus. I hope he helps you along. If not, what the hell, it was a blast doing something different in Z-Brush than my usual head models…:lol:
Nick, sorry to threadjack your excellent Tortosaur… Just thought I’d help a fellow Z-Brusher along…
Dickie
[]
Hey Dickie! Thx a lot for the great reference. I appreciate your time for the help. Didn’t know that actual maquette was used for Jurassic Park 2. I found out a lot of information looking for reference for this Dinosaur. Did you know they were the smallest dinosaurs? heehe stuff like that!
I like a lot how the face area came out. Also the claws and leg muscles. I wonder how long it took you to model and texture it? You said you used Lightwave? or other?
Wow! You worked for DreamWorks… Very nice! You must had a great experience over there. I wonder how the business in creature desing and sculpting is right now? Do you know anything about it? I ask because this is what I want to specialize in the business of animation. I love to animate too and im good at it but, this is like my strongest skill.
Ok Dickie thx again and keep the good work!
Javi.
Actually, the maquette you are using is from here:
http://www.lostworldstudios.com/exhibits/dinoquest.html
They do some neat dino related stuff too.
I’m sending you a P.M. With additional info so as to not clutter this thread.
Dickie
Sorry it’s taken so long to reply back to the thread!
Dickie - No problem. The more help, the better! Thanks for posting up the cool dino pic!
javierloredo - Check out this thread by smellybug. You should find everything you need to know about traditional sculpting in this thread.
http://www.conceptart.org/forums/showthread.php?t=18287
Here is a link to the shiflett brothers web forums - some very cool talented guys. You’ll find all kinds of great info on their site.
http://www.shiflettbrothers.com/messageboard/index.php
Kyphur - Thanks for the link, Scott’s sculpts are amazing! Thanks for the critique and compliments on my sculpt!
ZedHead - Yeah I still agree with you. One area that is really bugging me is the shoulder area. My bind pose is a T pose, that doesn’t work so well for detailing a creature that will have his arms down to the side most of the time.
Now that I have him weighted I think I’ll just lower his arms 45 degrees to his side and then re - texture the shoulder areas.
While I’m here I might as well show some lighting and rendering impovements that I have made.
(Again rendered in Maya’s software render, bloom done in PhotoShop.)
Peace,
NickZ. 
Awesome. The pose is very engaging.
Hey Nick!
The tutorial from smellybugs it’s awesome! I use it all the time for reference. I found it in Glen Southern’s website like a month ago. By the way im a great fan of Glen Southern. (www.southerngfx.co.uk). But, thx anyways for trying to help. Wow! Shiflett brothers forum has some talented sculptors. Awesome work there!
Talking now about your character… I think it’s comming along very nice. Keep working on it. That character it’s going to look very nice on your portfolio. hehehe! Like I said before in another post: I think you should combine some of the wrinkles from the arms with the ones from the chest. The same thing with the neck and arms.
http://pixologic.com/zbrush/interviews/sigrecap.html - On the page look for Aaron Sims video. This is the video from Aaron Sims at sigraph. He works and explains how to combine textures and wrinkles to make them more realistic.
Hope it helps! Keep the good work!
Javi.
Here is something that I have run into as of late.
Before I brought my model into ZBrush I smoothed my cage model twice and then detailed it in ZBrush. I did this because I was using blend shapes (morph targets) to get my detail back into Maya.
Well now I want to get my original cage model back into Zbrush. I thought I would be able to do this using the feature in ZBrush that will let you generate a lower subdivision level. (Reconstruct Subdiv)
Well I was able to get back one level but not my original lowest level cage model. This is because I had 5 sided faces in my model. (bad artist.)
I was trying to figure out why there was a difference in my poly counts in ZBrush and Maya. Well after I put together the diagram above it became quite clear that if you take a 5 sided face and turn it into a quad and a tri you will get a different poly count than if you just leave five sided poly and let the computer smooth it for you.]
I personally like the way a model is smoothed when you take the five sided face and split into a quad and a tri. (Just thought I would share this small little find.)
There might still be a way for me to get back my lowest level of detail cage model, but I think I’ll have to do that in Maya.
Peace,
NickZ.

Keep in mind that lower subdivisions will only be created when there are no tri’s. Once tri’s are encountered it will not be able to lower the poly count…
A trap I fell into once…
Lemo
lemonnado - I haven’t really paid attention to this in the past. If my imported base model has tri’s in it will I NEVER (I hope not!) be able to go down to the lowest subdivision level or will I just not be able to recreate this subdivision level in ZBrush if it gets deleted?
Thanks for helping out!
Peace,
NickZ.
I just ran into this problem this weekend trying to fix my previous problem of having 5 sided polygons. (The way I fixed the five sided poly problem was a Maya only solution. I used my old model as a wrap deformer to get my new topology into roughly the same position. It wasn’t quite exact an there was some clean up in ZBrush but nothing too bad.)
During this process I started to notice that when you take the same base cage model and smooth it in Maya and smooth it in ZBrush you will end up with different vertex ordering on your higher resolution models after they have been smoothed.
Am I crazy or is this true? I checked and re-checked my models over and over and I paid special care to make sure that when importing my obj model back into Maya that I had the create multiple objects set to false.
I put together the simplest example I could think of (a cube) and smoothed it twice in both Maya and Zbrush and I’m ending up with different vertex orders.
Any one know what is going on here?
Peace,
NickZ.