The answer is in the Q&A list. :lol:
Well, I’ll make it easy: it seems this can’t be done at the moment, but Pixologic is aware of the problem. (Read the replies by Thomas Mahler in this thread)
You want the topology mesh to display the details of the original model? Click on Rigging > Projection.
Updated the front page to include the new Rastaman technique! 
I’m currently exploring the alternative for mesh extraction, by making a topology mesh over your model and then moving the points outwards.
Problem with that is: when you try to select points that are visibly outside your model (indicated by bright yellow lines), it can’t be done. You have to turn your model until part of the original mesh lies visibly beneath the point you want to select, and then it is possible… Is there a way around this?
?
Hi All.
I too am getting a little frustrated…
I’m following Francois Rimasson’s tut on ‘Birth’ with the express intent of
getting to know the topo’ tools.
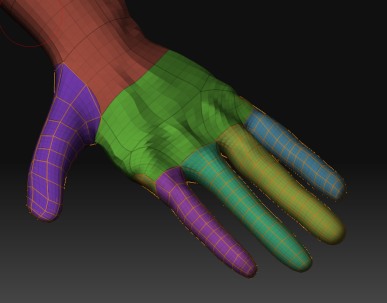
Following the script to the letter I get to the point where I have the cloned
‘fingers and toes’ sub meshes and have entered ‘Edit Topoplogy’ mode.
It looks good (image 1)
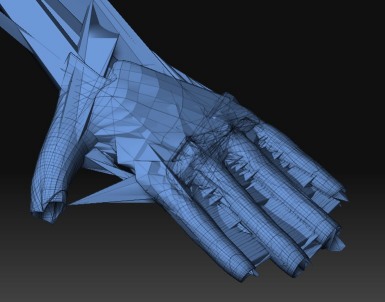
But when I hit ‘A’ to preview what I expect to me a minimal mesh, I just
get a horrible mess (image 2)
What am I missing here???
G.
Attachments
2 short questions to complete my tutorial:
-
How can I merge two Topology-Micro-ZSpheres to one to connect and close gaps ?
-
How can I delete the connection-line between two Topology-Micro-ZSpheres without deleting the Topology-Micro-ZSpheres itself ?
Question:
How can i hide my mesh, so i only see the wireframe of my new created topology in “edit topology” mode?
Rastaman:
-
Only way I know is delete the two points and make 1 new one.
-
Yes, that’s quite annoying, but I just found a crude solution: split the line you want to delete by creating an extra point in the middle. Delete that new point and you have the line deleted. It’s pretty quick…
- To be able to weld we need to be able to select more than one microzsphere(mzs) so i dont found with shift or ctrl to do that, also as far as i know ZBrush dont have additive select tool that will resolve that issue, just speculating about it:D
2.-To delete connection-line without deleting the mzs is inserting one in the middle and deleting it!
Here is a gift
Let me know what you think
Andreseloy

Hehe, I was first! :lol: But: Andreseloy made a very handsome movie to elaborate. 
On plakkie’s request , a Zscript making a mask using topology on the demohead model.
Plakkie, back to my question about mirroring your retop, you say just use symmetry, would this work if you have a asymetrical model, for instance a humanoid with one arm incredibly larger than the other, you want the same type of geometry on both arms, even if you were to mirror the smaller arm, scale/inflate that copied arm and then use that project on it would be good.
i mean drawing the same top on both arms would be difficult. sorry if this does’nt make sense i just woke up.
Namek: Thanks for the ZScript, I’m making some space for it on the front page. 
Spaceboy: For an asymetrical body I think it would be best to draw without symmetry. I tried it out on a humanoid with one shorter arm, and I couldn’t get it done with symmetry on. Scaling and moving the topology of one arm after creating a mirrored topology is quite hard. It’s quicker to draw the second arm yourself. As the arm is different from the other arm, it could do with a different topology then the other arm. I guess no shortcuts here. 
Thanks Plakkie and Andreseloy, that’s the same like in Animation Masters.
The tutorial is complete, but a little too big to upload.
I will shrink it and post it in a few hours.
Be patient.
That front page is getting more extensive by the minute. Eagerly awaiting that tut.
Hi Grey,
hard to tell by looking at those images. [post #124] It could be that because some points aren’t connected yet the preview function gets confused.  Try following the tutorial anyway and connect the fingers and the hand; most of the time the preview get’s it right then.
If you still have troubles, upload your Ztool and I (or someone else) will look at it and see if the problem can be found. Don’t give up; all beginning is hard!
Hi all
Very helpful thread this. One thing I noticed is that to reselect a point from which to add new topology it seems better to shift click and not control click, as seems to be indicated at the beginning of the thread. I find that if I control click then I end up creating an unwanted mask. Maybe I’m missing something but this works better for me.
Alex
hi there,
indeed, same here i didnt try shift click, but theres an other alternative, mentionned in this thread : click anywhere on a free space in the canvas.
Here is the tutorial (my first in this forum )
Enjoy.:lol:
EDIT 21.5.07: Updated with new infos from Plakkies Main-Site regarding freehand-topology-commands.
EDIT 23.5.07: Last Update with all informations that fits within the 500 kb Upload-limit-border.
EDIT 26.5.07: Now again a very last update.
You find my Tutorials here:
http://www.zbrushcentral.com/zbc/showthread.php?p=360566#post360566
Hi Plakkie
Thanks for putting my tut on the front page. Although I spent a bit of time working on it, I wonder if it might actually be best if we remove it from the thread.
It’s not that it doesn’t work, but I think I have found a much easier way to achieve using the topology from an imported OBJ than the complex procedure outlined in that tut.
Essentially all one needs to do is follow the instructions on the front page of this thread under ‘Editing existing topology’ and simply import the OBJ into the clone and then proceed from there. That is, with the clone selected in the Tool palette, use the import button to import the OBJ you want to extract topology from.
It’s been a little while but if I recall correctly, this works because the imported OBJ inherits the size and position data of the tool (in this case, the clone) that it was imported into. This means that it is nicely laid over the high-resolution tool.