Hi,
I’m very pleased with the retopo feature. However:
When I import new basemesh from XSI with new nice set of UV’s to ZB3, seems I can transfer the sculpt but will loose both the UV’s, new and old and therefore the paintwork if done aswell. If it isn’t possible to keep the UV’s, is there a way to transfer the paintjob from old UV set that seems lost? Right now I’d like to transfer the new UV’s from other packages UV editors keep the paint or not, is it possible?
i posted this a while ago still looking answers:( :
Hi i’m a newbie to zbrush 3. I’m having huge problems when trying to emulate what Rimasson is doing at the top of this page
http://www.zbrush.info/docs/index.php/Tutorial:_Birth_2
i’m struggling to even articulate what the precise problem is, as sometimes i’m able to get the topology up and viewable (but not movable). MOst of the time it just doesnt work.
the flow of actions that is described doesn’t really make sense to me. I’m not sure if i should create a zsphere after i’ve hidden all the poly’s apart from the feet and hands. In addition when rimmason says clone your model i get really lost as to whether i should carry on using the cloned model or the original mesh at subdivision level 4.
thanks for your help, sorry if this sounds really nooby.
Allforcalisto, why not turn scripting on, and do what your doing, then save the script and upload it here. Then we’ll see exactly what you are doing and help.
nRatio, your in that place so many have been in over the years with zspheres. Although the current toolset is far more remarkable. If you follow the link in my signature below you might get some insight. We used to make a zsphere rig, then sculpt a character from the resulting mesh and if we did it right, you could pose the character. Now you can use any mesh and just insert the zsphere rig to pose your character and it works very well. Perhaps you also could show us what you are doing so we canhelp you with a zscript, it’s easy to use. It is usually on by default, when you get to a point, just go up under scripting an stop and save and upload.
The talented people on this thread will help you if you can communicate what is going on, as you are alone in front of your system… 
I wish we had metaballs. The self-intersecting sufaces that Zspheres can generate still suck.
hey jason i’ve been trying for about an hour now to see how i can record a script and i’m really lost. how do you turn scripting on?
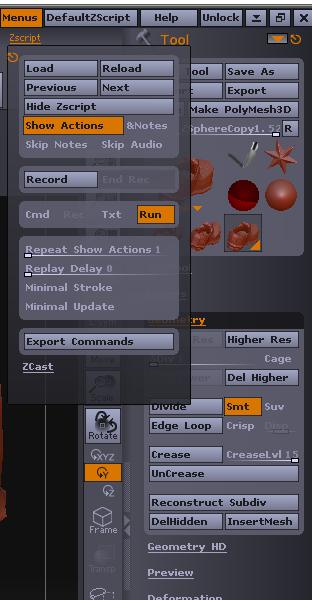
You should have a script(ing) menu in the upper right of your screen. I’m not near a system with ZBrush3 so I can’t post an image. It should be on by default recording your every move. Then just stop it at the appropriate time (click on the control under that menu like a dvd) and you will be prompted to save the script.
Perhaps someone else could post an screen grab…
as requested
Attachments
Thanks, I’m not trying to pose in zbrush I’d rather use other sowtwares for that. I try to form my questions more exact and provide the information you requested, while keeping it as simple as possible.
      <u>Question 1:</u>
      is it possible to import new basemesh with UV set from other softwares and use the imported UV for maps?

      <u>Question 2:</u>
      Is it possible to keep the original UV set when importing new basemesh to scutpted mesh?


      Example:

      Modled this simple shoe in xsi.

     [img]http://www.kolumbus.fi/noratio/zbcentral/shoe.png[/img]
     Wrapped 2 UV's for it, one lousy, other nicer one and saved them as separate objects.

#

Imported the lousy UV one to zb3 and roughly sculpted the surface.

      Next replaced the base mesh according to Dave Harringtons tutorial and manual and all the detailed tutorials I could find. [Zscript](http://www.kolumbus.fi/noratio/temp/RetopoNoUVInResult.TXT) of the retopo. Result looks like ought to, like was my previous try with more complicated mesh.
      [img]http://www.kolumbus.fi/noratio/zbcentral/NoUV.jpg[/img]
Unforunately no UV's whatsoever were transfered to the new adaptive skin. Just to make sure exported and checked the obj for UV's.i learned how to record the script here it is.
Still haven’t worked out rimmasson’s technique.
Here’s the text that i’m following in tutorial "
- Select a new ZSphere tool.
- Clone your model, and hide a part of the legs.
- Make sure that the subdiv level of the model is at 2
- Press CTRL and click on all the polygroups, one by one, to hide the whole body, except the fingers and toes. To spare time, we are going to keep this geometry and to use it as starting point for the final model.
- In the Tool:Rigging subpalette, select the whole model, and activate the Projection Mode, so that the model which will be generated is projected on the Template
- In the Tool:Topology subpalette, select the cloned model only fingers of which are visible.
- Enter the Edit Topology Mode
Attachments
A ZScriptRecordedSession.TXT (9.42 KB)
@ nRatio:
Question 1:
is it possible to import new basemesh with UV set from other softwares and use the imported UV for maps?
Yes, it is. 
But this only works when the imported version and the actual used version have exactly the same number of points and polys.
So you can do it like this:
Asuming you have a mesh with multiple subd-levels already highly detailed modeled and now you want to change your UV-set by having it created in another app (Maya, C4D etc.).
To do that, bring your mesh down to subd-level 1, export it as .obj, import it in the other app and make your new UV-Set. Save changed .obj and reimport it again into ZBrush while your original mesh is still in the subd-level 1.
Now the imported mesh with the new UV-Set replaces the former mesh and former UV-Set, but all your details, subd-levels and polypaining is still there also in this new UVed version.
Question 2:
Is it possible to keep the original UV set when importing new basemesh to scutpted mesh?
 Not quite sure if this works, haven’t tried this constellation so far, sorry.
Thank you very much Rastaman! It was too easy to describe. I couldn’t do it with the meshes I had exported from XSI, maybe there were modeling changes that caused point order to vary, who knows, should have been the same but crashed every time at import. However I exported back from zbrush, transfered UV’s and exported-imported along your advice, goes fine, nothing had to be redone.
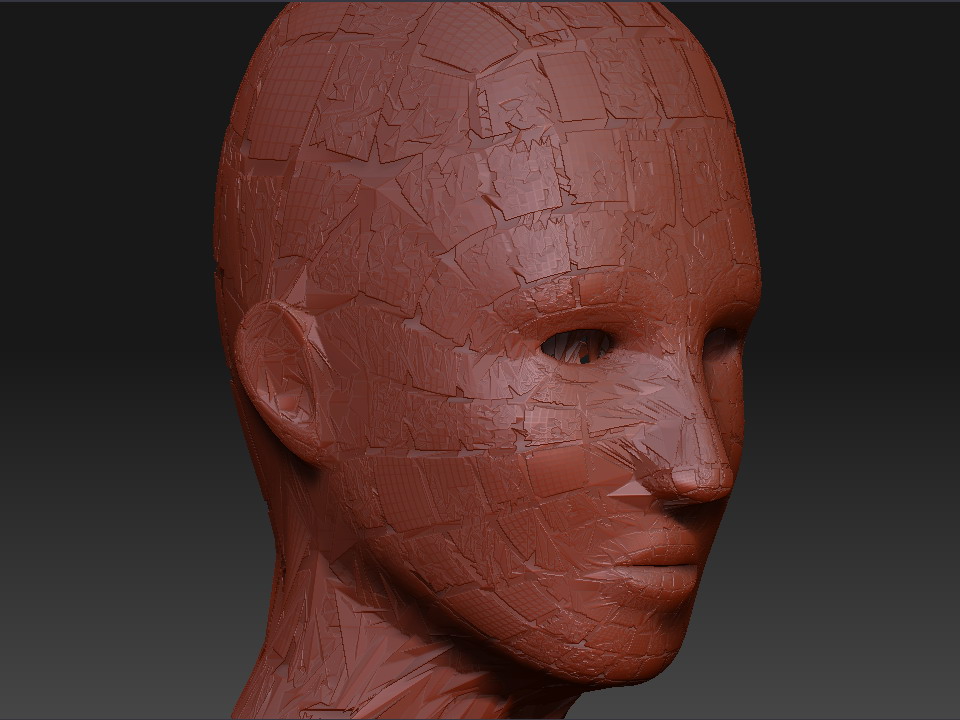
Rastaman: Hmmm doing it that way still doesn’t work for me. Here’s what I’ve done. Modeled a head in Max, brought it into Zbrush to sculpt. I then decided to alter the UVs and tried first to change the original Max file and import that but that turned into a huge mess. I then tried exporting the base level mesh from Zbrush, alter the UVs in Max, send it back to Zbrush… crash. Tried opening up the new mesh in Zbrush as a separate tool, exporting it as an .obj and then following your method… result is this:
[attach=64846]meshy.jpg[/attach]
Kinda cool but not quite what I wanted…
Attachments
Hmmm, I’m not quite sure what causes these problems, but I asume the problem lies within Max , XSI etc.
When I do what I described with C4d (Bodypaint), all works fine with no problems.
Maybe Max, XSi etc. add some more informations when they store an .obj-file and causes theses problems later in ZBrush  ?
?
Maybe you should check those export / import-settings for the wavefront-format both in ZBrush and Max, XSI etc.
That would appear to be a UV ‘filtering’ problem…
Did you export the base mesh from ZBrush and re-imort that one again; or re-import your original base mesh to re-instate your UVs?
EDIT: Did you Switch Morph Target at level 1 after import, but before bringing your newly imported mesh into the viewport ?
Just to avoid confusion, that is my middle name, with XSI it goes back and forth just like you described, like I wrote.
I don’t know what is problem in Shimakaze’s object but I counted 3 SDiv layers from the image he posted. I’d make sure he exported it at SDiv 1 to make UV’s in MAX.
Rastaman, check your private messages, there is something about the workflow you might be interested in.
4 subdivs actually. (well depends on if you call the base layer a “subdiv” I suppose) What I did exactly was this: Took the original Zbrushed model with 4 subdivs and made a morph target at the 4’th level. I then went to the base subdiv and exported it. I brought that into max and fixed the UVs without altering the mesh and exported it back out as a new obj file. I brought that obj file into Zbrush as a new tool, and exported it back out as obj without doing anything to it. I then opened up the original Zbrush model with the 4 subdivs, went down to the base subdiv and imported that obj file.
I tried doing it several ways at the end. First I just imported it directly into the first subdiv and went back to the 4’th and clicked switch. That just messed up the mesh completely. I tried deleting all but the base subdiv before importing and then subdividing it up and I got the result above. (also as I mentioned earlier taking the obj directly into the Zbrush model without loading it as a new tool first made the program crash)
Thanks to nRatio who gave me an important hint abaout a big fault I made in my tutorial: Easy Retopologising models preserving the fine-detail levels (by Rastaman).pdf
As you already might have noticed in the new tutorial-version, I changed the advice for the Rigging -> subdiv-Level-setting from 4 to 1.
[font=Verdana, sans-serif]The Topology -> subdiv-slider must be set to 1, then you will get the same subd-level-amount as what is set in the Adaptive-skin -> Density-slider-value, but only if there was no previous adaptive-skin-preview etc. with any higher setting of the subdiv-slider !
If there was, you have to exit the setup and rebuild it totally new.
So the very first thing you should do after loading both meshes in the rigging- and topology-slots is to set the topology -> subdiv-slider from 2 down to 1.
nRatio, thanks again.
Hey Guys, just wanted to drop by and say thanks! Rastaman and Cannedmushrooms were more than kind to give me further assistance.
My problem (post #490) was that the model was huge compared to the root zsphere. So the solution was to do unify (in the deformation palette) on the source model and the new topology seperately. To do so on the new topology you have to make an adaptive skin. Then pick up a zsphere and in Rigging choose the original and in topology the new adaptive skin. I had to go to -1 in the Projection strength (in the rigging palette) and then everything was heaven!
Just a small tip… when doing unify, you have to have in mind that (in my case) the new topology was smaller than the original because of the lack of hands and feet. So an easy solution was to retop a few poligons to match the height, the width and depth of the source model. 
I hope it helps anyone
Take care and carry on the good work
As you know, I’ve been designing miniatures in Zbrush, and then sending them off to be printed. I guess I got carried away, because the latest batch of figs resulted in a quote 3x the last batch! Mainly due to the number of polys! There is a limit to the amount of detailing a printer can render, and the fact I set these figs up in a classical 3D fashion didn’t help. IE, lots of small polys in the face, and larger ones in the torso. Of course, most of those teeny lil polys on the face and hands really can’t be rendered by the printer…
What to do!
Well, I started thinking. It would be handy if I could ‘slice’ a model up into the number of ‘layers’ the printer would actually print at. Then transfer the detail over. So that way, I’d have the ideal number of polys. Not too many or too few.
Voila! Unified skin! Of course, if you set any level on it ( Please fix this bug pixologic! ) you’ll get lil spikey bits! So set smooth to 0. Don’t worry, just lightly hit it with smooth brush when done generating it.
- Select model
- Set unified skin smoothness to 0.
Now here is the tricky part. How much do we need to ‘slice’ the model? Well, lets say your 3d printed can print 0.001" layers, and your model will be 1 inch tall when printed. We need 1000 layers then.
So set res to 1000, ere wait! Doesn’t go that high! So set it to 500.
Zbrush will find the model’s longest dimension in x/y/z, and slice the model into even cubes such that there are 500 in that direction.
Click on Make Unified Skin.
Well, we still need 1000 layers. No problem, divide the unified skin once. Then smack it lightly with the smooth brush. The resulting polys are now at the resolution level the printer can handle. No higher, no lower. You may want to divide again to 2X the number of layers the printer will print to ensure all the fine details can be captured. This has to do with how the polys will sample the surface, and how the printer will sample the polys to print the model. It also seems that Zproject works best with a denser mesh. You can always export your OBJ for STL conversion at a lower level anyways.
Then from there, follow Rastamans Z Project brush tutorial!
http://www.zbrushcentral.com/zbc/attachment.php?attachmentid=59217
Well, thin things like fingers are giving me fits. I hope Pixologic fixes this issue at some point, as it is very annoying.