Wow, thank you Plakkie, that cleared up a lot for me.
Can retopology be used to clean up strange artifacts in an imported OBJ?
Wow, thank you Plakkie, that cleared up a lot for me.
Can retopology be used to clean up strange artifacts in an imported OBJ?
I honoustly don’t know… Why don’t you try it out? 
Hi folks,
I just released a new tutorial about merging objects using topology.
You find it here:
http://www.zbrushcentral.com/zbc/showthread.php?t=47410
[attach=61006]Final.jpg[/attach]
BAM! Out of nowhere Rastaman congures another great tutorial! This will come in handy Ralf. I hope to put in on front page soon.  small_orange_diamond
@Yiannis: I retried the Retopo-Procedure of hands with my model Jana in a low-poly-status and it worked without problems.
Might be maybe caused where or in which application the base-mesh was originally created ? 
A possible solution might be exporting the low-level-poly to an application like C4D which is capable of turning all nornals in one common direction and then reimport it to ZB3 ?
@Rastaman : To add in your nice and clear tutorial that you can merge the 2 subtools, with the insert mesh, if they have the same subdivisions and you 'll have the new merged tool with all your details and subd’s
in case somebody doesn’t know
I just saw your reply because i was looking on your tutorial thread, I ll give it a try on my next retop on hands (soon)
all my models are zbrush zsheres-polymeshes, that means…
double post
As I understand it, it could be important to non-animators for a few reasons:
You start a head with a polysphere, but by the time you push in the eyes and pull out the eyelids, you’ve stretched the base polys so much that the resolution of the eyelids is one-quarter or less than the resolution of any other part of the face. (And it will be even worse if you try to pull down a neck from the base of the head to make a full ‘bust’.) This means to get the minimum acceptable resolution on the eyelids for your end-use, you have to subdivide one level higher (or more) than what would otherwise have been necessary, possibly putting the tool beyond the ability of your system to easily handle.
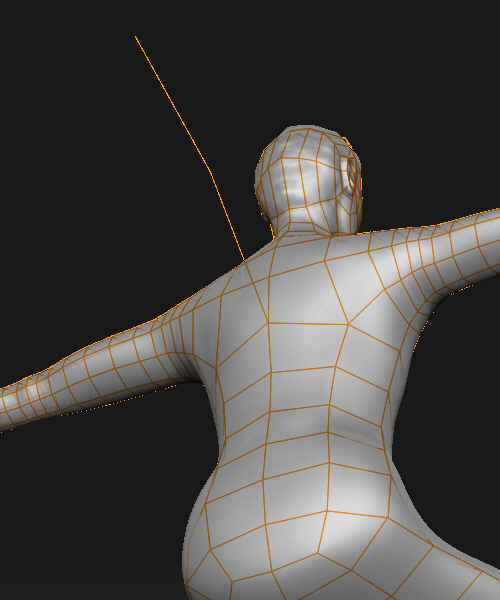
By retopologizing, you can get all the stretched polys back to a regular, uniform size and roughly square shapes. Now you can use poly-painting as a part of your texturing method and the texture won’t appear to be stretched in places.
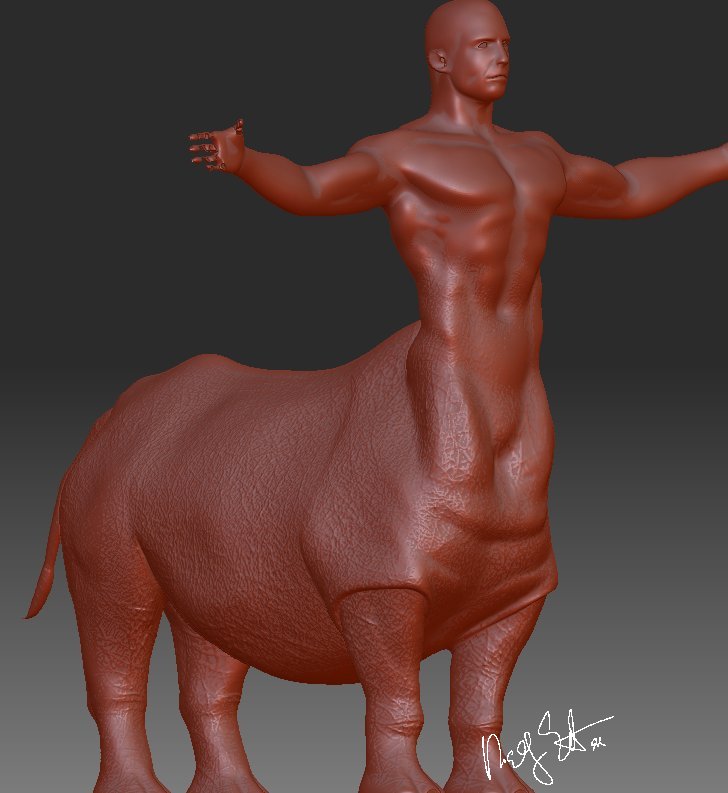
Another reason would be to stick the polysphere head you just modeled onto a torso (and then add that to something else like Rastaman has done with the Rhino-tuar above), and then retopologize the whole thing as one mesh, ZProject the details from the original meshes on to the new retopologized mesh, and end up with an easy to pose low-res mesh that has all the high-level detail from the multiple original meshes that you stuck together.
Hi there!
Ah, great! Thanks for the contribution Yiannis! small_orange_diamond
thank you… i could’ve used this trick last week!!! The only way I got it to work was to add a seam up each finger and toe.
Thanks that was helpful. We should have this in the Zbrush 3 manual.
i 'm glad that i helped!
@plakkie: this thread is great and i’m thanking you for this!
@kramskoi: i could have used the trick last week too;) but i did it the hard way once, i’m happy that i don’t have to do it again !
@xenosilence: i hope it doesn’t have to be in the manual! because it is a workaround and it shoudn’t be normally like this. It is always better to have the lowest poly you need for many reasons , even if it works great like this!
Id like to know if it is possible to use this to retopolize the mesh in parts then combine them all into one mesh… such as subtools… Let us say I rebuild the head and shoulders only, make the mesh for thet, then separately build the mesh for the clothes and then merge them when Im done into a single mesh (probably after colouring and texturing).
@XenoSilence: but you have all the infomation in this thread ,to be able to be sure, that what you want is possible or right .
you can check, if you didn’t already, rastaman’s tutorial in the previous page, on how to to merge two meshes into one, with retop tool.
Do you want to do the opposite? for example have a full body and then retopologize the arms, legs, torso and head seperately, and have them as seperate tools ,sculpt them and then merge them into one mesh? if this is the case you can also do that!
for the clothes i don’t suggest to merge them with yout body mesh. If the reason is to be able to transpose without loosing the position for the clothes it is still not a great idea,
remember the best way to extract clothes or anything is with the topology tool to have clean and low res geo.
texturing is best done after all these,
i hope i understood your question!
Thanks… It was the second one and the reason really is with the posing. The extracted subtools dont conform with the rest of the main mesh that is why I asked.
I could try using topology rigging to get all the subtools to move together right? Is binding everything (all subtools) to a single topology rigging skeleton possible?
Thanky you to all who contributed to this thread, I’ve learned so much so quickly.
I do have a technical problem, however:
[ ]
]
I can’t seem to delete these two stray micro-zspheres from the mesh. I’ve tried to delete even their parent spheres, but it won’t let me. I can delete spheres everywhere else, but it seems like ZB doesn’t wan’t these two shperes to go away. Has anyone else had this problem? and more importantly - how do I fix it?
It wouldn’t be the worst thing in the world if I had to go away from this with only the adaptive skin (which looks fine, oddly enough) but the Projection is all messed up.
i haven’t had time to read all the fun stuff but i get the same thing when trying to retopo.
i get rid of it by ctrl clicking to get a new point started then get some more going normally…then alt-click on that first sphere…of course i gotta ctrl click on the one it was attached to in the first place then create a new one blah blah blah…but it keeps me honest…if not loud. 
heheh nice job dude…i like this…but i donnt know mutch more about what is topology means?..in z2 i use to move mesh only to edit mesh …but know z3 add some topology…i must learn more…
when i re open a re-topology tool and go to add some more new polys they create but are invisible…so the tool is now unworkable…i’ve tried re opening the origional and using ‘select’ but nothing happens…i can move/delete points i have already and can SEE them but new ones are invisible…
seeing as there’s no help in the help system i’m a little bit annoyed…even bought the meats miere video on this but he made no mention of opening an old session to continue work…
my current thinking is reptopology sessions are one hit…you need to so ALL the work in one session or your stuffed!
any help email me!