I came across this must read thread on edge loops and poles while doing some further research.
excellent thread, DogBone…thanks for pointing it out.
I second Slosh. Thanks for the link dogbone. It really opened my eyes. I intend to evaluate all my meshes as a result.
It does however make me think… I really love this thread and I have started my own model based on everyones ideas… but after reading the thread from dogbone, is it even possible to create good “Face loops” or are we stuck with extrusion loops as a result of the limitations of ZB. That is to say, I do not know of anyway in ZB that you can minipulate the poles/edges as discussed in the thread. “Spin edge” for instance… can it be done? I have only had ZB for 6 months and I do not presume to know all the ins and outs of it, but it seems to me like that kind of control over edge flow and face loops is reserved for the highend apps like Maya etc…
Comments???
Thank you for the tutorial Handlebar. I have been struggling with edgeloops in the face for a long time but I think I get it now. Crits and Comments welcome.

thx 4 the information Dogbone, now i can explain the reason of 3d triangles more 2 myself and others.
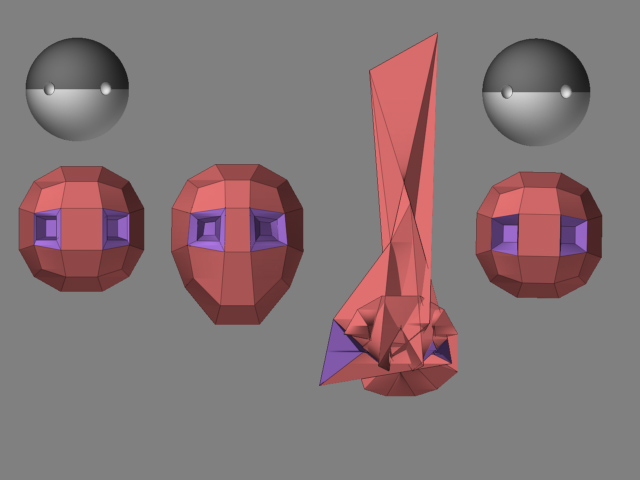
lets make a head with a south pole on top! 
greets joep.
Elixir
Zbrush demands a different way of thinking to the standard modeling apps that give you lots of options. I like to keep things simple, why have twenty functions to create a mesh when you can get very close to what you want with one. I can create a polygon in Maya and i can create a polygon in zbrush, how i manipulate these polygons comes down to practice and experience in both apps. Having a limited toolset isn’t a bad thing, and in the long run is a much faster way to work.
mnmava
Glad to help  my only crit, if you are after a realistic head model, is that the eyes are fractionaly too big, the edge flow seems fine to me though. Nice model.
Steve 8)
HandleBar,
Thanks for sharing. This is a good companion to Jason Belec’s ZSphere thread. Both are full of simple, direct information that clarify a difficult program in so many ways. Both are excellent instruction. How would you add a mouth cavity and throat to one of your heads? How would you use this topology approach to create a human body form?
~S.~
Hi SNARK
The principle behind making a mouth cavity is no different, you’re just pulling polygons inwards instead of outwards, there is also the function in the deformation pallet called offset. Just select the group of polygons you want to extrude inwards and set the offset slider to z and adjust the slider to suit. You can form the throat by adding extra loops to the back of the mouth and tweeking them into shape. As far as making a full body with this tecnique i would definately start off with a zsphere model and make cuts into the resulting polymesh with edgeloops.

Steve 8)
Hey handlebar thanks for the great tutorial. I had to watch that script a bunch of times to get it all of the steps. I applied it to a full figure made of zsphears, worked very well, I was worried I would get a bunch of funky polys where the head connects to the body, but I only got a couple at the base of the neck. Thanks again, that was a huge help and the figure is deforming quite nicely. 

Attachments

Looking good Harmonic, glad to help out.
Steve 8)
Hi, HandleBar.
Great thread. Thanks for your responses.
It had been awhile since I worked with zspheres but when I found your topology thread I thought I would work with them some more. Here is a picture of a problem I had and how I fixed it. I wondered if there were something I did wrong right at the beginning. Thoughts?
I started with Density and Ires set to ‘1’. When I got to the second stage image of the rough head shape, I tapped ‘A’ to adjust eye position then tapped ‘A’ again to preview the mesh and it came back like the distorted mesh in the third image. If I then went into the tool pallette and clicked on ‘Mc’ that distortion became corrected.
I created an Adaptive Skin instead of a PolyMesh 3D. Is this where I slipped? What is the difference?
Thanks!
~S.~
Attachments
Thanks handlebar! I am learning a lot from this thread, I started using Zbrush just a few days ago!
However, I can’t play your Zscript, I don’t know what could be wrong.
I am loving this method. It is very addictive. It is like trying to solve a puzzle.
Anyway here is my WIP of a base mesh that I am creating that will (I hope) be the base for all my models to come. My goal is to get good face loops with the 5 and 3 poles in areas that will not interfere with the subD, or at least put them in areas of natural creases etc…

Cool Elixir, looks like everyone has there own take on head topology, the’re all different in their construction which just goes to show that boxmodeling in zbrush is very versatile. Here’s my bace head as it stands now but i’m sure it will be refined more at a later stage.

Steve 8)
Handlebar,
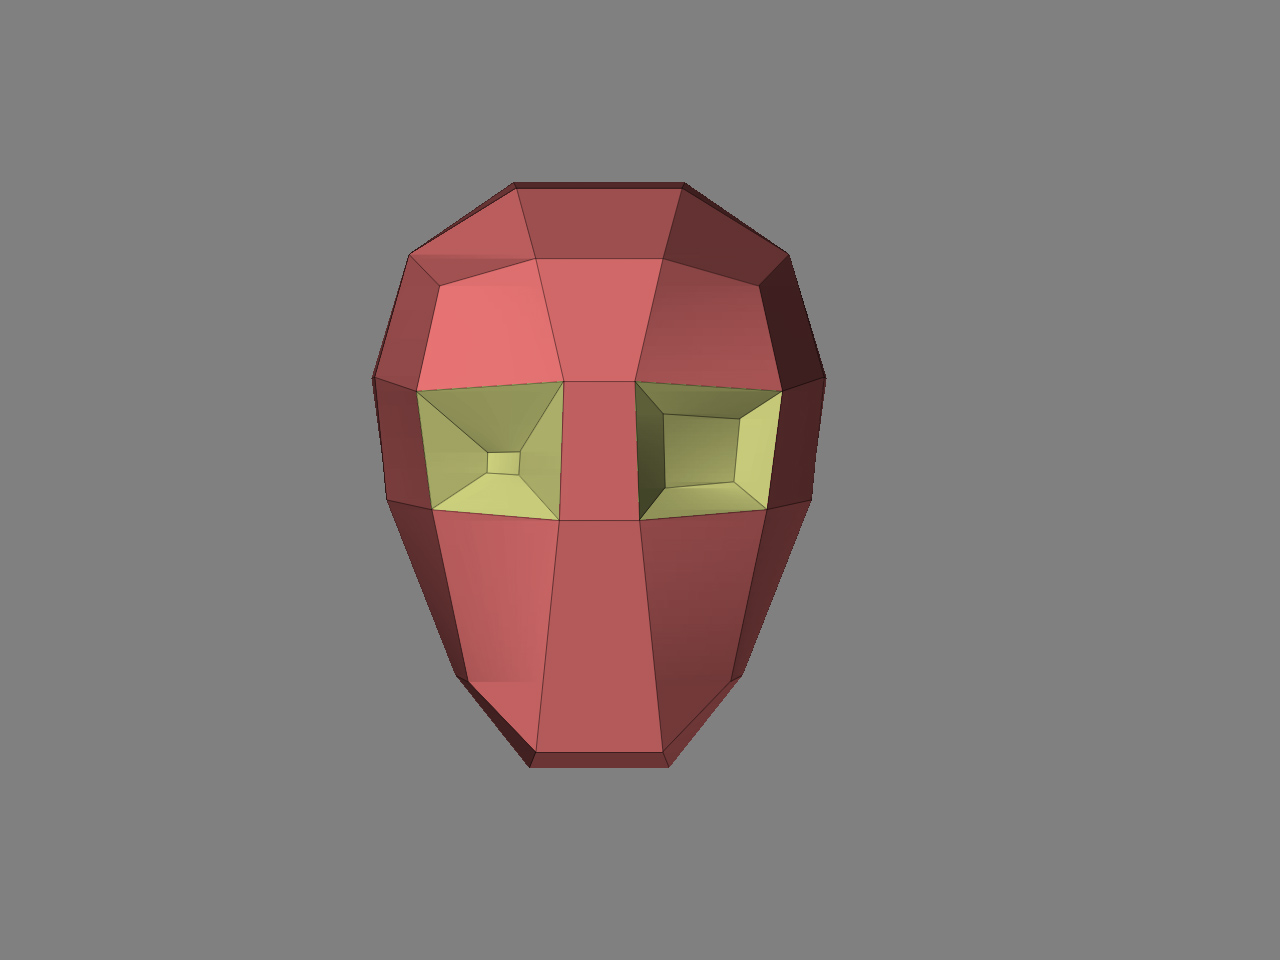
Thanks for the hard work. I like the approach and have no trouble with your process. However, I have bumped up against a program issue I hope you can help with. If you view my posted image you will see that the eye sockets (the yellowgreen polygroup) are not the same. Even though I have isolated the ‘X’ axis in the transform pallette, when I attempt to adjust the eye socket it does not update in a bilateral fashion. If I sculpt the head shape (the red shaded polygroup) the head shape does update bilaterally - the eye polygroup does not. What must I do so that all points update bilaterally?
Thanks!
~S.~
Attachments
Hi SNARK, sometimes zbrush looses symetry and can be fixed with the smart resym button in the tools/deformation pallete. If you have a complex model with many subdivision levels you need to mask out one half of the mesh and use smart resym for each level. Hope that helps.
Steve 8)
Hi, Handlebar.
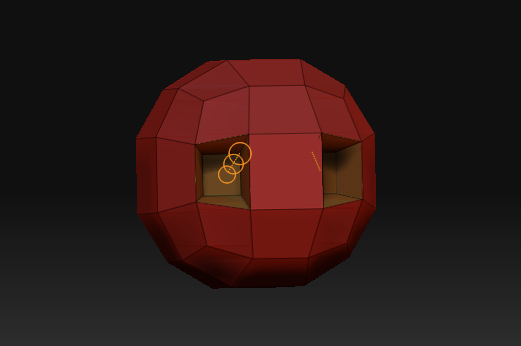
I have Z3 now and am trying to use this workflow to create head topology but it doesn’t work the same way as Z2. Have you played with this? When I draw a sphere and add the eyes then go to move vertices, I get three orange circles connected by a line and the Move function doesn’t work on the vertices. Any thoughts? Would it be possible for you to post a ZScript showing how to accomplish your workflow in Z3?
Thanks!
~S.~
Attachments
Hi Snark
The new tweak brush can be used to push vertices around. Use this instead of the move tool.
Alex
Thanks for the reply, Alex.
I have not had success with the tweak tool but I have had success with the draw tool. When I create a ZSphere head, convert it to polymesh and activate the move tool, the transpose icon appears. If I instead activate the draw tool I am able to manipulate the vertices the way I used to be able to manipulate vertices with the move tool. Is this intentional? Is this the new paradigm?
~S.~
What is it that doesn’t work for you? I’ve found that it works nearly identically to the ZB2 “move” function.
Only thing is occasionally it doesn’t appear to select vertices when trying to only move 1 at a time… but I’ve discovered that changing your brush size (usually to something larger than 5) and/or rotating the viewport slightly will fix this.
Otherwise, tweak is essentially the old move tool.