Awesome render and sculpture! his shaders rock
ages ago a tibetan monk turned to bronze in the middle of a thought.
love it 
Hello michalis,
Wow. This is wonderful.
Love the mood, gesture and the composition – the isolated, compact simplicity of figure and seat.
…very gratifying for me to see GroBoto play a role in this work.
Best Wishes,
Darrel
A great homage to the beauty of ancient works!
Thank you for showing it to us!
Thanks SD. I used no reference for this, as you use to say “from my own”
SuperHer0, eduardoflores, thank you,
Darrel, its so difficult for me to explain how a specific topology can be an inspiration, I altered most of it in the end. But this armchair, more work is needed, but its a groboto-mesh and took 3 min just for masking-magnifying and some alphas here and there.
Julian, your material rocks, even modified. A monk? With some touches, a dish with food, a lamp in background and tv reflections… These Tibetan Monks are transformable :lol: My mother, here we’re. This zb thing is a dark application.
Michalis lol…I still say it, but not in this forum:D Using one’s own,… It’s the best method to keep the old imagination alive, kicking, and strong… Copying has it’s place, is very dangerous, should be used in moderation , and should only be used as a learning aid, which leads to using your own imagination…
Kind of like a crutch is used until you are able to walk on your own:D Use it too long and too often, and you will remain crippled, alongside of your own imagination:D Dare to make mistakes, and in the process their will be fewer as time goes on.
Keep Inspired and Inspiring Michalis 
An artist walking on his own, I don’t believe so, you didn’t mean this, I know, but I really understand the deeper meaning. We have to be brave in art, even if we lost the opportunity to be brave in our lives as well. Occasionally we may stayed bravely but time passes. Not an optimist you could say.
Another view.

Love the shader mate! the sculpture looks great as well ,
Keep up the great work bro:eek:
http://www.zbrushcentral.com/showthread.php?p=774018#post774018
http://minastris.cgsociety.org/gallery
Also available on freelance
No,…Stay brave until you drop,…If it doesn’t kill you, it will make you stronger…
Like that three quarter back view…nice shot of the hand,wrist and forarm…
OK, thanks SD.
I’m posting this groboto based fast sculpting just because I thought it was going well but I lost it, my fault. I reopened the file to add some nice teeth and this is only I have now, some teeth. These ‘save as’… sometimes :lol:


Attachments


Hi michalis,
Very nice…
Technical stuff yo describe is interesting, but what I like most is the palette, the persona, and that Old Masters feel you capture so well.
Best Wishes,
Darrel
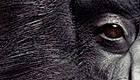
Hi Michali, nice chimp and nice hair.
Spectacular!
Thanks darrel, I forgot to mention that even this portrait started in groboto, even I retopo it in 3dcoat in the end.
@nassosa, This is the missing link between the chimpanzee, the babouin, my uncle and the new prime minister of greece, wait some months and see if I’m right. :lol:
@eduardoflores, thank you.
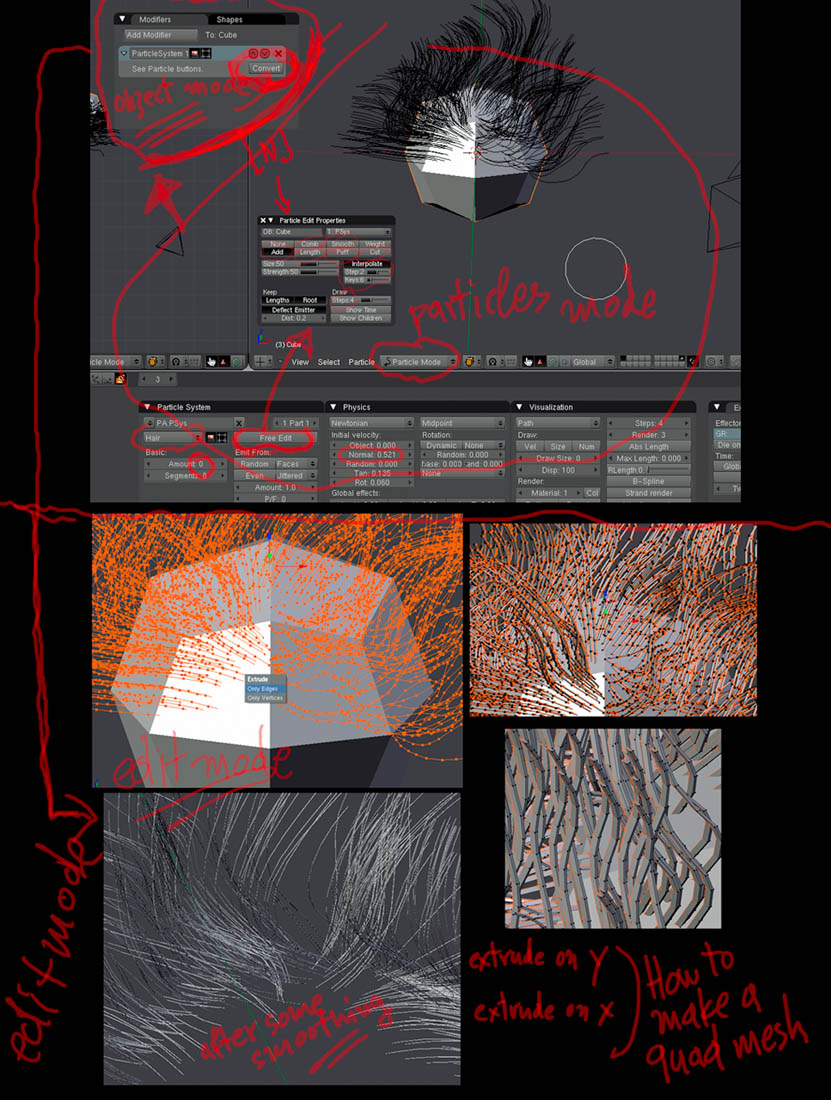
Here a simple zb tool if you like to have some fun. Copy it a few times, cut parts. Use the smoothing and move brushes.
http://www.mediafire.com/file/nprleurro2mbjnw/HairTestingBlender.ZTL.zip
Looks great. Which blender version did you use? I tried to export a (hair) particle mesh to ZBrush some time ago, and it wouldn’t show up because the export was kind of buggy and only exported splines and not a quad mesh.
thanks chris
here’s how in blender 2.49b (the best IMO), in bl 2.5.x particles are even easier but almost the same method. Its the exports I don’t trust there. Keep a 2.49b always (my swiss army knife)
As you can see, particles are just paths and the renderer will use a primitive profile to do the job. What we want to do is to extrude these paths on x and then on y to create a quad mesh. A 1 sec job.
When you have finished with particles mode jump to object mode and see that the particles modifier now has a button to convert them to paths. After conversion jump to edit mode.
So lets do this.
A 200-300 K final mesh is OK, you’ll duplicate it 2-3 times in zbrush and use smooth brush, move, mirror etc.
[attach=238880]blenderTut.jpg[/attach]
Attachments
Thanks a lot, michalis.
I tried it with version 2.5 (a couple of months ago) and like you said, the exporters can be a bit problematic (the API is kind of a moving target for the developers of plugins, because it still changes constantly). Your tutorial encourages me to retry it with version 2.49b.
I tested it on blender 2.56, exporting 200k particles worked fine. But 2.49b can handle heavy meshes in edit mode better. Just have in mind when extruding to have normals outside. If ‘recalculate normals outisde’ is what you have in mind, this will crash 2.5.6 probably. 2.49 works though LOL.
If you do not mind some constructive crit. As I myselt recently have found out study anatomy, details and textures as if it is a religion.
The refine your sculpting in zbrush step by step.
Good Luck!!!small_orange_diamondsmall_orange_diamondsmall_orange_diamondsmall_orange_diamond