ZBrushCentral

Stylized bust

fantastic work! really inspiring stuff, makes me want to open zbrush despite looming deadlines… :slight_smile:

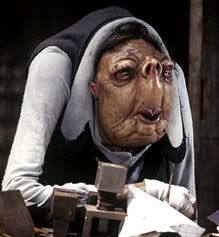
just watched the hitchhikers guide to the galaxy, your design reminded me of the vogons, which the ‘making of’ explains were based on the work of james gillray. Found a few images:

http://www.scifimoviepage.com/upcoming/photos/hitch-vogons3.jpg

http://img.photobucket.com/albums/v472/matt_sweet/vogons2.jpg

http://www.canmag.com/images/front/movies2005b/hitchhike19.jpg

james gillray:

http://www.greatcaricatures.com/articles_galleries/gillray/galleries/html/1787_0529_monstrous.html

http://www.greatcaricatures.com/articles_galleries/gillray/galleries/html/1791_1220_excr.html

http://www.greatcaricatures.com/articles_galleries/gillray/galleries/html/1793_0603_progress.html

Here’s what the Guide has to say about Vogons:
Vogons are one of the best subject you can base an artwork on to join
LudikaStyle’s DNA Pan-Galactic Challenge on ZBC :slight_smile:
see my signature for the link.
Hope you’ll all produce some artwork for it !
(this post is not spam :D:D:D)

Hi Scott,

I´m currently investigating into recreating topolgy automatically,
especially from triangulated 3D scan data. Here´s an info link to
a software called geomagic shape:

http://www.geomagic.com/products/shape/

Automatically creates NURBS patches from 3D scan data, allows
for refinement of the resulting layout and exports to various formats.

Would be cool to try to convert the NURBS back to Quad Polygons,
to have a clean basemesh ready to slap Normalmaps/Displacement on…

Awaiting a call from the distributor/our contractor that just lately
provided a neat scan for our university:

http://www.rsi.gmbh.de/shape_e.htm

Cheers

tim

Belseth - thank you! I’ll continue to post updates.

Mestela - I hadn’t seen the Vogons from the movie - makes me want to go back and make this guy even more grotesque! Thanks for the links.

Ludikastyle - I’ll check out your challenge.

TIm Leydecker - Cool software - thanks for the link. Yeah, it would be interesting if it generated poly data as well.

Thanks guys!

Scott

Just an incremental update - more detail in the skin. Has anyone figured out a good way or rule of thumb to avoid the artifacts you get texuring surfaces with alphas in Projection master??

ScottfatHead_wip_dec_12.jpg

Lovely work man. They all got nice character to them, very expressive. I can really see them all beefore in some kind of scene, like a play of some sort…

Keep’em coming:)

Hey Scott he’s really coming along nicely!! Can’t wait to see him colored up.

for pm and alphas…i like to have max on, rf at about 7-15 depending on alpha, and use focal shift and alpha curve to hide edges…takes a bit of playing to find the right combo for an alpha but generally you can find a base mix that works for the majority. alpha curve and focal shift really are your best friends here.

my other rule of thumb is …specially using directional brush is to never use zsub instead I inverse the alpha…this seems to help alot as zsub tends to show edges no matter what I do on certain alphas.

I also tend to take a look at my alphas in ps with a white layer underneath and the alpha’s opacity around 50% this allows me to see any funkiness going on in the blacks that I probably don’t want.

That’s all I can think of at the moment. Hope something there can help ya out.

Hi,

Thanks MrLearner!

Aminuts - thats all good info, thanks! I specifically meant the artifacts you get with overlapping surfaces - the stalagmites you might get inside the nose or behind the ear, etc… once you exit projection master and change your view. I’ve been tring to hide overlapping parts of the model and only work on surfaces that are directly facing the camera, but I stil am getting the stalagmites occasionaly. I’ve been smoothing them out as I find them, but it’s problematic.

Scott

![projMasterWoes.jpg|758x579](upload://koVHMrpO9clpMsUWabSl6PLRjxi.jpeg)

while staying away from edges you might try it with normalized turned off. or if you have it off turn it on. Also hide select just what you want to work on.

I pretty much do the above and can’t remember the last time I had some geometry deform that wasn’t intended.

if you do get em …yeah it’s a pain in the arse to smooth em out and the best way is to go down a few levels and start smoothing there and work your way up.

also if you do get em…undo…when ya pick up from pm take a spin around the model…don’t do anything else and if something shows up undo and start over.

if you don’t have a morph target stored for your first level then store one before pm this way if need be you can use morph brushes to restore that area alone and might be faster for you than smooth.

Ok - thanks! good info again. I have normalize off (I think just because one of the training DVDs says to, I never tried it on), I’ll try it on & see what happens.

Didnt know about the morph target/brush thing - thanks a lot for that tidbit!

Am in incorrect in my obvservation that masking areas doesn’t have any effect in PM?

Thanks man!

I’ve had these same issues and I have to say I’d love to see a much stronger smoothing tool. It’s a real pain having to go back three or four subdivisions then work your way back up. Since you are basically painting a displacement map there has got to be a way of removing all displacement info from those polygons without having to go back to the morph target. It’d be great if say when you held down on the CTL key in erase mode it did an earse all.

I agree - the smooth tool is really slow when you get up in the millions of polys range.

Another good thing might be if they added functionality to the resurfacing tools coming in 2.5 - like in addition to being able to use zshperes to trace & create new geometry, you could alternately use them to define polygroups. I’d like to be able to isolate the nostril interior and the inner eyes so I could hide them & avoid this issue, but its not that easy to do right now in ZB (a lasso tool would be cool - am I missing that? is it there already??) Using zspheres to define borders could make isolating irregularly shapped areas as polygroups easier. Of course, I could shoot the model at sub-d level 1 back into maya, build additional uv groups & merge it back in to ZB.

S-

The lack of other selection options has always been an issue for me. Not sure if this would help your situation but one obvious option that would be nice is allowing you to keep a selection that was made in a lower subdivision. Basically take it back to a 1 sub then deselect the interior nose polygons then go back to 6 or 8 sub. Also being able to select Polygons one at a time would be huge as well. Right now it’s kind of the shotgun approach to selection. I’ve also requested mirrored selection which I think they are considering. Sometimes it’s a raging pain to get both sides mirrored so a change on one side is consistent with the other. I lost symetry a lot early on because of this. It’s not whether something can or can’t be done in Zbrush but the workflow sucks. I just started using Modo recently. I swear it’s the God of all interfaces. I had a working knowledge of it in 24 hours and I was doing fun complex models in five minutes. When I tried doing my first serious model with it I kept laughing out loud because things that were slow and clunky to do in Lightwave were a breeze in Modo. I think Modo for traditional modeling and Zbrush for high detail displacement models is a great combination. If you haven’t tried it check out the Demo. It’s a 30 day full license. The final license is open so you can install it on multiple machines.

Scott,

you have some powerful tools in masking. Mask the areas you would like to hide at various times, invert and save out the alpha…makealpha button in masking menu. now at anytime you can call up that alpha and use hidept in masking menu. Or make life a bit easier and use Aurick’s Select-it plugin.

you are correct that masking and doing deformations in pm is not always precise. specially if the masked parts are not 100%. I usually find it better to just hide anything I don’t want deformed in current situation.

Heythis is looking really awesome…
I did some daumier type character’s too…I’ll show them if I ever get around to finishing anything I start… :roll_eyes:

I hate those stalagtites…I hate the overspill while painting textures too…especially when it accidentally spills over onto something you really spent sometime on.
They should make a feature that prevent you from overpainting on the edge…
that would b nice…

-tiktok

Thanks aminuts - I’ll dig deeper into the masking options. This project has been a great ZB learning effort for me.

Thanks tiktok! I saw your character with the cap (“interesting character” thread) - great work!

Scott

Morph brushes! What a cool idea! I must check those out…
Thanks Aminuts!

Yeah, thanks aminuts. Those are some great tips.

When it comes to the smooth tool dont neglect the modifier curve for the smooth brush under Transform. You can up its power substantially there.

Also, when in the million+ poly range and trying to correct a spike use the blur brush in PM. It smooths geometry when in ZAdd mode and is MUCH faster than the smoothing brush.

S

Wow! I just tried the morph brush - that’s great! Thanks for that aminuts. Makes me wonder how much good stuff is sitting there in the interface that I’m just not seeing yet… :lol:

Cool info Scott - thanks (as always).:sunglasses:

S-