ZBrushCentral

Sketchbook - Mine.

jmeyer - I hadn’t thought of using a curve brush. That would be a good way to start leaves but I definitely find myself wishing for some way to curl and bend objects after placing them, often just tips and pieces of geometry here and there.

blueferret - I was tempted to texture it for about ten minutes before I started. The correct way to model a flower is to do it with planes not sculpted petals as I did. That allows you to bring out the SSS and other delicate touches that are really important to getting nice looking flowers. Being a sculptural person, I chose to keep the heavier impression rather than risk awkwardness by mixing contrasting elements. I also rushed this at the last minute and didn’t quite have time to try it. Nice alien flowers in your thread too!

Thanks!

Made another set of lips. I had wanted to go with some thinner lips for a change but I also wanted to challenge myself rather than doing more of the same.

The hardest part was trying to find a decent place to end the mesh. It might have been hard to appreciate the density of details if I had cut out early like the last mouths and I originally had planned to skip the nose. The face seemed more flat than usual and, with all the layers of deeply chiseled wrinkles, it was difficult to tell exactly where the cheeks rested. The depth probably is pretty weak on this one but the detailing and layout is much better. The lips were also tough because the lower lip doesn’t really have a well defined border.

Here’s the reference I used for these lips.

benMiller_Lips_C.jpg
benMiller_Lips_viewRender.jpg

1 Like

Were the teeth on middle lip sculpt a separate subtool? Very cool studies! I love the wrinkled sculpt. cheers.

They were part of the same subtool. It wasn’t the right way to go about it, especially since I only dynameshed a few times but it wasn’t that big of an obstacle. One thing I really had trouble with on that one, though, was sculpting in the back side of the lips which are barely visible from most other angles.

Normally for a quick set of choppers I’d put a quick cylinder in there, line it up, and then have at it. It’s usually really easy to get basic teeth like that.

Cool. Thanks for answering the question it helps me picture the process you used a little better. I’ve done some mouth/nose sculpts recently and these are kind of the look i’d like to hit with them. My sculpting is still pretty rough though in comparison :wink:

For some reason, I refused to post my last few projects because they weren’t as done as I wanted them. I’ve since changed my mind and realized the folly of my ways. Here are the presentable things I’ve been working on and my reasons for making them.

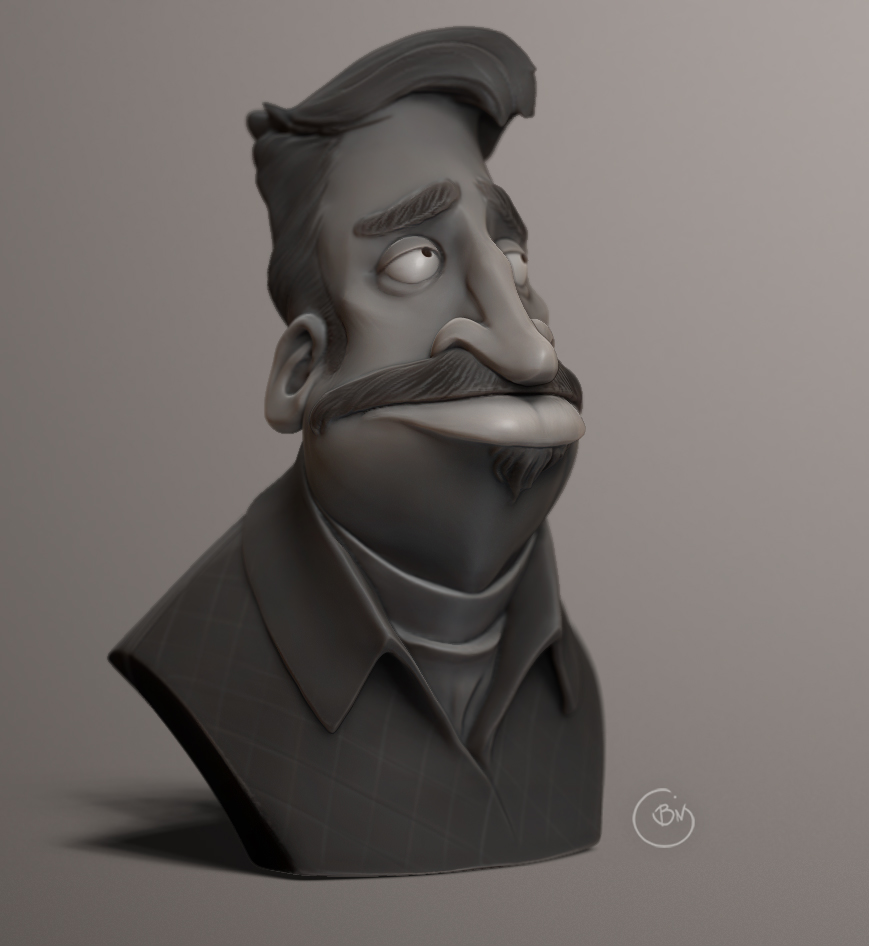
First, here is a fairly quick sculpt (by my standards unfortunately) of a character that I happened to be looking at around the time when I had a sudden urge to work from someone else’s concepts art.
This is based on Mike Clarida’s concept sketch, posted to his coroflot portfolio.
*The difficult part: Adapting those sharp edged cheekbones to three dimensions. Each side was different and I wanted a neutral character, not a pose. I went with significantly reduced cheekbones.
*The easy part: It was incredibly easy to draw out the proportions. There are some basic things I missed, but with stylized characters you can pull in ten different directions and get a unique character each time.
bM_MclaridaConceptSculpt.jpgViews.jpg

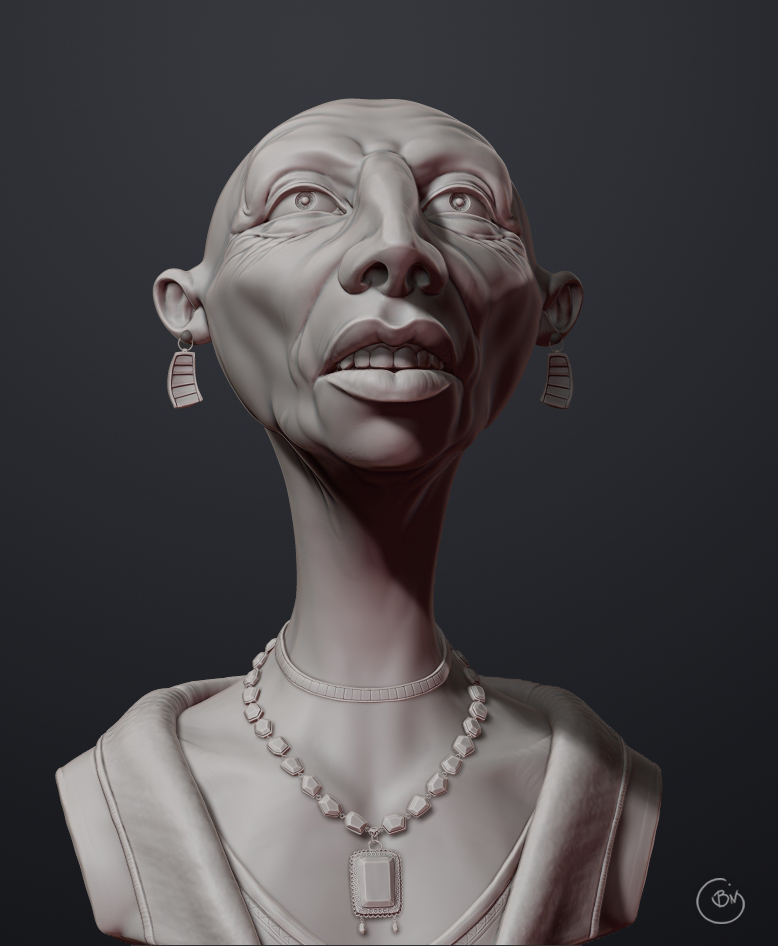
Next, this is a character bust I sculpted from scratch. The only thing I had in mind when I started was a big, long nose. The whole upward looking face thing softened the expression I was going for and the earrings were what defined the character to me. I really wanted to add hair but I couldn’t think straight and ran out of time (ie. I did some of that sleep stuff).
*The difficult part: I approached the necklace wrong and it ends up clashing too much for my tastes. I created four or five random blocky shapes, gave them each bases, and manually spaced them out and connected them. In zbrush. This is something you should do either in maya or with a more interesting workflow in zbrush, something involving randomly chosen chain links on an insert mesh brush or on a micro mesh (if that’s possible) would be ideal.
*The easy part: Facial details are getting a bit easier. I didn’t necessarily think through all the wrinkles and folds, but I seem to be better at placing them in ways that seem, at a glance, to be reasonable.
bM_bustStretched.jpg

I have this obsession with understanding an abstract factor that passes through my mind when I see certain sculptures. I call it “bigness”. When I sculpt, I often have a mental block that prevents me from seeing an object as “massive” in the sense that I could zoom in and perfect the volumes on many many levels. The sensation is particularly acute when I encounter extremely fluidly sculpted anatomy or anything else that seems so natural and appropriate that my eyes will double take. It’s like an inverted uncanny valley.
Anyway, I realized that this feeling comes from properly balanced weights and naturally defined volumes. I set out to make a character with good balance and more presence than I usually create. I referred to the save file as a “dumpling” because I intended to make a series of similarly shaped creatures.
*The difficult part: I actually design the character second and the body or face first. It makes things both easy and hard. It’s easy because I can put a hat on it and suddenly it has a personality. It’s hard because I’m starting from one giant puzzle piece and trying to fit it into a mosaic. I added the horns and beard because they were quick and easy and seemed to fit the strange anatomy.
*The easy part: I’ve gotten better at creating a certain unfinished look to my strokes that temporarily puts my perfectionism on hold. Seeing smooth surfaces always makes me thing of maya’s smooth preview. Seeing intentional, directional strokes across forms instead shows me the thought that went into that for. Chaotic strokes and smooth surfaces, at this stage, only indicate that I didn’t understand that part well enough.
*The part that needs more work part: The lack of pose is the biggest downside. It’s hard to notice any quality to the flowing fat rolls when they’re symmetrical like they are. I did some goofiness with the legs too, designing them more like an animal’s hind legs with little to no lower legs at first. I had to modify it to include more human anatomy and did some major changes to the feet to make them match the structure more. I wanted to smooth out and cover those muscles a bit but I need them to be apparent before I pose it so I can understand the pose easier.


I drew some sketches of where to take my “dumpling”. The simplest way to describe it is to say that he’ll have a large leather pouch filled with seeds at his hip, spilling over and growing as they reach the ground. He’s reaching in for a big handful of them and several of them are clearly stuck in his beard and around his cheeks. Passive earthy type.

Finally, here is a quick nose anatomy study. The nose was from an anatomy book I have sitting on my desk (by Valerie Winslow). I didn’t take the time to render it nicely but it worked nicely.
*The difficult part: Sculpting just a fragment of a skull without having the whole thing made for reference. Definitely start from a basic proportional sculpt next time.

I spent a few days trying to make a zscript to automate quick sketch sessions (to set up a few fifteen minute sketches in a row, for example). I figure if a robot tells me what to do, I might actually do it for once. I got 90% of the way to a basic functioning code and then ran into a fundamental limitation in the coding language (apparently). I’ll have to rewrite it to remove the automation. Later, of course.

These are lovely !!!:+1:small_orange_diamond:+1:

I’m making a sculpture for a friend of mine that requires a horse and a dog. I really wanted to get some of the anatomy right and put it off for quite a long time.

It needs to be done very soon, so my random studies are about as far as they can get for the moment on it. My horse is pretty much ready to pose, at which point I will use countless reference images to add the correct tensions and details and the more dynamic hair. I retopoed it so I can pose him easily. Before I started, I went all out on a skull and pelvis sculpt so I could understand the most complex forms of the body. The pelvis in particular is really difficult to visualize without having the whole thing right in front of you (which I have now!).

The horse is supposed to be a draft horse. I particularly like the Percheron and Shire horses. I use both the Ellenberger and Goldfinger anatomy books as well as many photo references. I specifically used Ellenberger’s horse measurements for Shire horses (only because I knew they were reasonably scaled draft horses). It will probably have even more muscle mass when I detail and exaggerate it a bit more. It took awhile to get the face looking right attached to the neck.

The legs are just volumes until I pose them. The tail, mane, and hair around the hoofs will come later. The muscles I went over and emphasized so I remember them when I pose it.

bM_horseProgress01.jpg


I’d be grateful for any critiques on anything with these as I am really interested in learning and doing them right. Oh, and the horse will need to be 3d printed eventually so any practical advice on that would be nice (printing in casted metal through shapeways).


Here’s the lower topology in case anyone knows better ways to approach it. A few extra loops for the joints and skin between the legs, otherwise fairly straightforward.

Nice work. There’s a setting to Enable variable PolyFrame visibility. What level is that and how many levels do you have. What’s the points count? I don’t see a way to rate this thread(used to be able to), It’s 5 stars in my book.

great start on the horse. i think the head is too big, even for a shire horse. the sculped skull is great!

A small update on my progress. Started with the dog mannequin and built out to make and pose the horse and dog for my scene. I’m only using them to develop the pose, not to actually control the geometry. At this point I was mainly considering which positions to hold the legs and the twisting and balancing of weights in their forms. After posing a basic frame, I dragged out some of the major muscle boundaries to represent the stretching of muscles between bones.

I wanted to really try to understand some of the smaller details with the pose, like knowing which scapula is higher (a lifted leg hangs from the torso and the torso hangs from a weight-bearing leg), how much bend might be expected in those buried upper arm and upper leg bones, and how far under or away from the horse’s center of gravity to angle the legs to create the right impression of speed. The horse barely lifts its legs off the ground, enabling it to hold itself lower and to allow for a slower but still playful gait. The dog is lifting and pulling with its neck and exaggerates its steps to imitate the horse (both are taking alternate steps with their front feet raised). The horse does lean in towards the center a little bit to give the impression that the horse is still moving quickly, almost as if lunging around the dog which is moving more slowly and consciously.

The neck position is probably the hardest thing for me, especially with zspheres. Necks don’t seem to bend too far out of their way and horses tip their noses down to look out from the side of their heads to see behind them (eyes on the side of the head). Most of that pivot is probably going to happen at the start and end of the neck, so I’ll have to play with it to find something that seems to work best.

The overall feel I want is to contrast the gentle giant of a horse against the proud yet small dog. Any suggestions on how to emphasize that even more (either in the pose or details) would be helpful.

Is there any way to control zspheres so that you can create mannequin style connections (which has solid cylinders, weird tapered bits, and chunkier end pieces)? I can alt-click the connections to turn them into normal zsphere connections but it doesn’t reverse. I saved out a minimized mannequin so I could build from that if I wanted too.

DougJones – I had the polyframe displaying the first subdivision level out of six (divided it early so I’d have the levels when it comes time to pose on a layer). For the render I turned polyframe on and then increased to the max subdivision level so it would display the wireframe smoothly. The lowest subdivision level has 1,917 active points. I keep the visibility and saturation controls for polyframe up on the top of my interface so I can mess with them from time to time. Don’t know what I had them set to.

your question how to get zphere look like manequin,: get your zsphere construct, select the zsphere you want replace , activate “classic skinning” in the “unified skin” panel. click insert “local mesh” and select the polymesh you want insert for the zsphere. if you want replace the connector, then click “insert connector mesh” instead and choose your polymesh that you want see instead of the connector.

Here’s a quick progress render of my horse. Being my first real animal study, the final surface is a result of my studies of the muscles and volumes and skin and sculpting techniques. I’ll get better at understanding how muscles actually fill space and how skin actually covers them as I do this more. I like to take my random sculpts and break them down after-the-fact to see why they worked or didn’t work.
The hardest part of the horse so far has been the hair. I’m better at choosing appealing patterns from random strokes than I am at designing a random pattern and then constructing it.

More to come soon. As always, critiques and suggestions are welcome.

Beautiful job!

that’s a sweet looking horse!

Nice and balanced pose. Really good job on the sculpting. I would make the eyes bigger.

For the horse, walking is a gait with three legs always on the ground. Unless it’s a trot but then the legs need to be raised a little more if it’s jumping in place or a little more spread if it’s going fast. Google it.
Very good looking horse, BTW.

I love it. You just to make the eyes a little bit bigger.

Very nice sculpt! I like the pose.