ZBrushCentral

Simple Question - Setup UV or Not ?

Hello everybody,

I just wonder about something basic and hope you may help me understand it better.

I wonder when you Created your Model (in Maya) and move it into ZBrush to start sculpt/texture it…
Before you move your model from MAYA into ZBrush - DO YOU SETUP THE UV Mapping of your model in maya and ONLY THEN move it inside ZBrush to get best results and smooth blending textures while working ?

thank you guys ! :wink:

when I first started using zbrush I would just automap in maya then zbrush the model… or I would AUV tile in Z and my workflow was ok but not very versatile. Since I started using UV groups to seperate my model I have started laying out UVs in Maya. Sometimes I still just select the faces I want to be able to seperate and do an automatic mapping on them as opposed to a tedious UV layout.

Really it dosent matter, you can detail and paint your model on any UV se you want then lay them out by hand later and import the OBJ with the desired UV set at level 1 and go from there.

Thats just how I work.

WoW !
I just downloaded your amazing Video Tutorial that explains the process of maya > ZB2 > Maya… and I think I’ll finally gonna understand it ! (hope so)

Scott - Thanks for the Quick Answer, My Goal is to create a character for Animating later inside Maya, so I believe what you just explained by “groups” is like… if I have to seperate the Teeth from the Head skin, and nails, or any other Diffrent material of the specific character… Since I’m only now learning UV inside maya (won’t take long hehe… I know the basics allready, just practicing). so you actually do the Seperate groups INSIDE MAYA …I hope I’m not wrong in this one: by creating diffrent Shaders to the single character ? (for a general example - Head = Blinn, Teeth = Blinn2, Nails = Blinn3… etc) <-- Is that the idea of grouping the materials, or I’m totaly wrong in my guess ?

thank you so much for creating this amazing Video Tutorial, and for your help Scott !

:small_orange_diamond: I’m sorry about my bad English… :warning: vbmenu_register(“postmenu_207795”, true);

Hey kayoto,

Cool I hope the video helps. Take a look at the thread for the video too as it has a lot of good tips as well.

As for seperating into UV groups you select the UV islands/shells for the objects you want to be able to isolate in zbrush (in the UV texture editor, that is) What you need to do is take those shells and place them outside the default 0 to1 UV space. The way to fo this is select the UVs from that shell and in the commmand line enter the mel
polyEditUV -u 0 -v 1
This will shif tthe shall one region in V (up) you can change the number for the U direction as well.

So if you have UVs on your character for the nails and then for the hand select the nails and shift them into another quadrant. Export the OBJ and import it into Zbrush. Go to tools>polygroups>UV Groups make sure you are in frame mode and your different UV sets will be color coded and you can selectively hide them and even extract maps per body part.

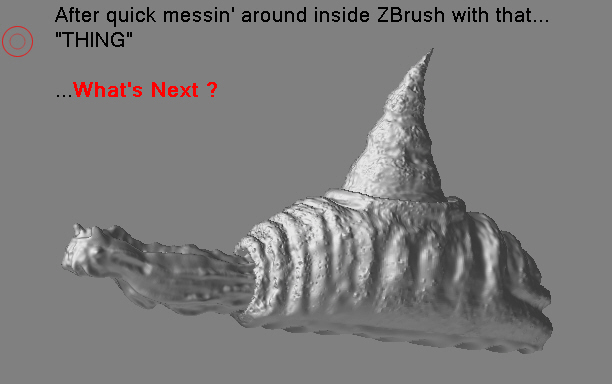
It’s exactly what I’m trying now inside maya… selecting the UV’s and setting in 0 to 1 region inside that texture editor.
but I didn’t know about that command it’s cool ! thanks !

:large_orange_diamond: 
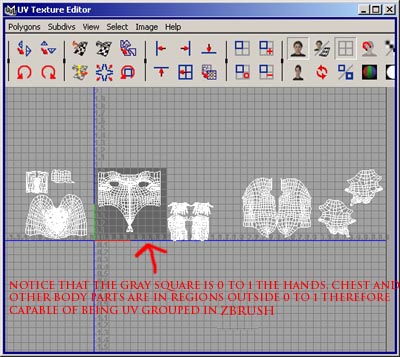
what if I do the UV mapping 0 to 1 manually - any risks for later work in ZB2 ?

:large_orange_diamond: also, from what I understand after I have those many groups of UV (each group is different shader - Am I right ?) …wil be able to sculpt/texture without damage the other materials ? so it will be easier to manipulate in ZB2 stuff like head and Horns 2 diffrenet materials and textures without damage each other ?

:large_orange_diamond: I hope I understand the basics… still not sure if I understand that each GROUP you said is different Shader Just like the example I gave, Blinn, Blinn2, Blinn3… etc is that how it works ? or it’s all in once Shader ?

:large_orange_diamond: Also, when saving the model inside maya (.obj) and open import inside ZB2 it will reconize the diffrent shaders ? (groups) I created in Maya ? …

Sorry for those billion of questions Scott, but I just hope I got the general Idea I will sure go and try it, also I will check the thread of your amazing Video Tutorial for sure !

BTW - Your works are amazing ! …Must say you inspired me a lot !!! thanks ! :+1:

No worries on the questions, we might want to move this to the questions and troubleshooting forum tho since this is the main forum : )

The shader assignment doesn’t mater. What is important is that the parts of your mesh you want to modify have their UVs in seperate regions in the UV texture editor. They are placed by the mel command above. When you export the OBJ and import it into zbrush Zbrush will see where the UV shells lie (0 to 1 1 to 2 2 to 3) lie and seperate the mesh into selectable regions based on that layout. Zbrush ignores any material settings on the obj file.

Here is a sceenshot of a mesh with seperate UV regions in the maya UV texture editor:
settings1.jpg

Attachments

settings2.jpg

This is great Scott !
Now that I saw your example everything is much more clear to me !!!
I gotta try it out right away !!! I think I will just make a simple low poly “thing” (not even character) and try to use that Mel command and test it in ZB2… if I’ll get stuck in some level I will ask, but for now I should try those basics…

This is just gettin more clear to me, now I will try and make some… thing… with at least 2 seprate UV groups, and then I will try to import into ZB2.

:small_orange_diamond: THANKS Again, Again and AGAIN !!! :+1:

Since UV setup isn’t a very short process (I rather spend the time on ZB2 sculpting and texturing… but who’s not ? hehehe)
So… Is it NOT RECOMMANDED to not MOVE with Maya Model into ZB2 without UV Setup it in Maya first ? I mean… What if my model is finished, and I didn’t setup the UV’s of the model… any problems will appear later on ?

Hmm… hard for me to explain what I mean… but I’ll try:

Is there a SHORTCUT of spending hours on sew UV’s in maya… to get a way to start sculpt and texture in ZB2 then get the texture back to my Model ?
or SETUP the UV’s is most recommanded to get NO ERRORS or something later on ? any recommanded from your own workflow ? how do you guys work ? …You’re setup the UV’s in MAYA and ONLY THEN move into ZB2 ? (I mean for animation goals, not stills)

Please tell me how you guys work… it may open my eyes to learn new techniques… thank you all !!!

:qu: :qu: :qu:

If you’re looking for the simplest way to create your UV’s so that you can spend the most time texturing and stuff, then AUVTiles or GUVTiles sounds like the way to go. Import your model into ZBrush, create a blank texture for it (usually 1024x1024, 2048x2048 or 4096x4096, but any power of 2 will work), and then press Tool>Texture>GUVTiles or AUVTiles. Your model is now mapped and ready to go. Export the model so that you can take its mapping back into Maya, and then subdivide it and begin your texturing and high resolution sculpting.

I just hope it won’t have any Stiches or Glitches when texturing/rendering in some specific parts… is it a RISK to use AUVTiles or GUVTiles ? any chance to get some problems while working ?

Just wonder, since I must get the most SAFE way UV to get the best Textures/Sculpt ressults without any problems later, that’s why I’m asking.

I would recommend you do a quick test by uving a guv in zb then import to maya…you will probably have to flip it vertically but you will see if maya can deal with it. if so…

you bet your but guv or auv tiles are the best way to uv…with one exception…You are going to have to texture in zbrush (don’t know if any of the other 3d texture programs like the uvtiles or not) because they are impossible to do post work on in Photoshop or the like…You will see why when you do your first texture.

I love em in zbrush but if I wanna do post work in another app I pull my hair out.

Otherwise, you will need to learn how to uv in another app. Uvmapper makes it pretty easy as you can create groups with your model in zb that you would like mapped separately then use the select by groups in uvmapper and map each group seperately if ya wanted to.

but yeah…with zbrush guv auv mapping is a no brainer…easy …no problems, very little distortion way to go.

Yeah… that’s exactly what I ment, I remember long time ago when trying to use Auv/Guv (about a year ago… or something) and started to draw (texture) over it inside ZB2… and I had some distortions that killed me ! I didn’t know how to figure it out… and it appear in weird places… so that’s the thing I’m afraid of… I’m actually learning this days how to Setup UV inside Maya itself (that’s where I’m going to Model the basic models anyway) …and it is not hard or something it is just a very long process comparing to few clicks of creating Auv/Guvtiles.

But as Scott and you guys recommanded, the Group thing sound very cool since ZB2 support it in a way (I need to see to understand, so I will test it asap I think) and it may be very easy to work with later.

thanks again :+1:

OK… as I said before I’ll test this Maya > ZB2 > Maya + UV setup as Scott explains in his amzing Video Tutorial !

Starting within maya:
snl01.jpg

OK… now before I get back to Maya… I got lost in ZB… how to save the map… displacement… whatever… …I’m confused… any Movie for that !? LOL ! …I’m kidding that’s the confusion I got lost… :qu: :qu: :qu:

Attachments

snl02.jpg

snl03.jpg

I don’t really understand the concept of putting UV coordinates outside of the 0-1 box. As far as I understand it, the texture maps get tiles so that if your object is in 1-2 space, it’s really just overlapping the object in 0-1 space. Perhaps if you arrange your uv islands in such a way that stacking up every “square” of UV space still does not create overlap of the islands then it would work.

Anyway, the reason I am replying is because I’d like to point out something that seems to have been neglected…

It’s not necessary to have UV maps for your object before you use ZB on it. This also means that you can change your UV setup without re-doing all the ZB sculpting. All you have to do is re-import the obj with new UV coords at subdiv level 1, and the disp map will be calculated based on the new UV coords.

Right on! Thats a really good point! One of the best things about zbrush too is that you can sculpt away while you wait for UVs to be finished : )

About the UV regions: Seperate UV regions allow you to generate maps at 4k per region so the head, body, and legs could each get a high res map instead of a single map for the whole body. It also allows you to easily hide and show parts of the mesh without masking them out. VERY nice when dealing with horns or teeth.

The maps would need to be applied in maya using UV groups or some other means of seperating the maps in your software of choice.

It is a extra step but it makes life SOOOO much easier inside zbrush since you can easily hide portions of the mesh as well as the aformentioned ability to generate much higher resolution maps.

I dont think I understand what you mean about the overlapping UVs? I know zbrush hates them and will usually crash if it comes across them. Are you refering to the way the UVs are handled in maya?

kayoto vbmenu_register(“postmenu_208062”, true); : The next step is to make your dispalcement map. Have you checked the Practical Manual yet? You might want to look over it since the steps are explained in more detail there but in a nutshell go to tools>displacement and create the map while at level 1. If you want seperate maps hide the portions of the mesh you dont want before you generate. Since you are a new user I think one map would be fine. I didnt mean to overcomplicate the steps for you I got off on a tangent : )
You are almost there tho, just extract that map and take it to Photoshop!

The map will be in the alpha pallatte when its done. Flip it in V and export.

Scott

stuh505 - The reason I setup the UVs over Maya is because long time ago when I used ZBrush I remember used AUV/GUV tiles, and ALWAYS no matter what I had distortions over my Models, that made me go crazy ! If I only knew how to create AUV/GUV without getting distortions, it would save me a lot of time because I don’t really like Setup UVs manually… I think it’s a waste of time (while I can enjoy the Sculpting and Texturing).

Scott - Yeah, I did read the manual but because of my Bad English I stop read it becase I got lost in some stages and I notice that when I watch Video Tutorials (like your amazing Video for example) it make me understand in a flash ! since I SEE the steps, and it’s fun and easy as ONE ! So again Thank you so much for made that video !
I will try the steps you just said, it sound like I’m really near to the end since from the Photoshop point I can follow your movie again and get the results, But I asked it because I didn’t know how to create a displacement map for photoshop, when I downloaded the PIXOLOGIC head it was ready, I only tweak it to RGB and flip V… so I didn’t know how they created the map… anyway I’ll give it a try ! THANKS !

I think I made a mistake, As you can see on the pictures above, the Model I export from maya smoothed …maybe I shouldn’t smooth it since I go to ZBrush I divide it. this is a VERY basic 2 minutes model, what if I’ll work on a REAL model ? …so Should I export from maya the very NOT SMOOTH object ?
just wondering…
I know that in this “THING” model case, it’s not really matter since it’s very light model, But I want to know the workflow you guys would use.

:+1:

I would reccomend exporting the unsmoothed geometry for use in Zbrush. When you are back in Maya you can smooth it if you need to but sometimes it can slow down the render at higher settings. Use it only as needed.

I am not sure wy the tiles would distort for you, are you sure you flipped your map? AUV tiles are supposed to have very little distortion at all. I have not had bad experiences with AUV tiles but I dont like not being able to “read” the maps by sight. Like I reccomended in the very first post you can just use automapping in Maya if you dont want to lay out UVS by hand. : ) I hate doing that too so I understand : )
Then if you later decide to use other UVs you can always go back and reimport the model at subdiv level 1.

Good luck : )

Scott

If you are working with a pipeline whereby others will take the mesh from you and paint textures on it, attributes map etc. you may want to make sure your UVs are going to keep everyone happy… make a good unfolded UV layout of your model.
Rather than rely on any kind of automatic mapping (which usually produces lots of shells and UV borders) in Maya or zBrush there are some great tools and scripts around that will allow you to create an optimal UV layout with minimum texture borders before importing.

On the other hand, you could always create multiple UV sets in Maya (eg one for zBrush in 0 > 1 > 2 > … space , and then one for the riggers/textureres to use in 0 > 1 space and switch to whichever one you need to use in the shader) and that way have the best of both worlds

I want to model+rigg in maya and sculpt+texture inside ZBrush, but my goal isn’t STILLS… it’s Animation, that’s why I asked all those weird questions, thank you for help me out in this.

:small_orange_diamond: OFF-TOPIC QUESTION:small_orange_diamond:warning:
I’m modeling using Polygons (starting from Cube most of the case) and my question is, should I try stick to 4 edges faces ? (try not to make 3 edges ?
will it be much more “flowwing” when it comes to UVs and RIGGING+ ANIMATION later on ? …do you recommand me try stick to 4 edges faces ? or it doesn’t really matters ?

…just wondering that’s all

Thanks again ! :slight_smile:

zBrush will work best if your model is all quads (as in 4 edges per-face) and try to keep the general density of your model the same across the topology