Just had my first try on the new mesh. Worked really well. http://www.flickr.com/photos/bottlebird/5217418575/ Thats my first Textured mesh. I used the uv master for the first time.It took a little figuring out i was hoping i could take the polypainted parts of the shoe i had, and have them appear by magic on the flattened uv.Maybe theres no way of doing that. I just polypainted on the new combined uv verion of the shoe. A little extra secret bonus of this plugin is the files open in Photoshop extended in 3d. As time passes im using photoshop less and less as i keep finding out zb does all that stuff
Great looking shoes! Polypaint isn’t UV dependant so if you didn’t clear out the polypaint information I would think you could to apply it to the new uv’d version. After creating the UVs, hit the “new from polypaint” button in the Texture Map sub palette of the tools palette and the polypaint information should transfer to a texture with the uv layout… Worth making a copy and experimenting. I’m not experienced enough to know what happens to polypaint if you merge subtools. I’m not sure that’s what you meant.
I made a pair of sheepskin boots, pants, tank top and sweater so far, all mapped out via retop in Zbrush, successfully rigged and UV’d in blender and textured in Zbrush. I had some problems with crashing after some painfully detailed texturing via spotlight so I declared myself a Blender enthusiast and ignored Zbrush until I got over myself.
I’m planning to tackle a pair of rigged thigh high boots next, right after I finish texturing my sculpted bengal kitty. (Am I having fun and neglecting my RL?..yes, yes and er …yes.)
Hey thanks for the response ill give that a go today. Re crashing the only problems iv had with that is on a very high poly model when all the ram gets used up and it freezes to disc swap, windows 7 does the prog isnt responding thing, if u wait it out it comes back to life.U can crank up the amount of ram in preferences-memory-compact memory but it u use it all it will freeze up anyways I think cos hard drives are slow in comparison…
hello Nancy,
how do i rig my mesh for second life
you don’t with Zbrush, not with a skeleton that will work in SL. You will have to look into a program like blender for that. There are tutorials floating around, I’d suggest you start at machinimatrix.com
Hi soulo, I had an enforced break here while I waited for Dell to replace my failed video card and screen, so I apologize for a delay in answering.
Iridescence is 100% correct. You need a full animation capable program like Blender (cough…cough FREE!..cough…cough) or those other $$ guys (maya, etc.) to rig your mesh.
The first video of the machinimatrix mesh series was sufficient to teach me to rig the avatar. And from that site you can download a copy of the avatar and its bones. (It took a lot of experimenting in Blender to shrink it to a teeny tiny size and scale it to a giant - painful yet fun.)
You need to stick to the default avatar bones without adding or removing any, however you can scale bones to fit your mesh, just don’t change the “hip” location. Check out the Second Life Mesh forums. I think Gaia Clary (machinimatrix.com author) has a beta tutorial of some length that she posted for feedback with plans to refine it and turn it into a video. I read it and it’s an excellent start.
Thank you, Nancy you have been a great help
Thanks Iridescense
Hi Marcus and thread gang…
I am going to sound like a noob as I have been using Zbrush 3.1 and the Zsculpty plugin for 3.1 to make my SL sculpties and I have learned enough about this environment to let me create my sculpty maps with ease.
Now, I got version 4 and I installed the plugin you offered at the beginning of this thread and I can see the plugin in the Zplugin tab.
But, when I load up one of my old 3.1 create ZTL tools into Zbrush4, it all looks fine on screen but I get one error after the other in trying to create a sculpt map from it. I read this thread. I tried a couple things lke executing the UV Master on it. And I am as close as now being able to create the sculpt map before it comes back and says:
MESH IS NOT SUITABL FOR SCULPTY MAP, OPERATION ABORTED.
In as much noob language as someone can speak, how do I convert my old 3.1 save ZTL files to a manner than lets me use the new plugin?
Or, is it just too complex to be worth converting them?
Thanks in advance if someone has explained the steps to convert old ZTL files to V4 and this new plugin.
PS… the past zsculpty plugin was a godsend.
Hi Toysoldier, something to try until Marcus chimes in (I no longer have an activated version of 3.1 or 3.5 to try this in advance so you’ll have to do the experiment):
-
Import the sculpty from the previous version of Zbrush. Go into the UV subpalette of the Tools palette and delete the UVs. Drop the tool back into the palette by turning off the edit button.
-
Set up up the primitive type you used for the item you are bringing in to version 4, for example a sphere. Make it a sculpty polymesh via the button from the plug-in and go into UV Master to copy the UVs.
-
Re-load the sculpty (now without UVs) from your current tool palette. Go into UV master and PASTE the uv’s you copied into this tool.
Proceed with making the sculpty map using Marcus’ plug-in.
Please report back to let us all know if this worked. If so it might be useful for others.
If it doesn’t work then the only other workaround I know of is to shrink down the UVs (reduce down to about 99.95 % uniformally - just a tiny bit) using another 3d program, such as Blender or Modo and reimport the item back into Zbrush then try out the plug-in with the externally revised UVs to make the sculpty map.
I had a moment to dig up some old tools from prior versions of zbrush to check out my previous suggestion. It worked in 2 out of 3 cases. Not sure why this workaround failed in one case. Be sure to back up anything you play around with!
Hi ToysoldierThor,
Nancyan’s method should work but there is a simpler way:
- Open the ZTL in ZBrush 4.
- Press the ZSculpty Tools> Scale UVs button.
- Export the sculpty using ZSculpty Tools> Export Sculpty map.
(You will get the ‘Mesh not suitable…’ message when the UVs are wrong for sculpty map generation.)
Hi guys,
I’m a newb myself. I just started using Second Life a bit, and I want to make my own anthro(furry) avatar, I love the amount of detail those guys put into them.
I’m creating a personalized fox avatar, and I’m having difficulty preparing the head for my model for use with the plug-in. I guess that’s because I started using Zbrush right away and made a Zsphere-made sculpted model of a fox head. I wanted to import it to SL and see how it looked so I found your plug-in.
Is there anyway to get my current Ztool-fox head made from Zpheres to be accepted by this plugin? It comes up with the obvious error; not a primitive, and if I try the other thing (UV scaling), it says not a polymesh.
Any tips would be wonderful. I read the whole thread to see if anyone was in my same boat.
One approach is to convert your zsphere object to a polymesh and append a proper sculpty polymesh sphere as a subtool. Line up the sphere’s poles where it’s least noticable and then “Project all”. I have included a pic of what I’m describing using the head of the ZBrush Dog model (I hid the body and then deleted it in the geometry panel, selecting “fill holes”…not sure if the fill hole part is necessary).
You will be limited as to detail when you transfer to the sculpt mesh. this is natural in a sculpty so if you have a highly detailed mesh to transfer and hope to get all the detail of an entire head into one sculpty primitive you will be disappointed. You’d have convert that detail into a texture ( and/or use multiple sculpties to build up geometric detail.
Edited to point out that the projected copy is on the left and the original is on the right, although that’s fairly obvious :lol: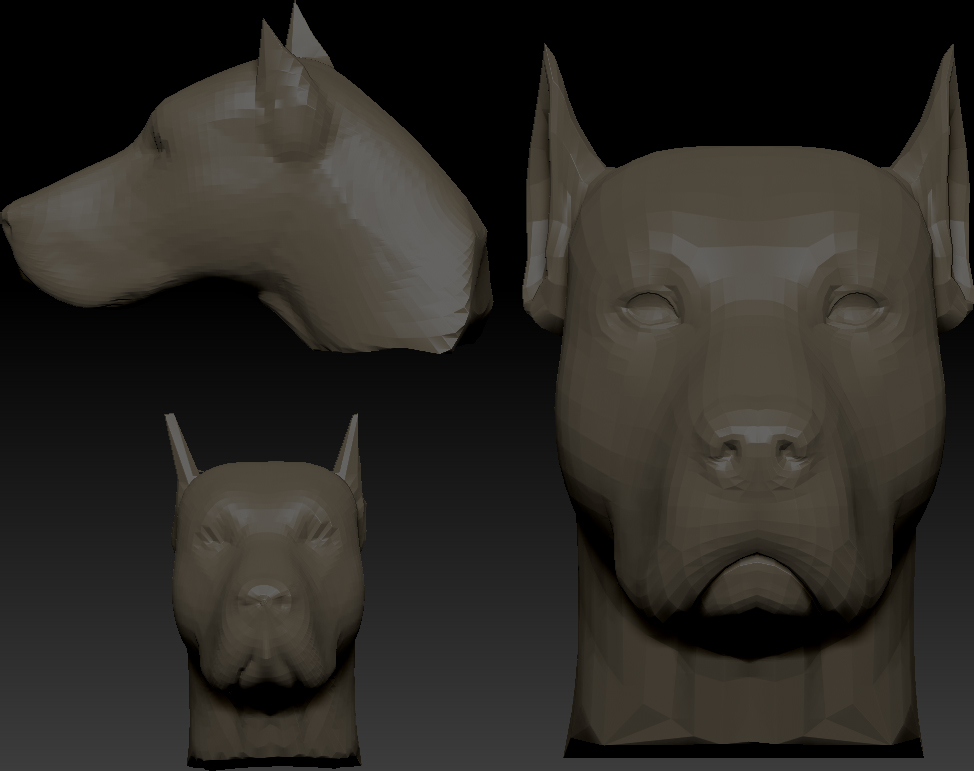
hello Nancy,
I was wondering if you could tell me the steps to polypainting the sl male grouped .ztl mesh and export the texture for use in secondlife…
soulo that’s a tall order, and not one I’m best qualified for. If you have specific questions about the process perhaps I, and others can be of assistance. I’m not at a professional level in either modeling or texturing and having attempted a few SL skins I greatly admire and respect the work I see by some of the better known SL skin artists.
There are a few versions of the SL avatar, some optimized for working in Zbrush and perhaps thats what you are referring to. I forget where I got a copy, but I will say that my copy of the male model isn’t quite right in the polygroup divisions. There are polys in the bottom group that belong in the top on my copy, so to begin with that needs to be straightened out. If you have been having problems in this area and would like help let me know. I’ll include a picture of what I mean. Its creates a problem with splitting the mesh properly for texture export as I describe below.
To begin with you need to create polygroups by going to the polygroup sub palette and selecting “autogroups with UV”. The sl male grouped ztl which I think you are referring to, is almost properly divided, with the exception of a few polys assigned to the wrong part. If you are using a different version of the model which you imported as an obj file, you may find after pressing “autogroup with UV” your model splits into many groups, but they are easy to group together into the three main groups that coorespond to the models UVs.
You paint on the unsplit model so you can cross over UV boarders. After painting the whole model you can then split the mesh into subtools by using the “group split” option in the subtool menu. Then you can select each subtool and select “New from Polypaint” and you will get individual UV images for the head, top and bottom (and not the top, bottom and head all overlaying each other as you would with an undivided mesh).
Clone your textures, flip them vertically and export them to photoshop to refine them, or as bmp images to test out in SL.
The really great skins are worked on in great detail with many layers in photoshop. Seams are also an issue so you need to paint a bit outside of the uv islands to overcome this…that needs to be done in a program like photoshop, although there may be features within zbrush I’m not remembering that take care of the seam issue.
Possibly I confused rather than clarified here. Its a time consuming process with alot of steps, but other then the artistic skill part it’s not too dificult.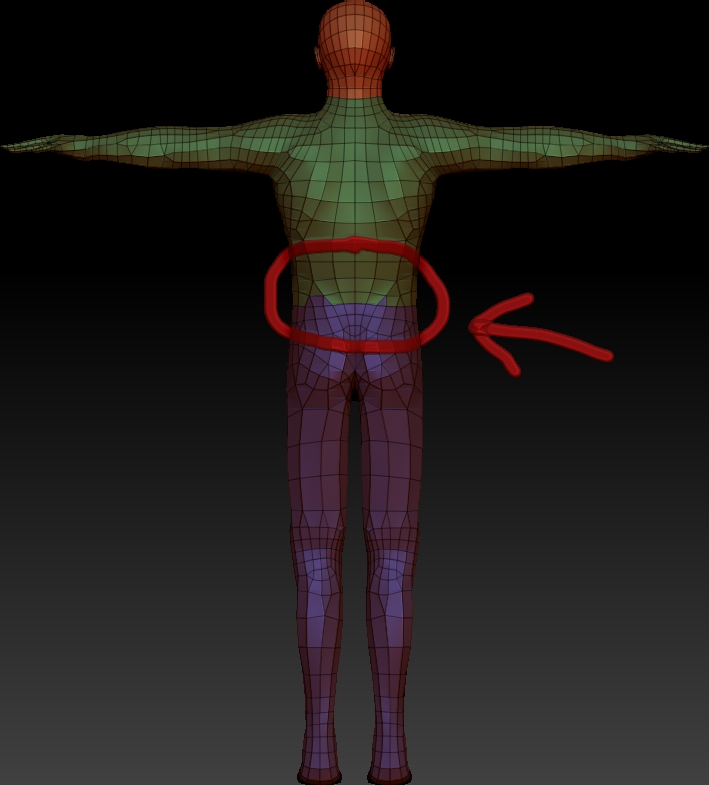
Thanks Nancy and Marcus for the help! Yes Marcus, your idea did work and it was quick and simple! 
Thank you nancy…fortunatly i have one of the better sl meshes, your efforts still managed to enlighten me in more then one way in your response…cheers 
hello nancy,
I was hoping you could explain how to get a displacement map made, and uploaded to secondlife. Do i have to choose between a texture or a displacement map or do i combine them in photoshop or something? i would like to allow residents in secondlife to be able to add their own textures or change colors to my sculpties and maintain the displacement or shadow/occlusion map details…
Much thanks in advance
Hi Soulo,
This is an excellent question that can be better asked via the Second Life community forums. You can access the forums via the Second Life main website. There’s a number of very helpful groups there and I follow the mesh forums closely. The Build and the Texture forum are also very helpful. Since this isn’t a Zbrush specific question I think that you’d be better served there to get the Second Life specific information you need. Lots of friendly and helpful folks on those forums. Good luck!