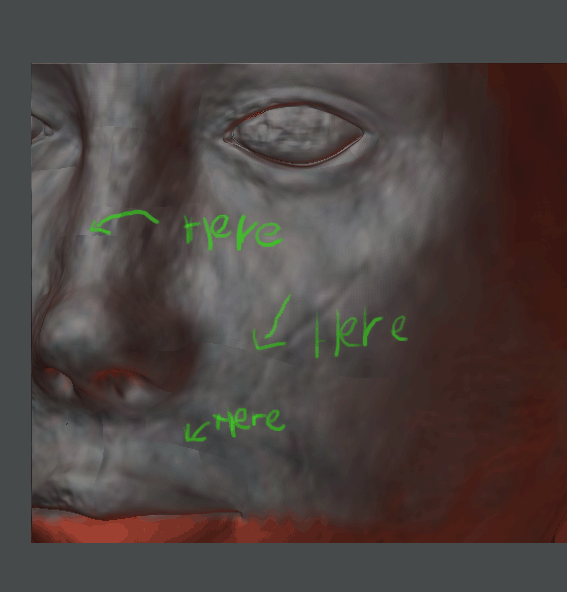
Just done a quick test with GUV tiles and you get seams as well.
heres a pic witha low res texture 256x256.
Attachments
Just done a quick test with GUV tiles and you get seams as well.
heres a pic witha low res texture 256x256.
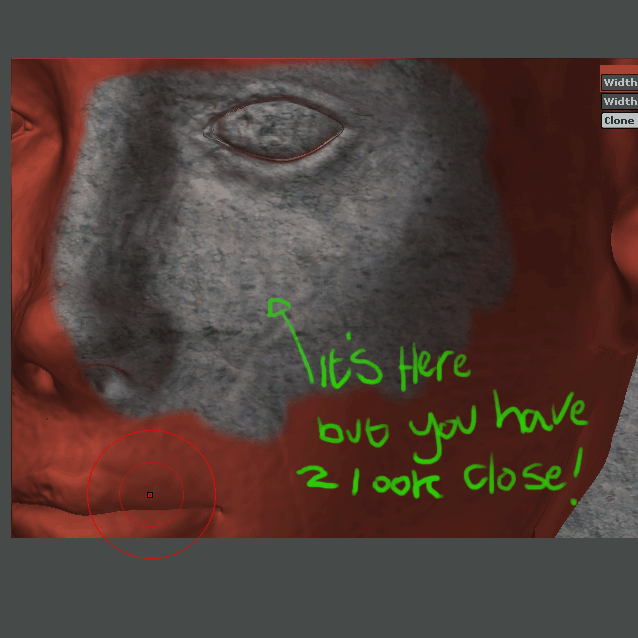
Now heres the same model with a 4096x4096 on it. You can’t even see the seam it seems to have gone, but it hasn’t.
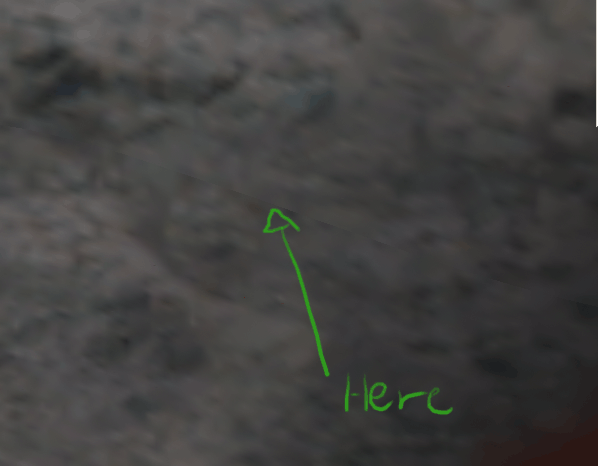
Here’s a real close up of the same high res texture. Also worth mentioning is the first two pics were in Zbrush set to best but still in open gl. The pic attached to this post is in Lightwave and is a render. If you look closely you can still see the seam. It’s so subtle that to be honest it wouldn’t bother me but unfortunetly I have to use a lower res texture and it’s then that you get really obvious seams as you can see from the above pics.
Now is this just me doing something crap or is there more to it. I’ve used the fix seam button as well but to no avail.
Ok I’ve donea little more research plus also looked though more threads to see if I can shed more light on this problem. All I’ve managed to discover is that if I create a primitive in Z-brush and stick to the AUV mapping that is assigned by default to the primitive, then when applying textures they come out great with no visible seams at all. I can even turn the primitive into a 3D mesh using the make polymesh button and it will still paint fine.
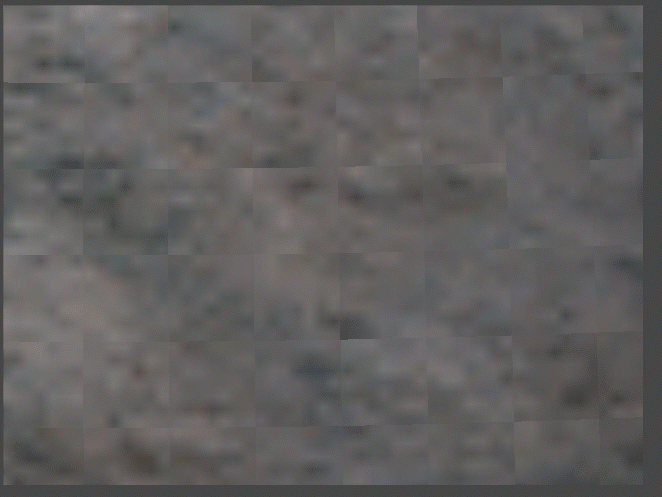
But if I then assign new AUV tiles to the mesh I’ll then see tiny little squares where all the uvs tiles are assigned. have a look at the attached image to see what I mean. From a distance or with a high res texture assigned you can’t really see this but they do still exist. I’ve tried everything to get rid of them, I tried exportig the mesh and redrawing like Pixolator mentioned in another thread but all to no avail. It seems to me that it’s just the way it is and if you’re going to use low res textures then the seams will be obvious. Can anyone help me out with this because I can’t believe no else is getting this stuff.
I guess it’s also worth mentioning that I want to use UV’s assigned from another package which I’d already tried. I just thought I’d try with AUV andGUV tiles to see if Zbrushes in house UV’s would help but they just have the same problems.
Just curious: Before you paint any texture info to your AUV-mapped model are you turning off the Quick 3d Edit button?
Sven
I’ve tried it both ways, that is applying the texture with quick edit on and also with quick edit off.
Anyone found an answer to this?
Well, before dropping the model to the canvas, you should turn Quick 3D Edit off and also set Tool>Display Properties>DSmooth to 1. That way, your model will be smoothed when you’re painting on it, the same as how it will be displayed when rendered.
After texturing, be sure to press Tool>Texture>Fix Seams before exporting the texture.
Also, be sure to turn off any texture anti-aliasing or MIP mapping in your rendering package.
did any one find a solution for this issue of seams, i see it when rendering my bumps in maya…
First, what UV mapping did you use? Bump maps are a bit more susceptible to seams than texture – especially if the adjacent sides of the seam are different scale. For example, AUVTiles with a ratio other than the default of 1 can result in one side of a seam being one scale and the other side of the seam being up to 30 times larger. This then results in a visible seam when the bump map is rendered. So if you’re using AUVTiles for a model that is going to be bump mapped, it is a good idea to not use a ratio other than 1.
Second, was the mapping calculated for the texture size that is being export? If you have not assigned a texture to the model before pressing the button to map the model, ZBrush assumes 1024x1024. If you then actually create the texture at 4096x4096 you will get a different amount of space between each tile than what the mapping was actually calculated for. This can also result in seams.
Be sure not to use MIP-mapping or texture anti-aliasing when you apply your bump map in the rendering engine. These affect how a texture renders, and can cause problems with UV edges.
Lastly, your rendering engine may not register the texture in exactly the same place as ZBrush does. For that reason, ZBrush provides adjustment features in the Tool>Texture menu. By applying very small adjustments along the horizontal and/or vertical you may find that the seams disappear. Once you know the proper amount of adjustment for your rendering engine, these same settings can be used with every texture you export to guarantee excellent results every time.
Dear Aurick,
it’s now about months that me, Vivien and Drummer are working hard to solve the Seams trouble with no success. Now we’ve decided to ask for help.
the main problem is that there are too many threads that talk bout it but noone solves all the aspect of rendering a zbrush work without seams in Mental Ray.
i’m proposing you to catch this part1 part2 part3 part4 part5 part6 part7
and try to solve this mistery, because we are in a dead corner.
Please give us a detailed, step by step procedure to:
keep also in mind that we have read all the threads about this problem through this forum, and we’ve rendered succesfully tools in XSI without changing the UVs.
an example of no seams

PS:  is there another way to upload a 5 Mb tool? :idea:
how did pixolator generate the displacement map in zbrush?
and is a problem of the generated disp map in zbrush or in the rendering of XSI??? 

wating for some possible solutions…pleazeee
the problem must be that we are not generating the displacement map correctly, because the tests with the files of the head and sword that pixolator posted worked just fine in xsi. would you be so kind as to tell us how the map should be generated? we must be doing something wrong…and we’ve been at it for monthes…what’s going on? thanks aurick…
aaaaaaaaaaaah ah ahaah aah ah ah
http://www.zbrushcentral.com/zbc/showthread.php?p=206180#post206180
Maya user here too.
I maped my model with AUV (ratio 1) set size to 4096 and created a disp map with and without fix seam.
i went to maya created a simple blin for test and aplied the map as a bump
I TURNED OFF all filters to 0 under effects in the bump node and file node.
rendered in mental ray and it showed seams no matter what else i tried.
i think it has to do with adjusting
the uv cords in zbrush before exporting anyone found any succesfull settings to do so ?
Why are you applying the displacemebt map as a bump?
If you do this, try setting ilter to 0 and turning on fix edges in the bump 2D node.
Also try generating your map with smooth UV on.
S
thanks a lot chum!!!
gattomanzo: Youre welcome! I didnt think that would help you too but glad to be of service : )
S
I missed the fact your filters are set to 0 already Busil. The Adjust Edges option is worth a look tho.
Have you guys tried the new 32bit map option?
not yet, hope to have some spare minutes this week 
thx a lot for the interest.