ZBrushCentral

Rendering Zbrush Displacement Maps in Maya

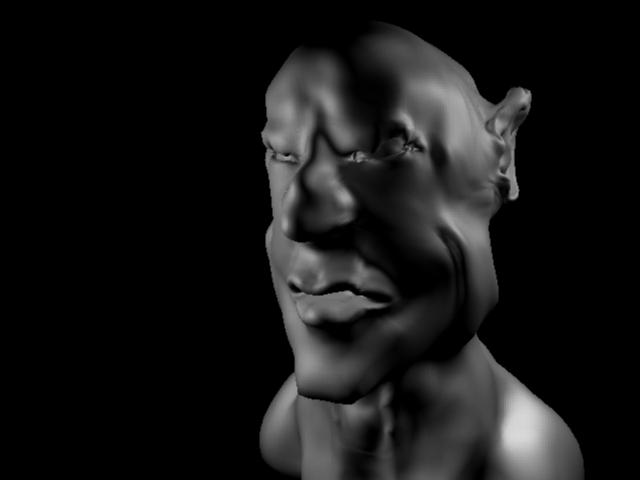
Think I got it to work now, but with some funky stuff going on.

Before exporting I chose an apropriate subdivision level, deleted lower levels and deselected grouping.

Exported a regular 16bit displacement map, adaptive with smooth UV´s and 4096 resolution.

Imported model to Maya and chose to convert polygons to subdivisions.

Deleted default material in shader groups, and added blinn material. From then on pretty much as you described in your video(except maybe for lower alpha gain).

I think the stuff in the eye region could be from overlapning vertecies, but I don´t know why the shape of the face got so thrown off.

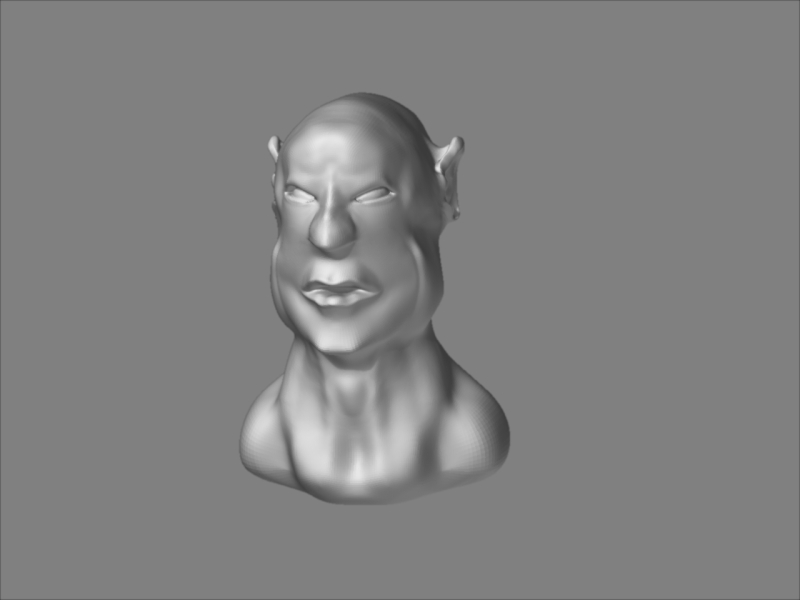
Anyway, maybe it will look better with a finished, cleaned up and more detailed model.

Attachments

funkyrender.jpg

neck.jpg

Hi all,
following this thread, I now have to ask a maybe very stupid question. I wanted to apply a displ. map to my demon in maya 7.01. I followed the vid of scott spencer but my disp map exported with the displacement exporter can neither be read by photoshop, nor by mental ray. So I tried to export it with the standart disp. exporter, Zbrush comes with. But my model just gets displaced, but with no details, It kust looks like it was blowing soon. =) (-> see image)
I used the settings from the video and had no problems, rendering the test head from pixologic. I also scaled the demon to the same size as the head to reuse the alpha gain settings to avoid problems. I even tried to render my demon with the displ. map of the head, just to figure out if my map was broken, but it just gets blown up like before. Stupid situation, but I need help.

Thanks a lot

Attachments

demon-displ.jpg

If you are rendering in Mental Ray download the Displacement Exported extension from pixologic.com and the ZPipeline guide that is linked in my signature. This guide walks through a 32bit floating point displacement workflow which gives you better results than the original 16 bit I cover in the video.

Best,

Scott

Thanks for the tips and the fast reply. I diddnt realized, that the video was dealing with 16 bit… :rolleyes:
My last try was successful because I converted to .map format, which I can once more recommend!
Now it works very fine, and I just have to fine tune the values.
Just one question left, why am I not able to open the maps, generated by the
displacement exporter plugin?

Thanks Scott and thanks Pixologic for their great support, including simple Questions as well as always new and amazing plugins.
The Zbrush to Maya Guide is great!

Greetings

So just yesterday, I finally tackled the test head and test Displacement map, and got it working (after a while). Then, I made a Disp. map for a model I was working on, (16 bit, 2048x2048), and was able to do a simple 3 joint rig in Maya 7, screw with the weights a little, and do a brief 2 second .IFF animation. Now I can feel the horizons broadening…
I’d like to post it, (and I apologize that this is a Maya question, but the model, the map, and the texture were all strictly ZBrush),

How do I convert an Iff animation to ,say, an MPEG, or WMV file? Or, can I render that format in MAya?

“How do I convert an Iff animation to ,say, an MPEG, or WMV file? Or, can I render that format in MAya?”

----- two options,…

  1. When you render from maya, tell it to render images as tif or tga,… Generaly a more usable format,…

2… You will need to take your image sequence out to shake (if its an iff,), or some other editing software… (you can get a free trial of after effects or premeire on adobe’s website)… also to get more control over your renders you may want to render your project on several layers, e.g, specular, diffuse, reflection, occlusion, etc etc, … Will give you a means to make your work look much better,…

Good luck

I’ll give it a try.
The next day, I tried the displacement thing again, very much excited, but I kept getting these renders where the sculpture looked like a bunch of unconnected polys(!). I bashed my head against the wall several times until I realized that I hadn’t highlighted my geometry when creating Displacement Approximator and Subdiv Approximator (in the Approximation Editor) for Mental Ray. Just in case someone else becomes baffled, it’s just a little tip.

Does anybody know how to properly align eyes in Maya? In other words, I’m importing a low-poly OBJ from ZBrush, that will be displaced at render time, but the low poly model has no recognizable eye sockets. There’s got to be a way…
I was thinking I could import the high poly OBJ (risky…) and mimic the translation/rotation values when I bring in the low poly… Anybody?

If your having problems with placment of extra geometry to a low poly mesh with a displacment, I have a method that works good.

  1. Make sure your original low mesh has some level of detail for sections like eyes, teeth, horns, ect. I don’t actually make closed sockets for things like this, but rather a hole where the object will fit and a few faces that will extrude into your “extra” surface, to hide any black spaced gaps. This should help with your placment.

  2. The next step is to use the high mesh from zbrush to actually fit your “extra” surfaces where they should go. The best way I found to do this, is to hide the majority of you mesh in zbrush, and export that. The highest mesh you have isn’t usually necessary, so use a subdivision level 1 or 2 lower than your highest. Then hide everything (shift+crtl) that you dont need (everything but the sockets you have). This will still be a pretty high mesh, but not to high that maya can’t handle it. Now all you gotta do is fit whatever “extra” mesh or objects (eyes, teeth, ect.) into place of the higher, partially visible mesh, and thats it.

  3. Now if you keep eveything in the same place when you render in maya, it should match up perfectly with your displacment calculated by mental ray. Any questions or comments, feel free to let me know. I just love Zbrush.

Hi, here I’m again with a question about the process of my model, posted above. Now that my displacement maps work, I rigged it very quickly and posed it. ( should have modeled in the final pose, insted of T pose and then rig,… but anyway, I did it :cool: ) My displaced model is fine so far, but the twisting and squeezing, especially at the arms, caused by the bones are very ugly. So because it is for a still, I’m looking for a way to reimport the pose in Zbrush to sculpt again. I tried it via import as a morph target, and it seems okay, but when I subdivide more times, it just gets smoothed, instead of applying the high level sculpture detail.

Thanks

Hi,

I am getting a problem in using the displacement maps created from ZB to use in Maya 8. Everytime I hit Mental Ray to render, I get the following error message.

Untitled-1.jpg

Also if I try to convert to .Map file I get a similar error message. Any ideas as to what could be going wrong. I have used the displace v 1 & 2 from ZB?

Thanks,

TD

I’m getting the same error mesage that trappdoor (user above me) is having. Does anyone know what causes it? Thanks.

i followed through almost everything scotts said except for the morgh target, apparently i forgot to store one when i started scuplting. but HELP, URGENTLY, i need a solution fast as my displacement map (i converted it to .map, set alphagain=2.2 alpha offset=-1.1, turned feature displacement off), explode on the model when i tried rendering, showing bloating and spikes. Can anyone help me out here? PLEASE…

wolfbane

have you done the mental ray subdivision approximation for your model??. i remeber haveing a few problems when i forgot to set the approximation for my model.

trapdoor: comvert your tiff file to .map format

wolfbane: make sure the shader file node is pointing to the displacement map. Sometimes I have had tis problem when everything seemed fine. IOn this case I recreate the map in ZBrush and apply it to the shader network ( dont forget to convert to map)

Bloating means the remapping of displacement values is wrong because
a the map is wonky
b the alpha gain / offset is wrong (make sure the - sign is in the alpah offset)
c the wrong map is in the file node

Also make sure, as abbasi notes, to have a subdivision approximation attached to the mesh.

Hope that helps!

S

Hi,

I need some help with a displacement map I have generated. I used the md2 r32 plugin to create the dis map and conveted it to a .map file and it appears that when i render in mental ray (maya) the uv seams appear as very fine lines all over the body.

Feature displacement is Unticked, mentalray approx is set to spatial and every thing else is set to standard. Any help would be great, I have included a pic below.
Uv Seam.jpg

Sorry scotts… i did converted it to .map and have a prroximation editor and did almost every thing u mentioned but still i dunno whats wrong… by the way, mental did gave me a error like “your <filename>.map texture file is not found”, i have attached a pic, hope it helps… [attach=48932]Tauren_DispTest.jpg[/attach]

Attachments

Tauren_DispTest.jpg

HI Scott,

When I try coverting the tif to map file I am getting the same error message.

Thanks,

TD

wolfbane: It appears to me that your UV’s might be overlapping causing your model to explode!!

Jdraks: i beleive ther is an option in the MD2 Export Options which says Seamless, you just have to check it!. hope that does the trick.

one thing i would like to mention here is, i know all of you guyz have read Scott’s ZB to Maya PDF. but i would recommend reading it again!, throughly. there is literly every possible workflow regarding Maya and ZB, you just have to concentrate!.

You do this and hopefully you wont have any more problems, and if you do you will know where to track them and solve them!

Cheers!

But dude, i dont my UVs is overlapping cause i used the pelting tool plugin to unfold my UVs. and i really read he pdf a lot of times, but anyway , i will try to look for seamless button and try it out as soon as i can get to my com… but thanks abbasi