ZBrushCentral

Rendering ZBrush Displacement-Maps In External Renderers (May 9th: 2nd file added)

I followed HaDDeS example only I used a Blinn. I didn’t change the map at all for the bump but I did have to set it to about 40. I’m interested in if the D3 Normal map will work well with this. Does anyone know of another file format that Mental Ray would accept so we don’t have to convert the map to RGB. This would make this process so much FASTER at render times.
:smiley:

my test

10x rray

Just the last try:

Saved displacement map to 8 bit not compressed and flipped vertically!
Hypernurbs render level 5.
Displacement Height 0.8 m
Texture Filter with SAT sampling
Blur Offset 1.5%
Blur Scale 1.5%. (Tnx Aurick ;))
Contrast is set to 94%
3 point light and soft shadow.

Finally got something working in Poser 5, by inversing the .tiff for the negative displacement. It’s not too bad at the job, but banding cropped up when I pushed the displacement out a little further. Not bad for a 5k poly model, though :wink:

Later edit:

After some more tweaking, I managed something far more respectable. I now looks a lot more like it should.

Did a quick test with Blender and the rib export blenderman python script. works like a charm with the Air demo and the Olivers NormalMap_Displace shader, rendered out this image in just under 2 minutes on an old 1ghz athlon with 512 of ram.

Hi all,
One question: nobody use Lightwave here???
Only jotajota?
hope someone use this soft, and show some workflow, (i’m too busy and lazy to try myself :smiley: )
Bye
Leo

Cinema 4D art 7, using MrBraun’s stats:

I’m happy to see it works well.

Seems to me that a lot of the bloat were seeing is from an incorrect mapping of the bitmap to all positive displacement. In my tests I shifted the range on the bitmap from 0 to 1 to -.5 to .5, and achieved better results (in MAX). It’d be interesting to see the different applications tabulated together to see if this carries out.

Another test…

When ZBrush exports an OBJ, by default, it scales the object by a factor of 4, so I used a displacement scale of 3.34 (0.834 * 4) and this works well.

Regards,
Zendoftheworld…

rendered with Prman,use less than 16 seconds,so good!

Rendered in Max 6.

Meshsmooth, 3 iterations
Displace modifier

Displacement map levels adjusted in Photoshop.

Displacement map rotated 180 degrees on “U” axis in Mat Editor

MINg120 i dont think you have it doing true displacement, just bump mapping.

What an impressive model!

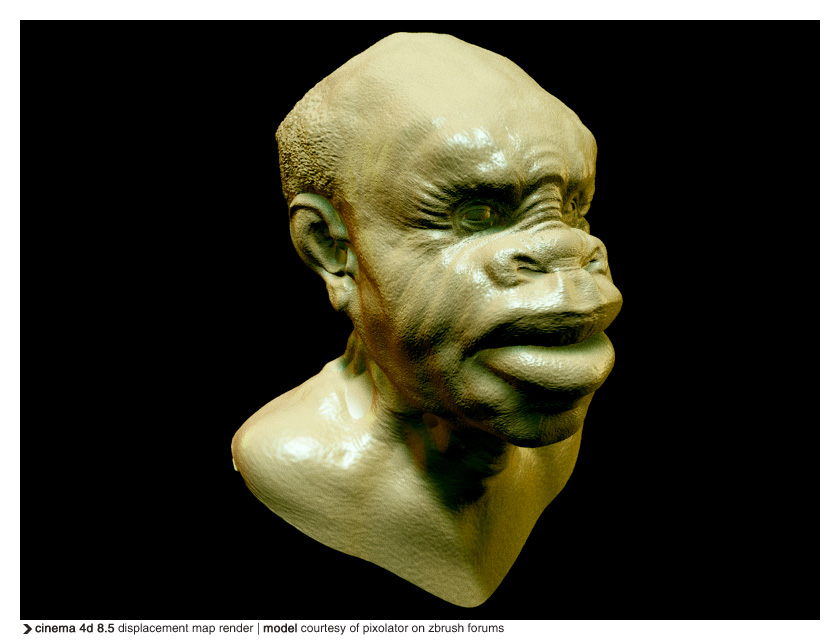
Here is my version, also rendered in cinema
4d 8.5 with the settings mentioned earlier
by cornel and ghopper (disp 1m). I have
rendered the the head with radiosity with
settings shown in the image itself.
Looks nice but i’m not happy with it.
Will try another version with an 8bit image
later. Thx for this model!

wurger: Those are really nice renders. You mention using the displace
modifier. Was that used in both renders, or did you use the
displacement shader for the Mental Ray one?

To all: Still seeing lot’s of banding in some of the examples posted here,
like I used to have in Max. Particularly in the C4D ones. Nothing that
probably can’t tweaked out I’m guessing. Just thought I’d make an off
hand comment about it (again, I know hehe). Keep at it all! :smiley:

My result in Poser 5:

Poser’s subdivision algorithm is not the catmull-clark algorithm, therefore the shape is not exactly like the original.p5_disp.jpg

Zeddicus,

Both renders use the Displace modifier. I posted them because the Mental Ray render seemed a bit more detailed than the scanline rendering.

I attempted using the Mental Ray displacement but got nowhere (didn’t have time to mess with it too much…I was at work after all). I had even less luck with Final Render but wasn’t in the mood to try and figure out why the Micro Triangle Displacement in Final Render wasn’t working.

Stew, I appreciate the quick mention of why the shape is a little different… although I’m not sure I agree that means you can’t get it looking the same. See my renders in Poser on page 5. The second one looks almost exactly as it did in Zbrush. I’m still curious about the banding though, when you increase the displacement to 2.5.

A little more exploration.

Just wanted to see what it looked like with dramatic lighting.

still not 100% perfect, but passable…

This is fun, thanks again for offering up the model Pixolator. It really helps to determine if zBrush will work with our rendering engines.

So far, my LW tests have been unsuccesful. :confused:

displace_c4D

Attachments

displace_c4D.jpg

policarpo set your subpatch tessalation to BEFORE the displacement object modifier!

also the remember the display tessalation can be way lower than the render tessalation.

it is the order that is of extreme importance

:smiley:

3dsMax scanline
Rendered in 11 seconds on a 1.8ghz
With 17 lights, all casting 1024 shadowmaps.

I’m cheating though. The details are from a normal map, they arnt real polygons. I’m only rendering 5440 polygons.