Hi all!
Can someone please advice with a correct workflow for ussing Multidisplacement with MAX? I cannot seem to find any info if it can be done!
Thanks so much in advance,
Rafael Polit Jr.
Quito, Ecuador.
Hi all!
Can someone please advice with a correct workflow for ussing Multidisplacement with MAX? I cannot seem to find any info if it can be done!
Thanks so much in advance,
Rafael Polit Jr.
Quito, Ecuador.
I’ve done some searching and can’t find the solution for my specific problem, so forgive me if it’s been answered elsewhere.
I’m having a problem getting the Displacement Exporter to run at all. I’ve followed the installation instructions to the letter, placed the .zsc file in the ZStartup/ZPlugs directory and ZBrush just crashes on startup.
I have a suspicion that there’s an update to the application that I need, but I’m having a hard time just finding out what version I’m using (my titlebar just reads ZBrush 2.0). What’s the version required to use the Displacement Exporter? If I need to update my application, where can I download it?
It’s been a while since I’ve used ZBrush, so my apologies for the newbie questions.
Hi this thread has been gold for me and im nearly there ive followed your avi on exporting a 16bit displacement map all good now im trying to follow your guide to z to maya 32 bit displacement guide all has been good so far but im stuck at the converting the tiff file to a map format. i understand you have to open a command line and enter Imf_copy -p originalfile.tif newfilename.map im all good with a pc but am stuck doing this on a mac
im running osx tiger 10.4 and am guessing its the terminal where this should be entered i have the pdf file and have been through this with my teacher on a pc but am stuck on a mac do you need any more info than what ive given
the section i refer to is page 21 in the pdf guide
The same command should function on a mac from the terminal. If you get an error make sure that the path environment variable contains the path to the maya bin directory. I think the command would be echo $PATH to check the path variable.
Headcrash: did you put the data folder in there too?
Good luck!!
Scott
Scott: yes, the data folder is there. When I get home tonight I’ll clean everything out of the folder and copy it all again fresh, just to make sure.
Hi Scott thanxk for the reply to be honest im out of my depth here i have been running around mac forms and tutorials re the terminal but i just dont get going under the hood of my computer i swear i will buy a pc soon
i think i mentioned the word pc on the mac morum and all whent quite is there other mac users here on zbrush central who have been through this process. re the data file do u mean the file which came with the plugin in which case its in the startup zplugs folder ive done this on a pc and it worked.
would batch files fix this prob for me
oldandgrim: try the imf_copy command in the terminal window.
what error do you get? If it is something like
-bash: imf_copy: command not found
The $PATH environment variable needs to be updated to have the maya\bin directory included. This link shows you how to update the PATH variable in many popular shells. Not sure which you use but the prompt in Terminal should tell you.
I am sure there are a LOT of mac users here as well as a fair share of Linux ones too who will have easier answers than mine : )
The easiest solution is saved for last. here is a Photoshop plugin to do the conversion. Make sure you use Photoshop CS and make sure color managment is off or the 32bit info will be destroyed.
EDIT I think that plugin may be PC only : /
Hope that helps some.
Scott
Thanx Scott you must live in the forum i wasnt expdecting a reply so quick i will give each of your suggestions a go Monday im seeing a freind who should be able to help me if i cant get it this weekend its funny ive posted the pc command in mac forums specific to terminal and the only reply has been that mac dose not read exe files like i dont know. ill let you know what the answer is when i get it incase any other mac uses are struggling
Hi , i`ve been trying to create displacement maps like the one provided by pixologic head test or sword , but i m having problems creating 16-bit maps , when i open the maps in CS it says they are 32-bit maps?!!! And i can t convert them in CS to the right type of tiff . This is what I am doing :
-polymesh 6 subds
-in tool pallete displacement options : adaptive smooth 4096 mode
-or in displacement exporter - R16 or D16 , multigenerate
Some advice please i must be doing something wrong , i really like to get this working
Thkx
System specs:
Intel P4 3.4 , 4 gb ram 120gb sata
Softw:
Zbrush 2.0 - Max 8 - PShopCs2
The head and sword tests render great on max , but i can t generate maps like those the best i get is a stepping displacement render , i don t think it s Max because only some tiff are able to get passed max support , i tried a lot of variations of displacement map generation within zbrush , some using multid and dspexporter produce only 32-bit tiff files even when i m specifying R16 or D16 in options a play with those. It s not a uv issue . When i open the map in photoshop that`s one issue and the other is the kind of tiff arriving on photoshop . Maybe it s my system rgb mode in my pc even thought i have no idea of what i just said…Well i really would like to take out my zbrush displacement maps similar to the tests provided by pixologic … Please help . Thak you very much in advance
Stair-stepping is almost always caused by a high-bit map (16 or 32) being converted to 8-bits. This often happens if you open the map up in Photoshop or another image editor – even if the editor can support such images, it sometimes has settings that cause it to resample them on import. Then when you save the map again, it’s now down to 8-bits.
Basically, after you have exported the map from ZBrush you should be wary of opening it in an image editor. If you get stair-stepping, go back and check that editor’s settings.
And of course make sure that your rendering engine is capable of supporting 16-bot or 32-bit maps, and if so make sure that you use the right settings there as well.
Ktaylor: i was just going though this thread and noticed that you have a problem transferring the buffer zone from mesh to mesh. This method isn’t pretty, but works:
-after done sculpting mesh A with a piece of mesh B (the bufer zone) export an obj from current subd level, import it to maya.
-export same level of mesh B. and import into same maya file.
-now use the script called xyShrinkWrap (highend3d) to conform overlapping vertexes of mesh B to mesh A. To clarify: the vertexes you select on mesh B will snap to closes verts on mesh A, making mesh B look identical to A…
-import mesh B back to zbrush at the same level you exported (either straight or as a morph, whatever)
Now, i dont rememebr how zbrush handles other levels, if it doesnt change them accordingly to match your highest, then you’d need to do the whole process for every level starting of 1.
Hope this helps.
Does that method have problems with createing seams, seems like the verts wouldnt all snap perfectly where the seam is especially at higher levels with denser meshes, seems like everything wouldnt line up perfectly, that a good idea though I will definatley give it a try, what would really solve this and it seems easy enough to script is this,
just be able to select faces, maybe say make them visible only right at the seam, and store those faces/verts positional info basically a localized morph target, then in your other Ztl that has those same faces, you could just show them and hide the rest and apply the positional data to those faces, it would be a lot like the morph brush,
since the face orders are the same( some tools would just be missing faces, but the ones that are there should still be ordered properly, if you delete just the head does it reorder the points/faces in the rest of the body or does it leave them the same as before the head was deleted, know what I mean.
well the localised morph target makes sence in an uncut mesh only, from what i knwo vertex count will change after deleting part of the mesh. if there’s any soft capable of cutting mesh and preserving vert. order that would solve the problem.
Yes there will be some seaming but:
A- this seam won’t be on the UV seam anymore, so you can easily fix it in zbrush
B- in maya, before aplpying xyshrinkwrap, make a copy of model B. After using shrinkwrap aplpy this duplicate versio as weighted blendshape to object B (new in maya 7). You can paint falloff now.
It’s not perfect, but i think better solution the aplpyuing displacement in zbrush
regards.
Michal Kriukow http://bananapunk.com
what would be cool too if in Zbrush when you imported obj’s if part of your obj was hidding it wouldnt update it with the new obj, only visible polys would be updated, so you could just save out your high level obj’s for those seam areas and transfer the detail that way, does that make sense? that way you wouldnt hvae to delete faces and stuf wouldnt get reordered
what would really be cool is if 2.5 would come out and actually support the higher polycounts they have been saying that 2.5 will deliver, that would solve all these problems.
I exported the displacment maps as TIF files, however when i try to import them back in Zbrush
it keep saying its not recognized file 
so after doing some reading…I think I have to make ANOTHER disp map for that overlap portion
would it be possible in the future thatZbrhs can read the disp maps generated by multi disp tool

Kris or Scott
actully anyone who use Maya
did that method hold in a rig…
I was playing around with your idea…to transfer the Displacment from one part of the mesh to the other
however if you Do that…and take your mesh to the highest level and export it to Maya
you will see that both meshed don’t alligh perfectly , so that give the visable seem…in other wordsthe problem is not the displacment …rather it’s the mesh object…
so what i did is to export the orginal mesh (before cutting it and use that to assign the displacment to it
my only problem now is trying to fade out hte displacment so ican transfer it to th other mesh with no artifacts after applying the displacment
interesting topic! And i hope this is the right place to ask this
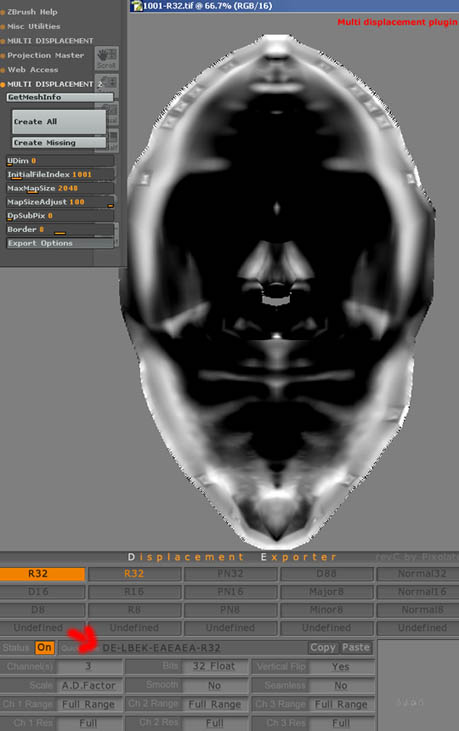
I still have a problem with the multidisplacement plugin … i think it does an auto Gain or something of my values.
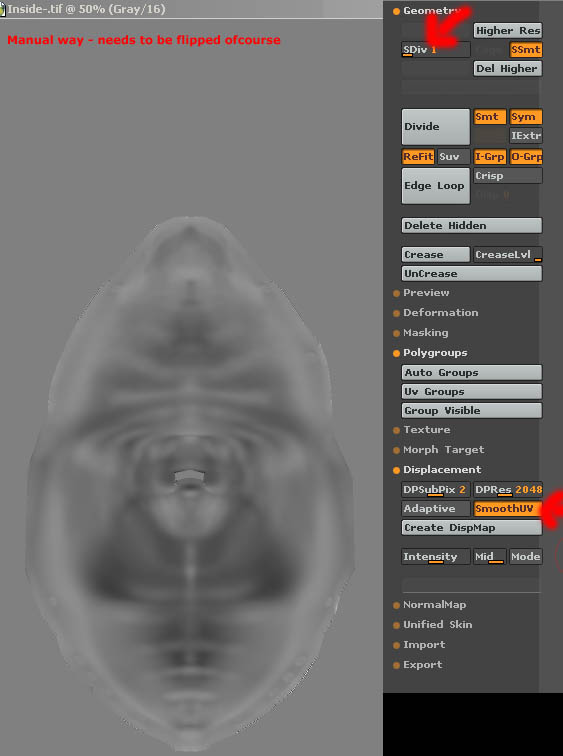
Suppose i have 4 polygroups and i hide 3 of them to export my displacement map the old way… not using the plugin. Then my results looks ok.
But if i unhide all my polygroups, thus seeing the entire model, and than use the multi displacement export plugin … using the good quickcode (from the zbrush to max pdf, DE-LBEK-EAEAEA-R32) than I get like autogained maps.
Wich dont give me the right result in max.
How could you explain this. ? They seem to be 16bit RGB images if i export them and not Grayscale images like the ones i get if i follow the normal procedure
Ah and one more thing. Do the settings of the discplacement export panel, influence in any way the multidisplacement plugin export??