ZBrushCentral

Questions and Troubleshooting for Displacement Exporter

PLEASE READ CAREFULLY BEFORE POSTING:

This thread is meant to bring together all troubleshooting questions for problems that you might be having with Displacement Exporter. When you post, be sure to include the following information:


  1. A detailed description of the problem that you’re having. Help us duplicate the error.
  2. Which platform you’re running (PC or Mac)
  3. Which version of the OS you’re running. Please give the full version number.
  4. Which application you use as your rendering engine (including its full version number).
  5. Your system specs, such as CPU, RAM, and free disk space on the ZBrush drive.

If you have suggestions regarding Displacement Exporter, please do not post them here. Instead, send them to [email protected]

Thanks! :slight_smile:

<crossposted>

There were some 32bit scale questions so I crossposted this for those interested in getting a 32bit map with baked world scale out of ZBrush. I thought it might be helpful to have in here.

If you want world scale baked into your map and it was an obj that was imported into ZBrush you need to use the MultiDisplace2 plugin not the standard method of generating the map under tools. In multidisplace2 you set your resolution and dpsubpix settings then click Export Options. This brings up the DE window. Set up using this quick code for maya
DE-LBEK-EAEAEA-D32

Click close and use the Create All button to generate your map.
This will create a 32bit map with the original object scale baked in NOT the zbrush scale as the other (tools>displacement) method does. This is imperative for getting good renders in outside applications. In Maya just load the map and for Alpha Gain use 1 and offset use -.5

Scott

Hey thanks for clearing that up! Will this help with making seamless displacement maps when you have to break your character up into multiple tools to continue detailing?

So I tried doing what you suggested above and I get this error message, I did a very staight forward test, I took a sphere from maya and detailed it, saved off 2 differnt tools a top and a bottom, loaded the bottom tool up and did some more sculpting then tried to export the map as you described.

Im running, windows Xp
dual xeon processors
54 gigs on Zbrush Drive
using Zbrush 2 with Current updates

Attachments

error.jpg

So I got Scott’s example to work with the multidisplace 2 exporter and the Maya code, but I have some odd results, it seems to be clamping the high displacement amount and flattening it out or something, these are rendered with Mental Ray for maya 7.0 and you can see in the texture that Zbrush made that it isnt generating the right hight field.hmmmm.jpg

I also still get the seam between the 2 pieces, the top and bottom of the sphere??

this is my main concern, Im working on a high res character and I need to created multiple tools to get all the detail that needs to be there, but if I cant render the character without having seams inbtween each tool then this is all pretty much worthless :slight_smile:

Guess I just need to wait for Z brush 2.5 to release so I can have more polys per tool, but I suspect it will still not be enough, currently characters Im working on require around 25-30 million if you add up all the seperate tools, like the head, body, leg, arm, hand, etc. . . .

how is everyone else getting aroung this??? I know people are using this in film production to make really high res characters!! I posted a fix for it using extra pieces of geometry attached to each tool where you maintain a fixed amount of positive and negative displacement so you dont get the seams but thats a REAL PAIN IN THE ARSE and just not very practicle in production environments.

Attachments

flat.jpg

hmm.jpg

hey ktaylor,

thats an interesting problem. I am documenting multiple tools and maps from a single mesh at the moment and I have not encountered this issue. Could you send me the ztools or make them available for download?

It looks like it might be in the map generation or conversion after the fact…

Did you convert the tif to a .map file?
Did you sculpt across the cut seam after seperating the parts of the tool?

I think the issue is in the map processing but I will know for sure if I can give it a whirl myself.

[email protected]

shoot me a link to those tools and I will see what I can come up with.

Scott

Just wanted to add I think what is happening here is the values from the map are being clipped at some point after export. This is especially suspicious since it appears that the highest areas of elevation are the ones being flattened.

Make sure when you export you use imf_copy to convert to .map The speed increase isn’t as important as the fact Maya 6.5 will complain about a 32bit tiff. It specificaly requests an 8 bit or 16 bit file. I have yet to get 32bit tiff working in Mental Ray so I keep using .map conversion for my 32bit tiffs since MR loves the format and seems to hate tiff anyway.

The seam issue could be because smooth was on when the tool was subdivided after being cut apart.

As for flattening, make sure the map isnt being opened in another application after generation. As for seams try adjusting the border option in the MultiDisplace2 window as well as in the Displacemebt Exporter window.

You may also try generating the map with the tools>displacement method and turn on smooth UV

I am in the middle of working with this same process myself.
Please keep us posted on your results if you have the chance : )

Thanks,

Scott

Yeah I read that earlier thanks! Yeah might as well post it on the thread so others can read it as well, so Im stumped on a couple things now

1- being able to render the .tiff with mental ray, your saying you cant and im sure you know what your talking about so that confuses me

2- Why those high areas in the Displacement maps are being clamped out, is there a min/max setting in Zbrush for what it will allow to be evaluated in the creation of the map and the sculpt is exceeding this clamp value?

I think the answers to this will help with why there are seams, I only gets seams when I alter the amount of displacement on one of the tools so its evaluating the amount of displacement and mapping that to a hight field in the texure so they dont match up anymore and you get a seam, im guessing if you mess with the amount of alpha gain/offset you could get the seam to go away but that detail would not be displaced as much as it should, Ill try that just to see if that is correct.

hmmmm,

Since we were talking about 32bit float maps and Maya:

When I load a 32bit tif file into Mental Ray the script editor reports a complaint and the output window clarifies that the tif file must be 8 or 16 bit.

ERROR, E:/Stega/sourceimages/newStega1001D32.tif: TIFF image class not supported (must be 8 or 16 bits)
IMF did not recognise image file E:/Stega/sourceimages/newStega1001D32.tif.

After ignoring these errors and plowing thru it does in fact try to render. I get several exception errors to full on crashes though and I am wondering if this is because the tiff format does not render as efficently in memory as .map… The map is merely 2k… From what I have found researching so far tonight.
Apparently the errors above are being thrown up by Maya. So heres the deal as I understand it so far ;

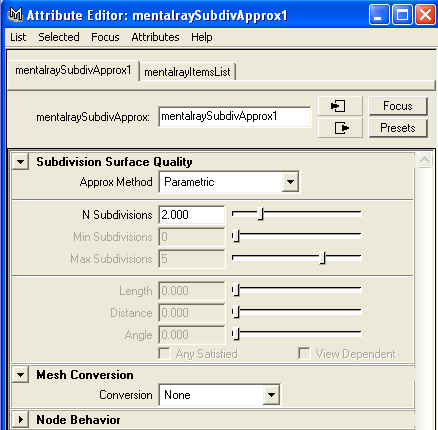
Maya cannot read 32bit floating point, it cannot display it in the preview icon for the shader, Mental ray which is supposed to be “integrated” will read it and does despite the 4 error messages and warnings… : )
That and the previous version of the pliugin had a ~ character which actually did prevent the map from being read mislead me. If you convert to .map the render is more efficient and maya does not complain it also will display your map in the file node. whew… that was a lot to wrangle with for just a bum error message : D

Im still sticking with .map since it is still the only format that renders in a decent time for me… heck this scene file just keeps crashing out when I specify the tif format and the only documentation I have found on 32bit float maps in MR is for HDR…

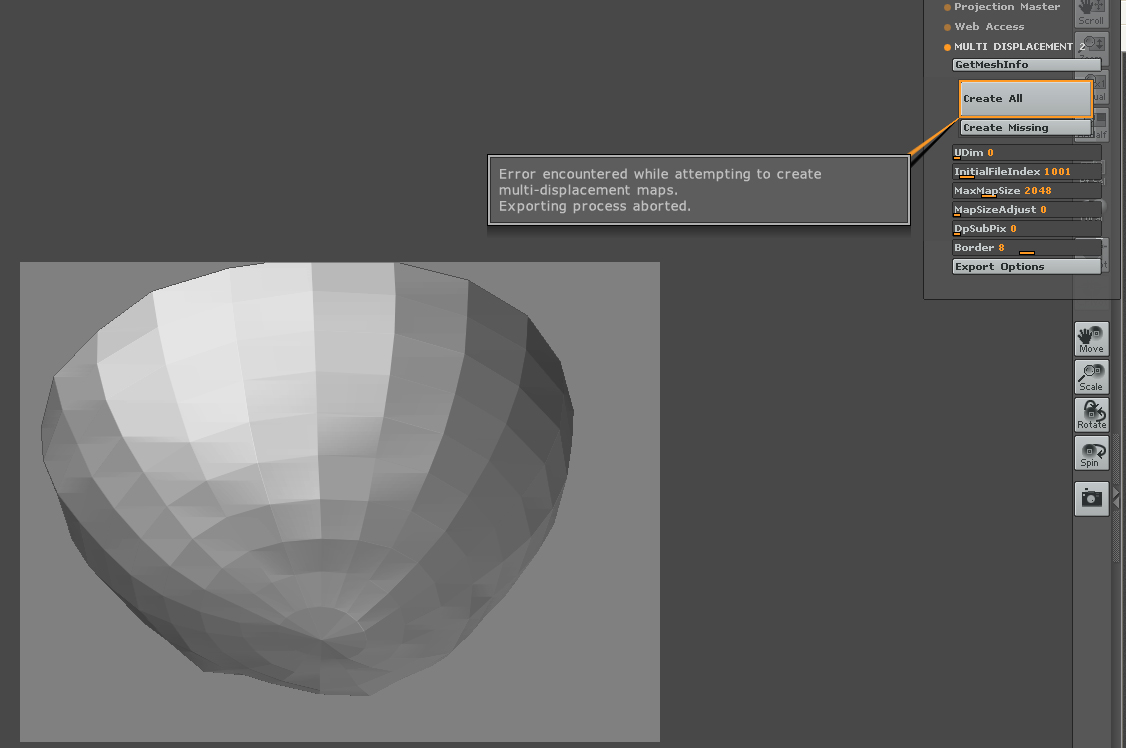
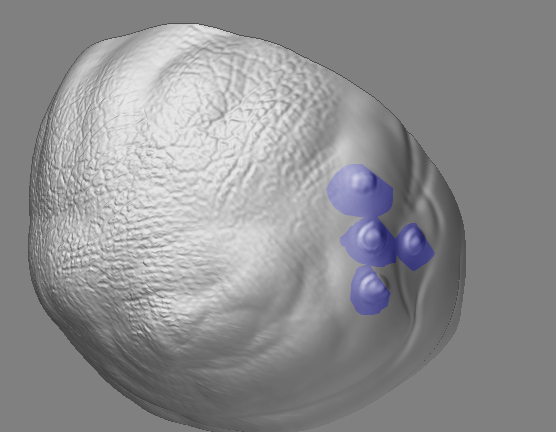
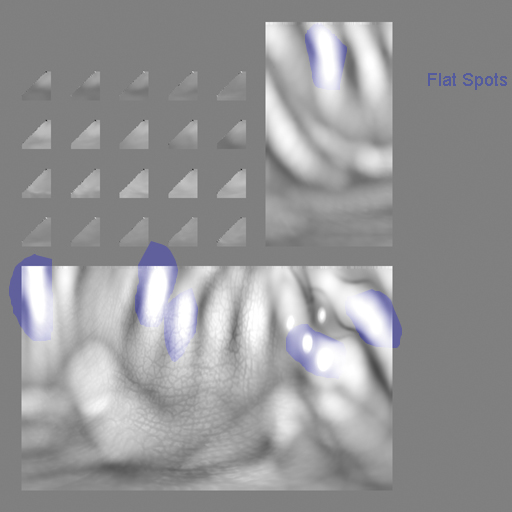
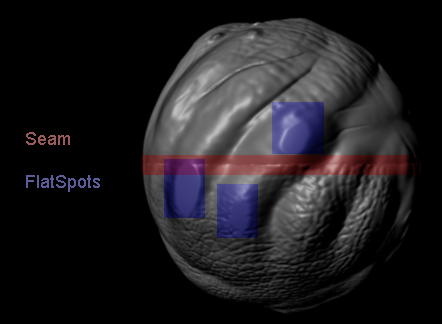
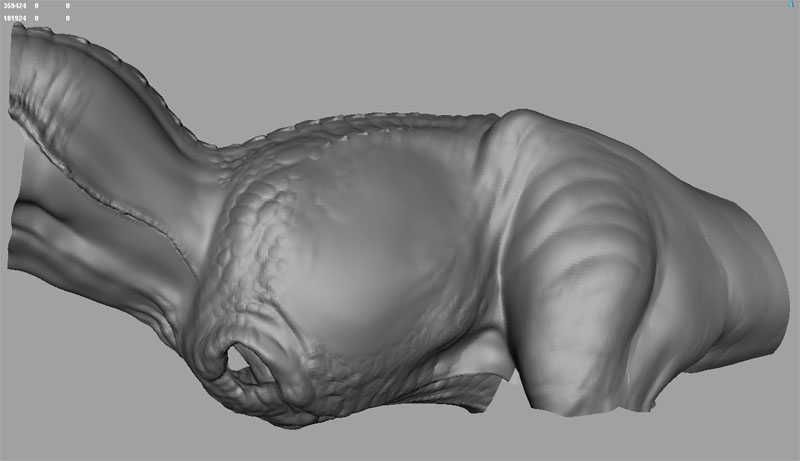
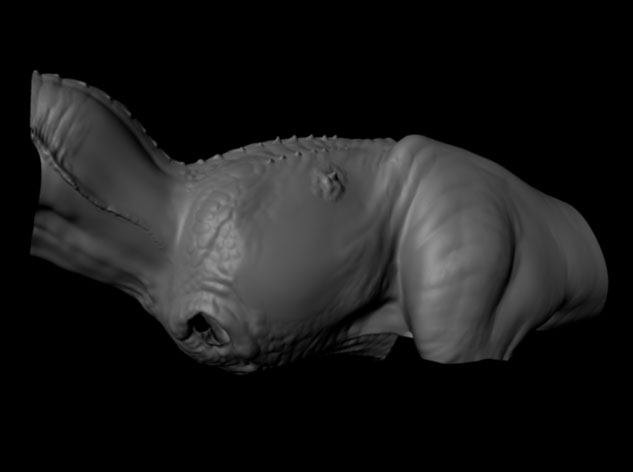
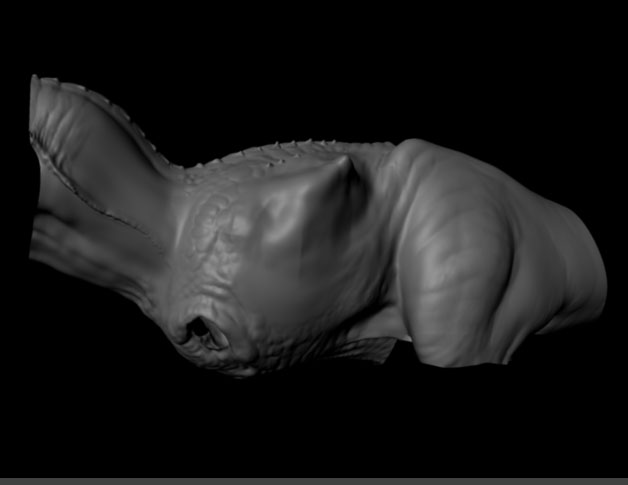
As for cutting apart the ztool I was able to get an almost passable render but the detail was very faint.
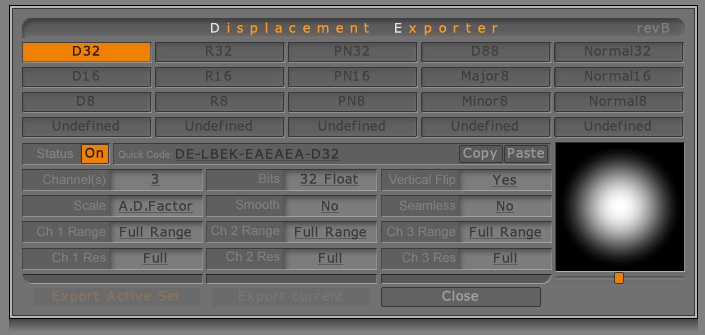
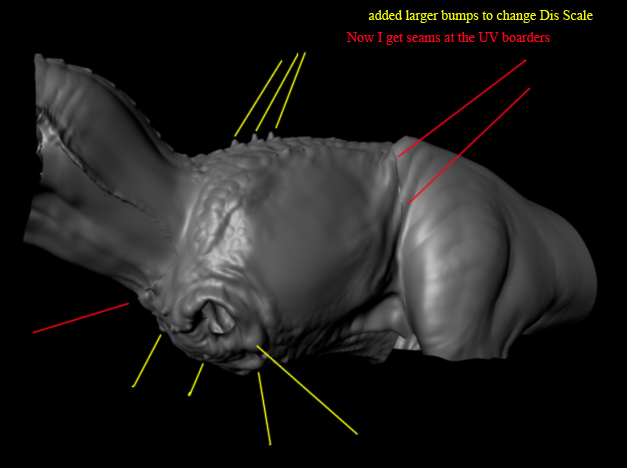
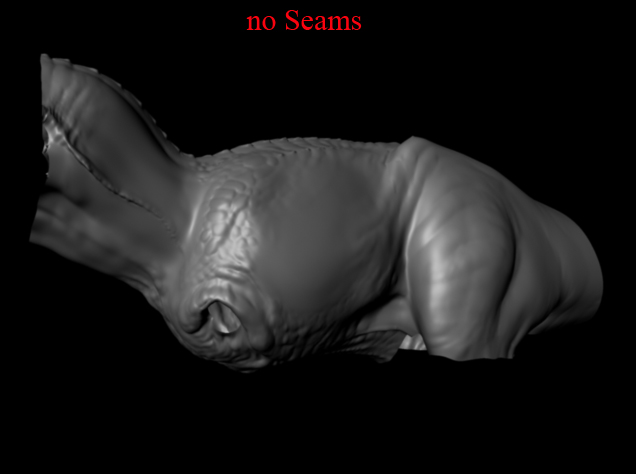
I got away from the seam and the clipped values when I turned on smooth in the displacement exporter. My initial thought is the playing with the scale option in the displacement exporter.

Let us know what you come up with : )

S

edit> update

Oh and after a good night’s sleep I came to this.
The scale would need to be set to Alpha Depth. The 32Bit float maps have such a vast range the values wouldnt be rescaled. The scale factor for all the maps would be consistent across the tools so when reassembled in Maya in theory they should render fine.

SO here is what I get

I export my dismaps from Zbrush using the multidisplace export2 with these settings, ( the quick code you provided earlier) settings.jpg

so What I have found is that

A. This Maya code doesnt give you the realworld displacement setting where you can set the AG to 1 and the AO to -.5 and be done with it.

B. Once you take on of the sections of your character for further sculpting, if you alter the max displace hight on the sculpt your new Displacement map will cause seams.

A. is aliright, its easy enough to find the right amount of displacement

B. just plain sucks and will keep you from getting your work done :slight_smile:

Hope this helps some, and again maybe I have something set wrong, hopefully you can look at the settings I posted in thise thread and see if someting is set wrong. I hope its that easy!! hahah yeah right

Thanks again!

Attachments

Mental.jpg

Seams.jpg

noSeams.jpg

Ztool.jpg

When you generate a displacement map with MultiDisplace2 it should create based on the object scale of the model you originally imported. In my experience maps generated in this manner dont require a magic number for alpha gain.

Try generating a map from your mesh as a single object and render in Maya with 1 and -.5 to verify the map scale is working.

Here is a thought…
If you are deleting a portion of the mesh export the tool as an obj file after you delete hidden. Reimport this into itself at level1. Then generate the maps. I also remedied some seaming issues by turning on smooth in the DE options.

hope some of this helps : /

S

I dont know, I did what you were talking about, I have my mesh in Zbrush I export it at lvl 1 as an obj to Maya so nothing is changing scale wise, I apply the dis maps and alphagain 1 doenst work for me, seems like im doing that stuff correct?? there isnt much to mess up in those steps.

I reimported my .obj into Back into Z brush and the scale didnt change, I am assuming thats what you wanted me to test when you said to reImport the obj back onto itself in Zbrush.

Oh I forgot to mention in this last test I didnt get any wierd displacement clamping with the textures they seem to be fine, I only get that when I change the scale factor in the exporter options to I think it was auto, or maybe off I cant remember. So that was fixed!!

Hey Scott thanks for all this info… ive been meaning to get involved with multi displacement for a bit so all this info is gold. Tony Jungs tutorial has been helpful too but this is more current and specific to my workflow. (i dont use messiah)

BTW i think u posted this before, but how do you create the .map files? is there a utility, or strictly command line instruction?

BTW you know u can make 8K! maps with multi displacement2, ends up as a 768MB file if its 32 bit! buts sweet none the less. My complaints about 4K not supporting 20 million faces in ZB 2.5 have been answered.

BTW I know its alot to ask, but will u be creating any sort of tutorial on this subject?
-Ken

Ktaylor:

When I turned off scale I lost a lot of detail… Perhaps that is why you needed to use the alpha Gain modifier on your maps.

Spaz8: Getting back and forth of info like this on the list helps so much. The best part of Zbrush is this community. I am sure in a few days this process will be nailed down and working. Im glad Ktaylor started the thread!

to convert the file use
imf_copy -p -v oldimagename.tif newimagename.map

there is another utility to use called imf_info which will tell you if your map is actually 32bit RBG. Opening these maps in photoshop is best avoided, The utikity is in the maya bin folder and can be mapped to tif files or kept on the desktop.

As for a utility Atwooki posted a super useful bat file here.

We have a winner!!

SO basically the only thing I did different this time was I left a row of the nieghboring uv regions around the piece that I isolated its easier to illustrate:

Im showing the Frame so you can see the different UV regions the Blue one on the chest is the one we are concerned about, this is the section I have made its own tool so I can further subdivide to add more detail, so make sure when you cut your character up into seperate pieces/tools so that you can add more polys, dont break it up right excatly on the UV boarders, but let some flash from the other UV areas on the edges stay around, that way it locks that boarder into place and you wont get any seams, makes sense now that I think about it.

let me know if anyone finds anything differnet, but for now its friday, and MILLER TIME!

regions.jpg

Attachments

before.jpg

after.jpg

just to make sure, I went back and really added a lot of displace to make sure and it held up just fine, you can see in the texture where the white appears to clamp out, but since its 32 bit there are tones of values you can see with your eye so it works just fine! Thanks alot for all the help Scott!!

waybig.jpg

Attachments

insane.jpg

ROCKIN
FREAKIN A : D

Cool

S

again great info… thanks for sharing -Ken

Wish I saw this earlier…Ktaylor…am sure you have seen this but this thread is a font of information and woulda had you solving your problem sooner I expect.