ZBrushCentral

Questions and Troubleshooting for Displacement Exporter

These are 32bit floating point maps and 50% gray is the level of no displacement in maps generated by ZBrush. KTaylor is refering to 16bit maps and yes, if you open them in photoshop with color managment off they will work fine. So, your workflow is good is you are using 16bit maps.

Ryan was asking about how you were opening 32bit maps in Photoshop to sample pixels for comparison. Trust Ryan on this, he is an Application Engineer at Pixologic ; )

As for the color shift… well Like Spaz sez its all in the version of your software. I cant imagine that LW does not support 32bit… Is there another file format it supports in 32bit float other than TIFF and HDR Spaz?

S

EDIT: Check out what spaz sais about color managment. I have seen PS shift values without telling you . Make sure it is off before you open the map.
I dont know why the gray appears visually lighter in PS. There are so many millions of levels it isnt really possible to verify a map “by eye.”

When I try to open a 32bit image in LW I have this message:
ZB1.JPG

If it is like Ryan says, that you have to change the extension of the file…
How to do it? Because you can only export in TIF from zbrush…Just for trial…

I suppose that nobody uploaded a quickcode for LW. Does it?

Attachments

ZB2.JPG

I know this isn’t exactly zb related… :smiley:

I’m wondering what level of smooth you apply to your characters when rendering in your chosen render package (ie max, maya, etc…)

I have a model that I want to pose in Max (although info on maya techniques could be transfered), that has displacements from zb but I don’t want to deal with all the poly’s associated with a highres mesh when posing in the viewports - chunky updates from the viewport.

How do you guys handle working with hi poly files like these, then rendering the hi-res verions. Do you use the lo - res cage as a deformer? and only show the hipoly version at render?

any help would be great, thanks!

Hey pixemo, I usually use either the origianl low res mesh or maybe lvl 2 from Zbrush and rig and animate that, render it as sub-D surface with the Displacement Maps from Zbrush, it takes a little getting used to so that you know what you need in your original mesh for animation VS what you need as a good edge flow for sculpting in Zbrush, but if you stay with an all Quad mesh or close to it you should be fine.

one more thing tho - I’m trying to render with Mental Ray, (Maya)there doesn’t seem to be any displacement input in the sss shaders. Are you guys not using MR when rendering your stuff? or is there something I’m missing (most likely the case…) in the render settings.

BTW nice stuff on your site - top notch!

Yeah you can manually attach a displace node to the shading engine, here im useing the fast_skin sss shader for mental ray in Maya, on cube that has a subD approx node attached to it as well,

Heya guys, very beautiful stuff on your site, and very iseful info on this thread…
I run into flickering problems while animating in MR, still images are ok but as soon as i to do a batch render and compo the images flickers occur everytime, did you guys run into this problem in the past ??
I’m running maya 6.5 on windows xp pro.

what was flickering, your sub surface stuff?? Im just now in the process of rendering out animations with these shaders so Im sure Ill get it too, maybe increase the resolution of the lightMap or the samples in the lightmaps settings??

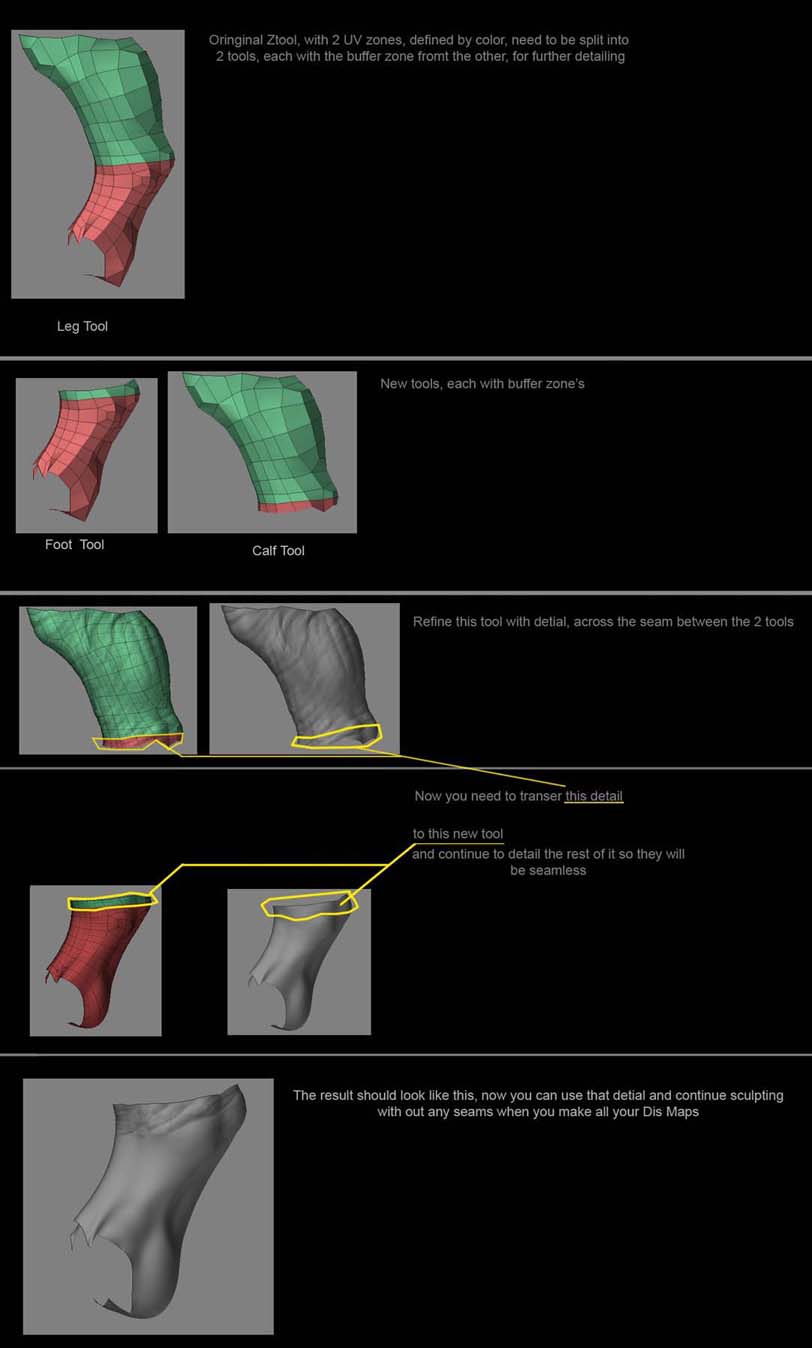
So I have been messing around with taking a character, cutting it up into seperate Z tools based on the UV regions, and adding the buffer zones around the edges.

This works fine and you are able to go in and add more polys/details to the individual Ztools, now I thought I had my head wrapped around being able to sculpt all the detail across the seams of the tools, say you want to put a bunch of little scales or wrinkles across 2 seperate Ztools, my earlier approach of saving the detail off as a displacement map and reapplying it to the next tool for continuity seems to have a few “problems” I wont go into detail about these but lets just say it doesnt really work and messes up your seams and stuff.

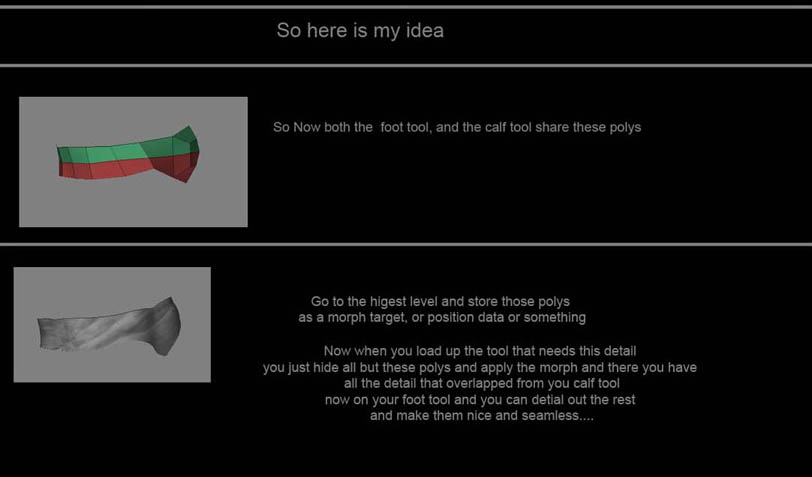
Soooooo… the fix I have in mind would work but it would require a Zplugin/script or what ever, I dont know how to do this so if someone could help out that would be awesome, or maybe this will give someone a better idea!!

What I am proposing is that you save out a Morph file or something to that effect of your polys in that buffer zone becuase the have the sculpted detail you want, but now you have to apply it to the appropriate Z tool that has the entire area to be sculpted. maybe an image would be better…

so you could save out the morph target of just the polys in the boarder zone from one tool and apply them to the same polys of the other tool, to ensure that the detail matched up perfectly. and with this function you could transfer the detail from these seam areas back and forth all day as you made changes, seems like it would be a usefull feature.

So WHO KNOWS HOW TO DO THIS :slight_smile: !!!

does this make sense, I dont feel as though I am explaining it very well :slight_smile:

Attachments

problem.jpg

solution.jpg

Seems like you can accomplish this by cutting the tool apart after you reach your max subdivisions and need to add more geometry… Then your detail you need to transfer is already there and you aren’t trying to transfer it.
I may be misunderstanding your process though since I thought you were already sculpting on the the mesh before you dismantled it.

S

Of course I do see how details added after dismantling wont be possible in the buffer zones… So I guess you are looking for a way to aleviate that issue?

I woudl think placing your “seams” in inconspicious areas that dont require as much detail would be one way of approaching it.

Perhaps there is a way to create maps from the buffer zones themselves of you can create a version of your mesh with those polys set up in regions…

S

PS Check with marcus Civis or Svengali, those two do some awesome ZScripts but I dont know if they spend much time in this forum…

Yeah I dont want to have to worry about where the seams are, and yes I am refering to the smaller detail that you cant sculpt until you seperate the tools, like on a dino all the small scales and stuff, and trying to hide the seams in places is what Im trying to aviod, but maybe the best option at this point !!! come on ZBRUSH 2.5!!! I cant wait to see how many polys it can handle, with stability that is!! seems like soon as I hit the 4 million range it starts to get pretty flakey~

KTaylor,

You might take a look at a somewhat under-appreciated ZScript “GEM” that Aurick posted a while back. It’s called Select-It.

With a little bit of patience, you’ll get it to do exactly what you’re wanting.

Here’s the link:Aurick’s Select-It

Consider dragging the necessary buttons (from the Transform palette-menu) onto your interface to make it easier to use.

Sven

[edit: Gave Select-It a quick test of your concept and it looks like it’ll work. A very useful high polycount work-around… Thanks for the idea! ]

I read through the info and it sounds like a tool for hiding/unhiding poly groups, I dont see how this could be used to transfer detail between Ztools?? am I missing something?

Hi Kris,

I guess I misunderstood what you were trying to do. I looked at your image examples and thought you were looking for a way to define overlapping margins along polygroup seams on the SAME object… which was what I tried with Select-It.

Different objects. Different problem. Different solution. :stuck_out_tongue:

Looks like 2.5 will solve it for you.

Sven

Hey guys,

I"ve been getting consecutive crashes when using multi-displace 2 . Setting my export options to 3076 size, it crashed whilst generating the displacement map , half way through.

I then proceeded to export at the default setting of 2048 and everything went well.

Any clues about this crashing issue? is it a bug or something like …we aren’t allowed to go above 2048 ?

REgards,

Mark Soon

msoon2k -

Check your UVs for each poly group. If there are overlapping UVs then MD2 will crash. Sometimes with smaller maps you can get away with overlapping UVs.

The procedure for this is as follows:
Draw tool on canvas and enter edit mode
In the tool palette, polygroup sub-menu, click UV groups
Turn Frame on (in the shelf) and deselect the texture to see the groups
Press CTRL + SHIFT and click on one poly group
In the Tool palette, texture sub-menu click Check Uvs
Repeat for each poly group.

:slight_smile:

r

Hey there Ry,

Thanks for the post. It’s not any overlapping uv’s I’m pretty sure, as I’ve been using the old way of generating displacement maps ( tools/displacement ). Creating 4096 maps that way is not a problem and zbrush doesn’t crash.

I reckon it’ something to do with the multidisplace 2 plugin. Has anyone here created higher than 2048 maps using multidisplace 2?

Please let me know.

Thanks fellas,

mark soon :smiley:

msoon2k-

I strongly recommend checking the UVs. MD2 can seem to be more sensative at times. If you have any red areas on the generated texture, fix them and about 95% of the time your problem is gone. Fix them for all the parts of your mesh. Go in with the cleanest model possible. :slight_smile:

When testing for problems like this it is best to have no assumptions and all tested facts. MD2 has been used in production at several major studios and we have not encountered a problem like this that is not eventually linked to the UVs. I have been through this several times and each time it was overlapping UVs. :slight_smile:

r

I’ve created 8K maps :slight_smile: with it! at 32 bits thats a 768 meg file…