ZBrushCentral

Pixologic Release - ZPipeline Guides

Ok, after giving out advice on using Quads to Triangles i’ve run into my own problem with it.

I’ve not done any work on my dwarf character for over a month and decided to finally try and get him finished. Previously i was only using the the Quad to Triangles setting to fix some dodgy tesselation on his trousers and boots, his head was rendering fine with conversion set to none.

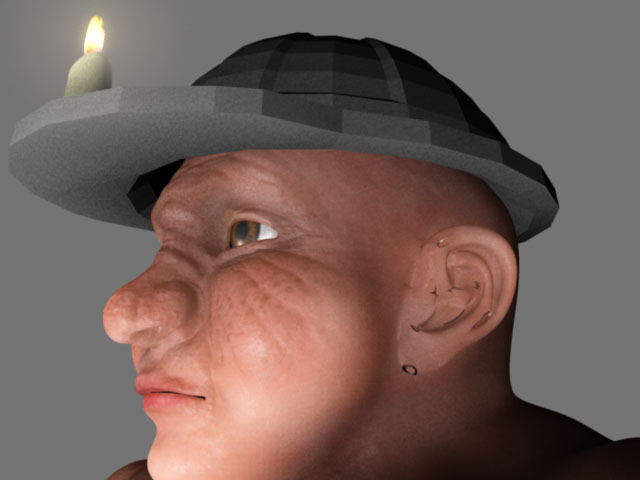
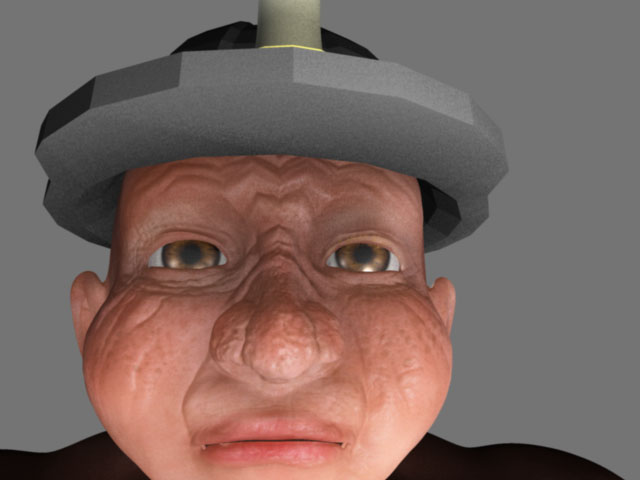
Now i’ve come back to him and i’ve been playing with shaders and his ears are messing up, looks like the mesh is clipping into itself. Switching to Quads to Triangles sorts the ears out, but then the displacement on his face goes all jagged. No amount of changing the SubDivApprox settings can seem to fix him. Tried upping the division levels, lowering the length etc to no avail. So i’m kinda stuck now, he either has dodgy ears and a nice face, or a dodgy face and nice ears.

Any help would be much appreciated, kinda stumpted at the minute

Hez

(Ignore the mouth/chin area, its covered by a big beard)

Conversion set to None, nice face, bad ears
Quads.jpg

Attachments

Triangle1.jpg

Triangle2.jpg

Ok, its not the end of the world, seems i’m just going to have to Smooth him one level in maya before render time, i dropped the SubDivApprox down a level on min and max and the render time has dropped by about 40 sec’s which is a bonus, can’t see any major loss of detail either.

This may make things easier in the long run, as i’m using hair, i couldn’t attach it directly to the low poly mesh as it wouldn’t match the displacemented mesh enough, so i was applying it to a smoothed version of the mesh anyway which i was going to wrap deform to the low poly mesh. (It makes sense in my head i’m sure :wink: )

Hez

Hi all, i’m newbie and
following the pdf i’ve encountered some problem (probably is my poor skill in XSI)
-Create a sphere in XSI and assign a spherical projection
-Export in ZBrush and check UV: at this point i have the whole object paint in red and the texture create is not right.
I can’t able to exit from this…
Some help?

Second question:
-Export a mesh in Zbrush and in Z assign a guv tiles and create a texture.this work fine.

  • If i try to export also the displacement map following all the step(starting create in xsi exported and mapped UV in ZBRUSH), when i come back in XSI and put the mesh and the Displacement, nothingh change: off course i 've check the render tree and i have all the input correct.
    iI need change manually some value? it’s seems like not applied…
    Thank’s
    leo

I’m back with another question…

How do I render bump maps in Mental Ray with default Maya shaders? Mine are not coming out right and I can’t figure it out. I’m using the Z Brush/Maya guide, setting alpha offset to -1/2 of Alpha Gain (base color of bump map is 50% grey, made in ZBrush, 4096 size), converting to .map, and rotating the texture. What settings should I use in the bump2D and file nodes? I’ve been messing with the filtering settings but no luck. Any suggestions or ideas? Thanks for any replies.

For those who can wait no longer for the 3ds Max/Mental Ray pipeline, the solution to your problems is posted in the ZBrush Tutorials Forum under the heading Tutorial:ZBrush displacement maps in 3dsmax, metal ray

It works perfectly!

Hey Fatkid:

To adjust the “volume” of the bump map under bump2D adjust the bunp depth slider.

S

Is the 3ds max Pipeline awaiting the ZBrush 2.5 release also? I didn’t realize that the pros would have as much trouble as the amateurs with the displacement problem. Max must not be very cooperative to work with at either end when it comes to integration with other apps.

Oh well…

Currently being in the process of moving my main rendering app from Maya to 3D Max here’s my take on the whole max thing. I found that it’s pretty easy MOST of the time to render the maps as long as you follow the same basic rules that you would for a maya mental ray render. Although I have to say that I’m using Vray not mental ray. Sometimes the map (although generated and treated the same way as a one that works perfectly well in max) will do ‘crazy stuff’ seemingly out of spite.:wink:

So I guess what I’m saying is that a definative max guide would be a massive helpt to me for one right now. If anyone has any ‘magic’ Vray settings pass them on as you’l save me days of fiddling about.:lol: I’ve found the pipeline guides to be really useful , so I’m eagerly awaiting the max one.

Wayne…

The test files from ZBCentral work great in max/mental ray, but all of the ones I create seem to be duds… Why’s it so hard? :cry:

Ladies and Gentlemen! Lo and behold! The eighth wonder of ZBrush land! The magical, the commanding, the bold!

The ZBRUSH to 3DS MAX 8 guide has been released to the world! Get your copy here. Experience what others have only dreamed about and, sometimes, crashed their heads against the computer trying to figure out. :slight_smile:

If you have questions regarding the guide please post them in the Question and Troubleshooting forum here.

Thank you Michael McCarthy for yor hard work and for an excellent guide! :+1: :+1: :+1: :+1:

Cheers,

Ryan

Now thats really made my night!:smiley: Thanks.

Wayne…

28 pages of Bliss!

:+1: Many thanks to Michael McCarthy & Scott Spencer!!!:+1:

I’ve been waiting SO long for this! Thanks for putting in the hours guys!

Upham :slight_smile:

Michael, Scott, I will buy you tree pints of beer each if I ever meet you! At lunchtime!!
Thanks a ton, even UVunwrapping hints, this is too much :eek:

Wowness! And only a day after I learned to do it by myself…

Better now then never :smiley: :wink:

smokebox46and2 -

LOL. Well, let us know how it compares with what you know. :slight_smile:

ryan

I’ve posted some pics in the thread below of a method that I used most recently.
I noticed a couple differences so far in our techniques, but both work, so I’m not sure one is better than the other.

http://www.zbrushcentral.com/zbc/showthread.php?p=263809#post263809

I’ll be posting my settings late tonight (early morning)–a short tutorial–to be used in conjunction with the great info that CvH has already provided.

I have learned about UV Regions from this tutorial that I didn’t think was possible in Max, so don’t get me wrong I’m more than grateful for the hard work that went into this lesson!

Thanx a billion Mr. McCarthy and the Pixologic Team and the Autodesk Team :wink:

I would like to mention, however, that the combination of CvH’s and my method does not require the use of a Blur Offset (or Blur for that matter) or the Mental Ray / Max connection rollout.

Do you know how long the high def renders took for you guys?

With my current method it took my machine 40 seconds to render each image in the thread above. Although my machine is pretty stout…

AMD64 4800+ Athlon–Dual Core
4GB RAM
SLI GeForce 7800 GTX x 2

Come-on guys! Give this PDF some top-row status! Let the wider community know that this max pipeline has been produced!! This one-post announcement is lame! There should be fireworks!!

I have not used Max for a few years, and I even downloaded it to read. Hope this helps all our MAX buddies out there.

Thank You!

Much appretiated!

and …:+1: of course to MICHAEL AND SCOTT:D
Andreseloy