I’m not a coder Mealea.
But I can smell some things around.
On such methods, on triangulated dynamically tessellated meshes, a refresh of a data base happens on the fly, under every stroke.
I never have seen such things happening in zbrush. We have a fast dynamesh instead. Far away from being a live recalculation, though. It still remains a surface displacement method.
On the other hand, a chaotic triangulated topology will never let you play with loops etc. What loops…LOL
But, sculptris like methods is the more close to a real, spontaneous sculpting. To add crisp details where you want them to be.
This game will not come to an end soon.
The only I can say, pixologic, so far, choses to freeze sculptris development. I don’t blame them. Hey have a very clear perspective on such matters. Trying to stay close to an artists needs, more than any other app around did so far.
Hey, I did tell you to add z remesher on your workflow, haven’t I?
Practically, you can add a dynamesh (low density) sculpt some wholes and z remesh it. You get loops.
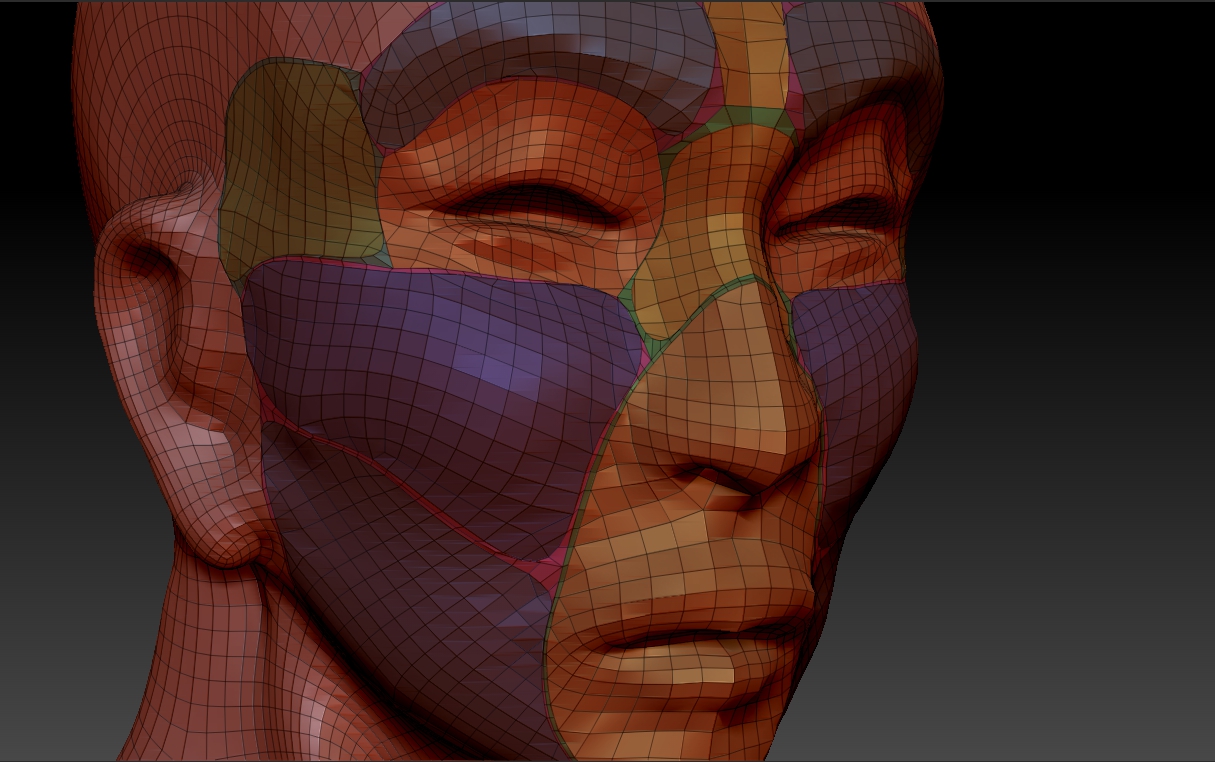
Add some forced loops and you have it. One particularly, on a face. Around the middle of the nose, around lower of the chin. It describes a general extrude of a box modeled face base.
Oh Mealea, this is exactly what I have in mind, during retopology
Thank you great thread.
However, I may add some more in certain areas, Like the forehead. I think there’s more informations there.
Is doing retopology by hand the best way to make these loops?
I tried using Mask to Ploygroup and doing edge and group loops on it but the result was ugly…
Hmmm…
DOing retopology by hand, is always the best solution. But I didn’t mean it this way.
Just add forced loops with the appropriate tool under z remesher. There are instructions, somewhere there.
I can’t find anything that does that under ZRemesher…
However this is the result of messing about with turning masks into polygroups:
I don’t think this is what I would be after but its interesting sort of
Attachments
interesting experiments here,
as always.
you could try the zremesher brush to guide your topology.
grtz p
Oh crap…
I completely forgot about that!!!
THANKYOU!!!
Mealea, read the manual… :lol:
Love the ‘greebled’ face… 
glad i could help,
but it’s somehow a crazy situation,
you learning things from me,
grtz p
the use of displacement maps in zbrush offers great results for sure i thing would be great to apply a displacement on HD geometry when rendering , i use to apply HD after the displacement to have smooth results in parts with less polygon density. Try also morph target and morph brush in the process or project all on dynameshed tool clone of the original one with displacement applied.
the other half of the time I get weird rounded shapes or its applying incorrectly
As you are, after previewing the displacement.
Having Hrepeat, Vrepeat in UV editor.
As you are because you already have the subtool selected.
Export the subtool as obj (please disable groups on export properties)
Import it as you are, it will replace the subtool.
Now subdivide or anything, and apply displacements. I think I already mentioned the bug. Right?
BTW, I just installed my new wacom intuos5 large tablet. I’m already in love with it.
So back to sculpting.
great info michalis.
just did a test with this trick and it seems to work very wel.
have fun with the tablet (i have a medium intuos5, no touch but with wireless module)
grtz p
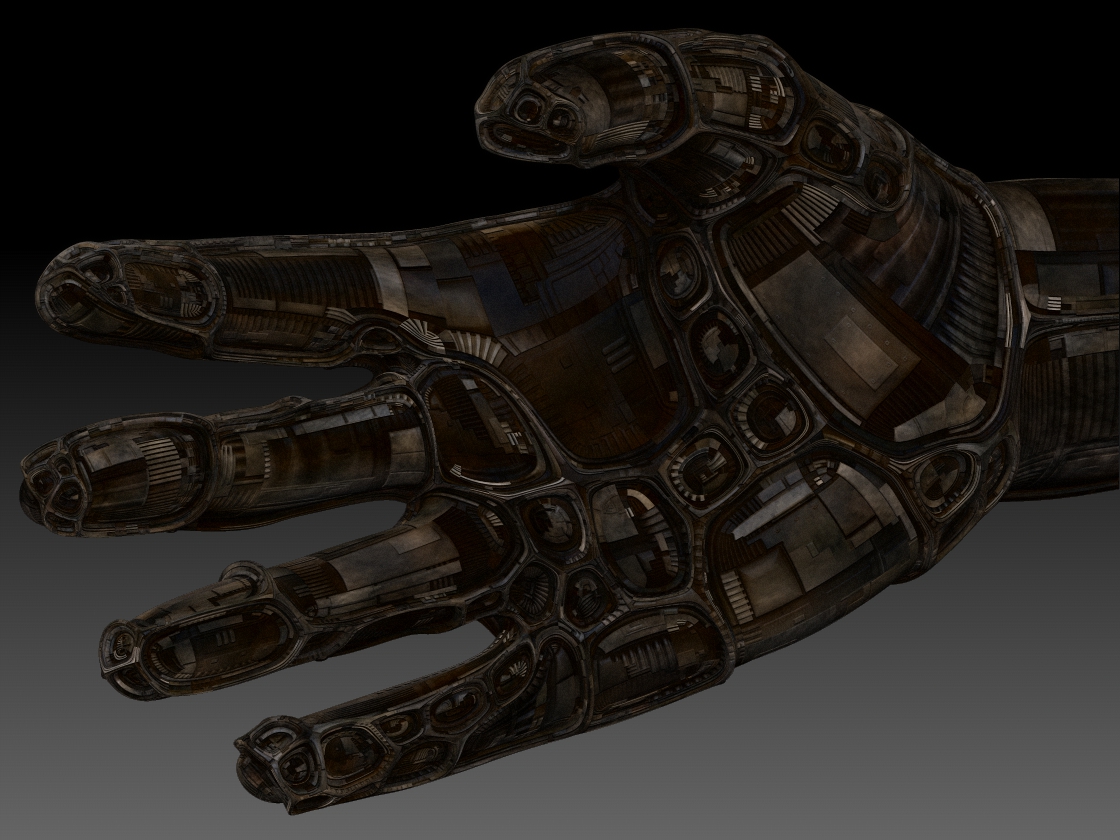
And since hands are so blasted hard to make I decided to make one and then mess with it:
Attachments
Nice hand , seems that you have not displaced it yet right ?
Right, displacing it didn’t work this is just on preview or whatever its called.
Also thank you, hands are not easy, but they are strangely easier than feet for some reason.
:lol:
WOW, this last one is amazing!!!
DO you separate these loops? As new solidified subtool? (sorry, I meant extract)
how the workaround with displ works:
- it must be a bug, because zbrush lets us to preview bumps but it doesn’t apply UVrepeat on real displacements.
- I use to export these to blender, render with cycles. Having in mind to fix it the blender UV editor. I just noticed that zbrush was exporting obj with h,v repeat coordinates precisely. So, importing this obj in zbrush works. Simple.
Just remember, next time don’t apply displ, just export the obj. You have nothing to expect from maps. These are already in zbrush and waiting the imported obj with the right (this time) UV co ordinates.
BTW, intuos are wonderful tools but I bought the large one. I need a few days to feel comfortable. It’s like working on small sheet of paper for long time and suddenly face a large canvas. The touch of the cat, the hit of the tiger… there’s a difference. Leading me to more abstract and expressionistic solutions. I don’t have to zoom for adding details now. It’s great to have a vision of the whole thing when you add details.
Of course, it is the hand behind the sword that makes the difference. (quiz, what was the movie?)
that hand is great.
export to obj and import trick is the thing, 
I also love the nice loops on that hand.
still strugling with that grouploop, etc… stuff.
do you zremesh them before applying the loops?
or after,
or not?
for me, whatever i try, the loops have always kind of jagged edges,
and they are mostly very tiny.
grtz p
Hey, all the loop tricks in zbrush is a remeshing (from a point of view)
Sculpt a potato something, curve some holes. Zremesh it. It will give you loops. You may select them, extract them or whatever.
Or just paint masks on a low poly dynamesh, they will be converted to loops if you wish it. (no tris please).