ZBrushCentral

NightShade WIP

Happy New Year All :smiley:

I finally have some free time so here are some shots of a character I’m working on at the moment, with the final goal being a game res model but I started this to test a more Zbrush Dependant pipeline with 4’s latest features.

I’d love some feedback.

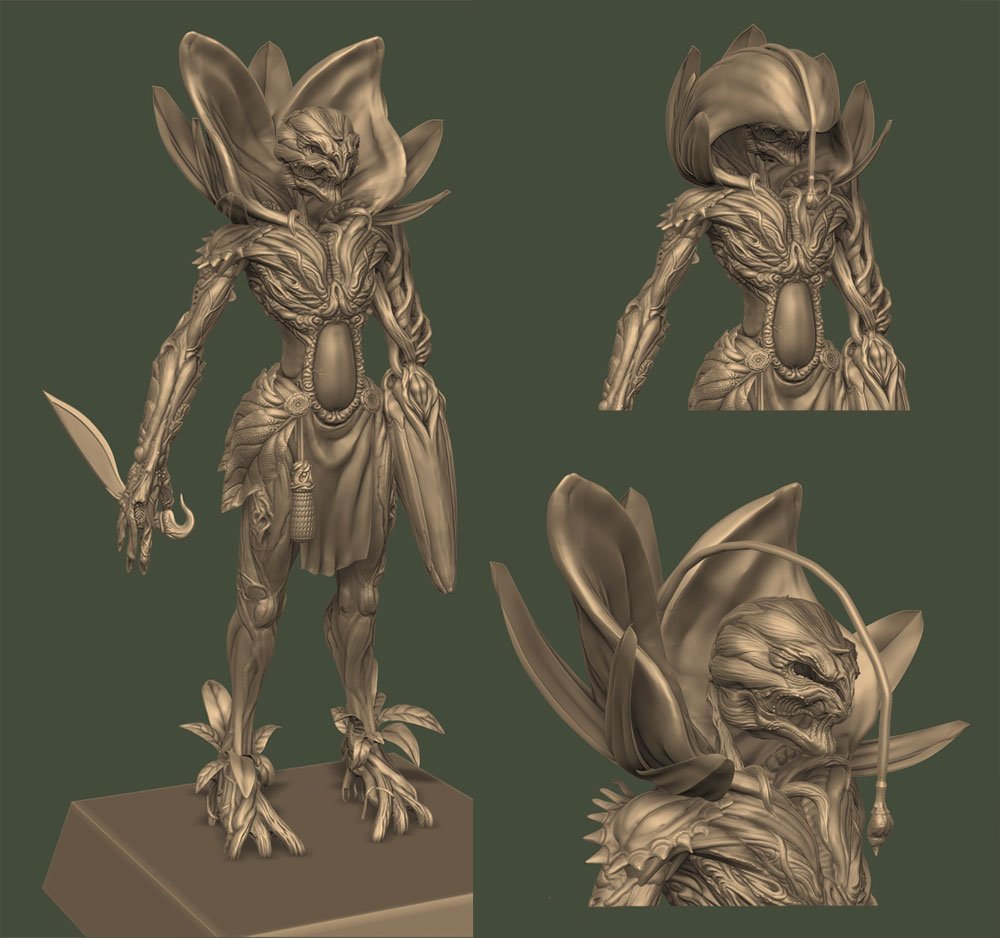
The short story is … NightShade is a mobile plant based warrior, who uses ( but is not necessarily rooted to ) the ground to give him additional energy and health. His Left arm is a flower that acts like a weapon. For greater energy he can open head so his petals receive more sunlight but reveal his vulnerable head.

My low res mesh is still a little on the high side but I’ll post that as soon as.
Thanks

NightShade_WIP_01.jpg

Attachments

NightShade_OpenHead.jpg

looking pretty awesome, i like the concept a lot, haven’t seen anything like it before. Is it a female or male character? or maybe just no gender ? anyways i have no critiques myself. just wanted to say it looks sweet and keep going with it

Cool, I like the chest! :+1:

Sorry not sure if my images are working properly so I’m reposting just in case…nothing new :smiley:

NightShade_WIP_01.jpg

Attachments

NightShade_OpenHead.jpg

so this is what Monsanto is shooting for.

look like flowers, i can’t wait for color!:slight_smile:

Thanks for the support guys. To answer the gender question Its either male - or a very butch female … your choice :smiley:

I’ve loved some of ZB4s new features but I am having some issues. The following screenshots to illustrate …

When moving or posing the subtool I used the lowest subD and transpose rotate tool with a mask. When switching to the highest subD I find the resulting mesh artifacts. They are hard edges that mimic the low poly mesh.

Zproblem_Translation01.jpg

I think I understand why it fails:confused:, as the detail is missing the rotational info from the first layer … but can anyone suggest another way to achieve the same effect as it would be useful in other areas of my ZBwork.

Thanks

Attachments

Zproblem_Layers01.jpg

Um, each layer contains the transformational data of what was sculpted on that layer SO if you hide the layer, you also hide the sculpting you did on that layer leaving only the sculpting details from other layers.
However, if you ‘apply’ the sculpting from one layer to your base layer then it will affect stuff on the other layers, too.

I’ve never used layers but I’m assuming that this is a similar drawback to working with morphs/blendshapes in normal 3d programs.

After a PC implosion, OS change I’ve finally got something close to a wiremesh, UVlayout and a test colour scheme.

NightShade_TestColours01.jpg

The images are screenshots from the max viewport using the Xouli Shader using only a normal map and simple diffuse. The mesh is 12k tris but I intend to get this under 10k which shouldnt be a problem.

Normal maps were also an issue and I ended up baking them in max. The Normal maps from Zbrush were very quick, very easy but unfortunately full of random hard edges and so are not usable:cry: 
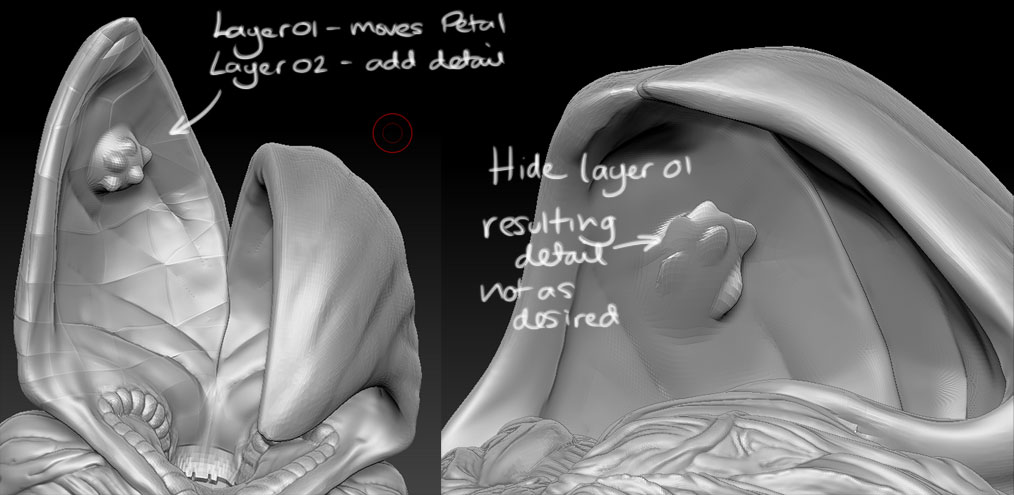
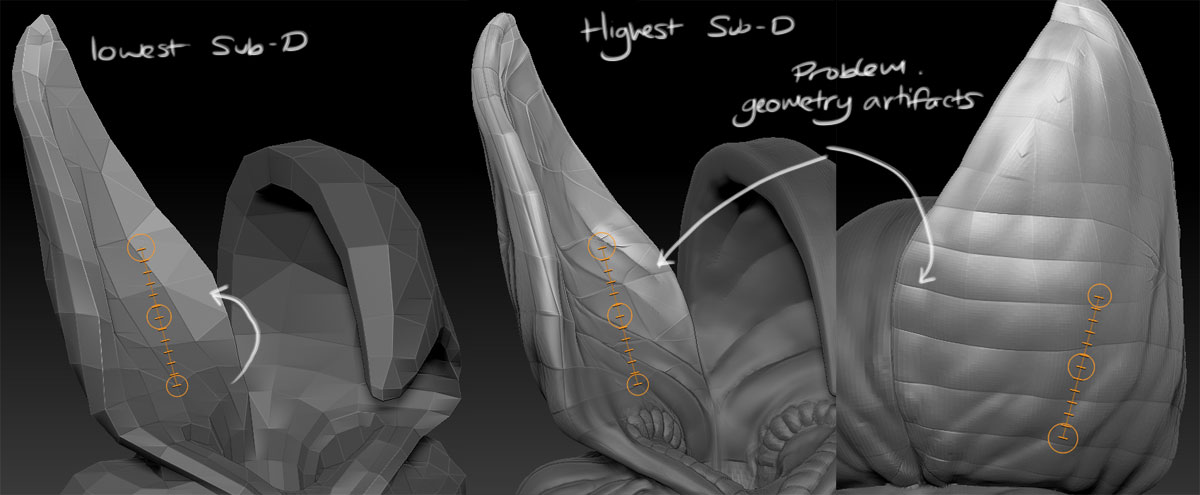
Rendering with SmoothUV removed these edges but changed the UV layout.

There was a solution posted here … http://www.zbrushcentral.com/showthread.php?t=76311&page=2&pp=15&highlight=Normal+map+hard+edges

But please tell me this isn’t the only work around as this doesnt really fit into free GoZ friendly pipeline.

I am struggling a bit on the colours scheme as i dont want it to look too busy but I do want to pick out the detail in the main body forms.

What are peoples thoughts so far?

i think it looks great so far. You should check out xnormal. Its simple and gives you great results.

Thanks SadamHu. How is Xnormal at handling high poly Zbrush decimated meshes. Can Xnomral out perform max in this respect? on, for example, a modest dual core vista machine with 3mb ram such as mine.

I have generated the cavity map passes in XNormal which was very quick and easy though.

Here are some more Colour tests …

NightShade_TestColours02.jpg

really like the concept, but the shade above the head seems -to me at least- to take away from the overall feel of the sculpt…looks great in the matcaps, but gets lost in the color test - red would be my fave of the three…

Anyways, like the sculpt and the concept, looking forward to seeing more if it.

I really like what you’re doing here with this sort of assassin botanical creature. I like the red too.

its very good at handling the highest subdiv you can throw at it. Its best to
make a cage around the highpoly using the lowpoly. What I do is have the
lowpoly highpoly in zbrush, duplicate the lowpoly and inflat the lowpoly until it
covers the highpoly. when you do that though you should just be careful that
you dont get weird warping with the inflat. Sometime you have to just pull the
cage out to cover the highpoly.

Good idea to create the lowpoly projection cage in Zbrush … I’ll give that a go when i next project my normals, which will probably be when i update the sculpt with my diffuse maps and work into the added detail.

Here is the colour maps so far … though its still very much wip so still no spec, gloss and updated normal map.

The following are screengrabs from the max viewport using the Xouli and not renders as I’m aiming for game ready model… Though seeing all of the very awesome stuff dotted around I’m very tempted to move towards a Zbrush render.

NightShade_TestColours03.jpg

awesome!:+1:

Very cool concept of the character… Nice one!

Hi Guys

Finally reached something like a conclusion. Here are the final screenshots of my little plant guy, taken using the XouliShader.

I have learned a lot about Zbrush 4’s shiny new features, especially GoZ … I really don’t know how I functioned without it.

Thanks to all those that helped out along the way and please let me know what you think.

Nightshade_Thumbnail.jpg
NightShade_Screenshots01.jpg

Now … on to the next character …

Attachments

NightShade_Screenshots02.jpg

NightShade_Screenshots03.jpg

NightShade_Screenshots04.jpg

This is killer!!

excellent character . love the work, howd you layout the uv’s