Thanks alot  Would be cool if you can get it working. I played arround with it, but perhaps there are some other things that need to be set
correctly. I’m not sure if its a Framing thing. You need to divide the plane up for more resolution!! and use FRAMER to frame it. (wrapmode 2).TexturePlane.zip (35.4 KB)
@decorix: I checked out your TexturePlane. To get it to work; set the Align to ‘Align Z’ then run ‘Create New TileTool.’ After that is processed; append the ‘TexturePlane’ Subtool to the newly created NanoTile Tool. Scale the appended ‘TexturePlane’ Subtool by 100 [Tool:Deformation:Size].
Set your Wrap Mode to ‘1’ when sculpting. It should tile correctly when generating the maps
-Joseph
Hey Joseph,
Great plugin, but I’m having an issue where the passes I export are unable to open, aside from one (the AO/height). I tried exporting both as TIFF’s and PSD’s, but when I open the PSD’s in PS I get an version incompatibility error. Its essentially the same for the TIFF. My PS is legit and everything, so I have a feeling it has something to do with the actual images being exported. Any ideas why this might be happening?
I skimmed through the posts on this thread and couldn’t find any issues brought up that are similar to this, I might have missed it though. I am using the first version, I only just noticed there are updated versions further into the thread, maybe updating it will fix the issue? I’m using 4r7 64bit P3 on PC by the way.
Thanks!
Hello Joseph,
Thanks for checking it out!!! I have played arround with it and it seems to work correctly now
I did have a other problem with a seam!! on my textureplane. I also tried this:
-created a plane (divided it up)
-create from NoiseMaker (a tilling texture)
-Mask by Alpha (tilling texture)
deformation (used inflate)
Then appended Plane in, but when I render out the maps with your plugin. I’m getting a seam from my plane.
Is this because the plane is getting distorted on the edges and I should be using my Textureplane.
In my TexturePlane I also had subtool called FRAMER does this also need to be appended and scaled to 100?
You didn’t mention this. Thanks.
@amvoelkl: Updating to the current version should solve this.
@decorix: Sorry for the late reply on this! Yes you are more then likely seeing the seams because of the edges are being distorted. Your Textureplane had geometry extending off to resolve this.
If you want to use your Framer you can; scaling up by 100 should work. The #FrameGrab subtool created when running ‘Create New Tiletool’ contains the offset that is used by the plugin. The #Frame subtool is used to display the framed Nanotile texture during creation (this subtool is the same size as a Default Plane3D object and should match your Framer from the Textureplane.)
-Joseph
Why don’t I see “RandArray” in the NanoMesh window? Anyone else seeing this?
@Pombero: Make sure you have ZBrush updated to 4R7 P3. (it should say what version you are running at the top of ZBrush.) The ‘RandArray’ should be there if you have the most recent version of ZBrush installed.
-Joseph
Hi joseph,
Is this possible with the plugin?
I’m trying to render different passes with different materials assigned such as basic material (for cavity), but when I render
with the nano-tiler plugin output maps/to BPR color its not rendering correctly. In my render options I have turned off shadows and
set it to BEST render.
When I do a BPR render (SHIFT-R) with BEST it renders fine, but not with the nano-tiler plugin when you output to BPR color.
Do you perhaps know why this is happening? Thank you.
@decorix: The Best render option does nothing with BPR and is actually a totally different render option inside of ZBrush (it was the only way to render before BPR was added; there was Preview and Best.) To get Best render to function correctly you also need to have Shadows turned on. If you are trying to obtain the the result you are seeing with Best render the only process currently with the NanoTile textures plugin that uses Best is the Normal Map pass (and this pass will always apply the Normal Map material before rendering.)
When rendering with BRP with shadows are turned off you should be getting something similar to the ‘Preview’ option in the NanoTiles texture. The only thing I can think of about why it’s giving you odd results is If you have any materials baked into the NanoMeshes? These materials would overwrite whatever material you have selected in the material panel.
If you can upload the file I’ll be happy to take a look at it; just shoot me a Private Message through ZBC.
-Joseph
NanoTile Textures
(Ver 1.8 Updated 9/5/2015)
Installation
**** Make sure you have updated to ‘ZBrush 4R7 P2’ or later! *****
ZBrush 4R7 32bit:
UnZip the attached NanoTileTextures_v1.8_x32.ZIP file to your \Pixologic\ZBrush 4R7\ZStartup\ZPlugs\ folder.
Restart ZBrush.
NanoTile Textures will be located under the Zplugin tab.
ZBrush 4R7 64bit:
UnZip the attached NanoTileTextures_v1.8_x64.ZIP file to your \Pixologic\ZBrush 4R7\ZStartup\ZPlugs64\ folder.
Restart ZBrush.
NanoTile Textures will be located under the Zplugin tab.
**** Make sure you have updated to ‘ZBrush 4R7 P2’ or later! *****
Change Log
v1.2: Initial Public Release
v1.3: Hopefully fixed the issue where Auto Exported maps were being generated incorrectly. (Thanks to ][-][4Z4R][)) for helping test this!)
v1.4: Fixed a ‘Y’ frame plane alignment issue (was slightly offset.) Added 8192 map resolution with some caveats. When selecting 8192 you will get a popup that asks you if you want to use ‘Full 8192x8192 that will have small seams on some passes’ or ‘Seamless 7824x7824.’ (Normal Map, AO, and Height Maps passes should generate seamless at both resolutions.) If you are okay with the maps being generated at 7824x7824 all passes will be seamless. If 8192 is selected on x32 bit; you will get a dialog that pops up suggesting you generate the 8192 resolution maps in the x64 bit of ZBrush.
v1.5: Fixed an issue where the default ZModeler brush would be selected after creating seamless maps (You would have to switch back to the NanoMesh brush you were last using each time.)
v1.6: Fixed an issue where NanoMesh indexes with stored Matcap Material information would not generate Normal, Albedo, or Bump Maps correctly.
v1.7: Added code to remove MatCap data from any linked textures (textures that have the ‘M’ channel baked in) before generating the Normal, Albedo, or Bump Maps.
v1.8: Added ‘Best Render’ to the list of outputs. Thanks to decorix for the suggestion.
Notes
A ‘Best Render’ option has been added for output. This will use the ‘Best’ render option located in: [Render:Best]. (This should be useful for generating cavity maps.)
-JosephNanoTileTextures_v1.8_x32.zip (79 KB)NanoTileTextures_v1.8_x64.zip (79 KB)
On Mac OS X 10.10.5 i get this error message on ZBrush 4R7 P3 (x64) startup and NanoTileTextures_v1_8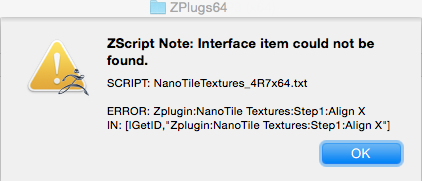
@TBAzB: Try this one and see if it fixes the issue. The error you are getting is related to ZBrush not being able to find the Interface for “Align X” I promise Its there
NanoTile Textures
(Ver 2.1 Updated 9/14/2015)
Installation
**** Make sure you have updated to ‘ZBrush 4R7 P3’ or later! *****
ZBrush 4R7 32bit:
UnZip the attached NanoTileTextures_v2.1_x32.ZIP file to your \Pixologic\ZBrush 4R7\ZStartup\ZPlugs\ folder.
Restart ZBrush.
NanoTile Textures will be located under the Zplugin tab.
ZBrush 4R7 64bit:
UnZip the attached NanoTileTextures_v2.1_x64.ZIP file to your \Pixologic\ZBrush 4R7\ZStartup\ZPlugs64\ folder.
Restart ZBrush.
NanoTile Textures will be located under the Zplugin tab.
**** Make sure you have updated to ‘ZBrush 4R7 P3’ or later! *****
Change Log
v1.2: Initial Public Release
v1.3: Hopefully fixed the issue where Auto Exported maps were being generated incorrectly. (Thanks to ][-][4Z4R][)) for helping test this!)
v1.4: Fixed a ‘Y’ frame plane alignment issue (was slightly offset.) Added 8192 map resolution with some caveats. When selecting 8192 you will get a popup that asks you if you want to use ‘Full 8192x8192 that will have small seams on some passes’ or ‘Seamless 7824x7824.’ (Normal Map, AO, and Height Maps passes should generate seamless at both resolutions.) If you are okay with the maps being generated at 7824x7824 all passes will be seamless. If 8192 is selected on x32 bit; you will get a dialog that pops up suggesting you generate the 8192 resolution maps in the x64 bit of ZBrush.
v1.5: Fixed an issue where the default ZModeler brush would be selected after creating seamless maps (You would have to switch back to the NanoMesh brush you were last using each time.)
v1.6: Fixed an issue where NanoMesh indexes with stored Matcap Material information would not generate Normal, Albedo, or Bump Maps correctly.
v1.7: Added code to remove MatCap data from any linked textures (textures that have the ‘M’ channel baked in) before generating the Normal, Albedo, or Bump Maps.
v1.8: Added ‘Best Render’ to the list of outputs. Thanks to decorix for the suggestion.
v2.1: Fixed the issue where turning ‘Show Placement’ off was still rendering with some passes. Fixed 'Best Render’rendering twice. Added some additonal modes to help with Heavy Scenes; ‘Quad’ Array and ‘Show Seamless’. Added a switch to convert between ‘Quad’ Array and the original ‘Keypad’ Array (Thanks goes to Campi.) Added the addition of a ‘WrapMode Plane’ Subtool (This will allow you to create a sculpted base layer (make sure you have Show Seamless on when using.) Added a Cavity Pass (Thanks to decorix for help on this.)
Notes
Soo… This is a big update. Turns out everyone enjoys creating really large geometry scenes containing millions of polygons with this plugin
To reduce some of the CPU throttling I added the option to use a ‘Quad’ Array in addition to the ‘Keypad’ Array to generate the tiling. This will reduce the amount of topology of the scene by over 50%! This mode however it’s not visually easy to use and can be confusing to users. When using the ‘Quad’ option the NanoTile will display in the lower right corner instead of the center (this is not a bug.) Below is an image to illustrate how it is working:
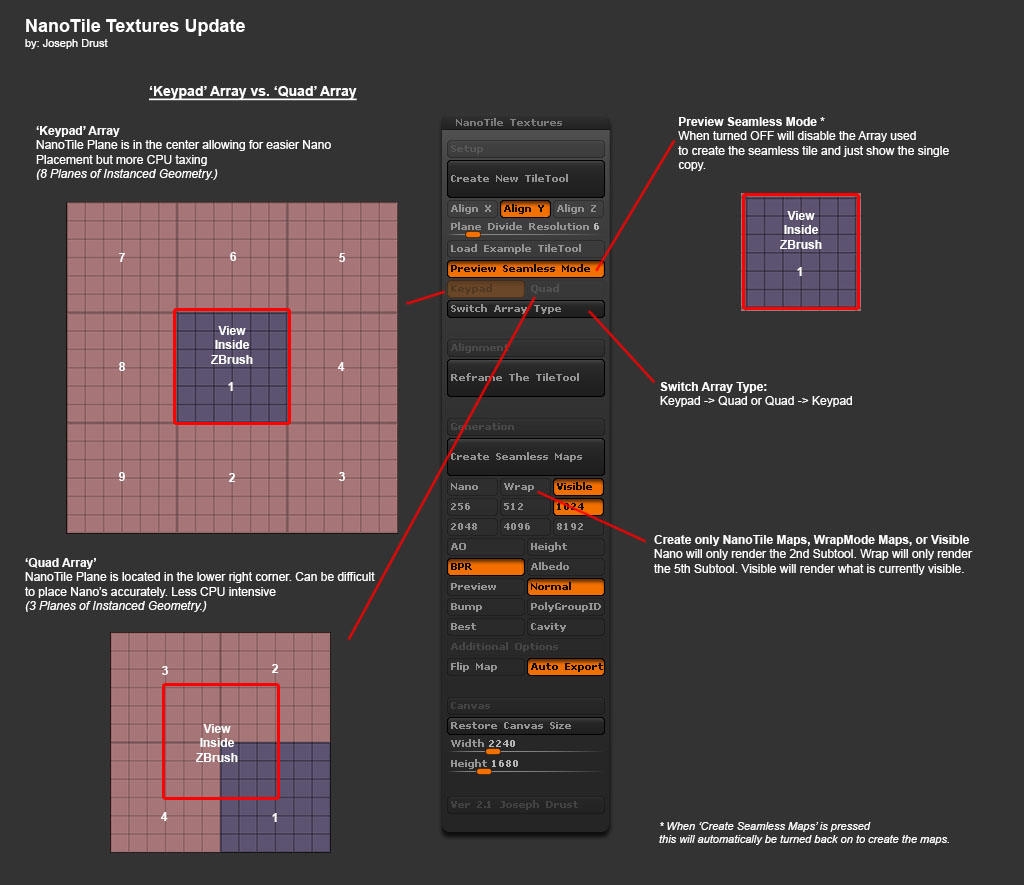
Now to make the ‘Quad’ option a little easier to use I have added a ‘Show Seamless’ switch. With ‘Show Seamless’ Off the NanoTile Plane will be centered on the canvas. This will make placing the Nanos easier but will not accurately show you what the final tiled result will be. (The WrapMode Plane will also not display correctly when using ‘Quad’ and having ‘Show Seamless’ Off.) A button has been added to switch between the ‘Keypad’ Array and ‘Quad’ Array (so you can toggle back and forth between the two if needed.)
In addition to the ‘Quad’ Array option a ‘WrapModePlane’ Subtool has been introduced. This will be the 5th Subtool in the created scene. This Subtool is setup to work with the setting of ‘WrapMode 1’ on any brush. (To activate WrapMode go to [Brush:Curve:WrapMode] and set it to 1.) By default when clicking ‘Create New TileTool’ the Clay Brush, Clay Buildup Brush, Dam Standard Brush, and Standard Brush will have WrapMode activated automatically (This will only happen on a new scene creation thou; if you open up an existing tool you will have to reactivate WrapMode on your brushes.)
To use the ‘WrapModePlane’ Subtool just select the Subtool then divide up to a desired polycount (SMT is already off. [Tool:Geometry:Divide] ) Then choose your desired sculpting brush. If WrapMode is active, when you sculpt over the outer edge the effect will be seen on the other side. (The WrapModePlane contains a safe zone to prevent tearing.)
Finally the ‘Cavity Render’ pass has been added.
This is a pretty big update so there is a large chance my coding has bugs somewhere  Just post any issues on this thread and I’ll attempt to solve them. Happy ZBrushing!
-JosephNanoTileTextures_v2.1_x32.zip (112 KB)NanoTileTextures_v2.1_x64.zip (112 KB)
This new version works well again on mac. 
Thanks, Joseph.
Hi,
Thanks for new update Joseph
I was wondering if there’s a solution/fix for example using Tilling textures
created with NoiseMaker/PS to be used with the new WrapModePlane?
I have currently tried to use Alpha62 (In the Alpha properties set tilling set 2) then
when I do Mask by Alpha I can’t get it to tile. It would be cool if you could use
tilling textures on the WrapModePlane in combination with Deformation/Inflate.
Would certainly like to hear if this is possible? Thank you.
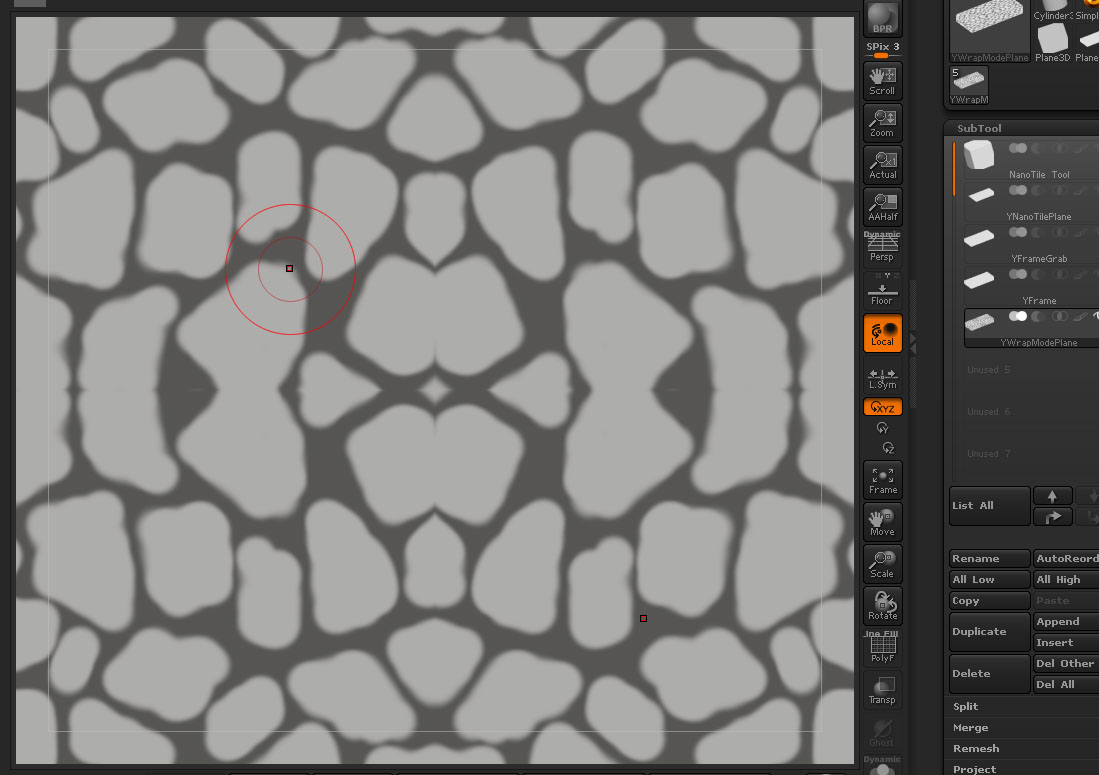
@decorix: Yes this will totally work when using the WrapModePlane Subtool as long as the alpha is tillable:
DragRect Workflow:
- Make sure Symmetry is off
- Hold CTRL to select the Masking Brush
- Select a tiling alpha (Alpha 62)
- while still holding CTRL set WrapMode to ‘2’ [Brush:Curve:WrapMode ‘2’] (Any WrapMode should work.)
- while still holding CTRL change the stroke to ‘DragRect’ [Stroke:DragRect]
- while still holding CTRL set your focal shift to ‘-100’ (this will make sure that the alpha draws out at 100%) [Draw:Focal Shift]
- while still holding CTRL drag the mask out you should see it appear. Now you will have to play with the rotation and scale as you drag it out to match the seams.
You can also select any brush and apply the same steps to make it wrap. If using a sculpting brush it is recommended to disable ‘Lazy Mouse’ before using the DragRect option. Storing a morph target on the plane before you apply the alphas then using the Morph Brush with WrapMode turned on will allow you to scrub out the details.
Now to remove the manual matching process out of the equation you can use Surface Noise as well:
Surface Noise Workflow:
- Select a tiling alpha (Alpha 62)
- Export this out so that if can be loaded into NoiseMaker [Alpha:Export]
- Turn on Surface Noise [Tool:Surface:Noise] The NoiseMaker window will pop up.
- In the view, frame the plane so that you are looking straight at it (The alpha will be applied based on what angle the model is facing.)
- Load the alpha (Alpha 62 that was exported above) by clicking ‘Alpha On/Off’
- Set ‘Mix Basic Noise’ to ‘0’ [Mix Basic Noise]
- Click ‘fH’ [fH] to flip the graph horizontally (this will allow for positive strength values to make the black recede. little more user friendly.)
8a) To Create a Mask (for use with inflate):a) Set [Strength] to ‘0’
b) Set [ColorBlend] to ‘-1’ and then Set the Color to Black. (This is purely visual so that you can see the noise applied.)
c) Adjust the [Alpha Scale] of the Alpha being applied if desired. (You are limited to these values for holding the seamless tile: 1, .5, .25, .125, .0625)
d) Click [Ok] to exit NoiseMaker
e) The alpha should be visible as color on the plane.
f) Convert the noise to a Mask [Tool:Surface:MaskByNoise]
g) Sculpt/Inflate/as needed.
8b) To Create 3D:a) Set [Strength] to ‘100’ (This can be changed on the fly to adjust how much depth appears.)
b) Adjust the [Alpha Scale] of the Alpha being applied if desired. (You are limited to these values for holding the seamless tile: 1, .5, .25, .125, .0625)
c) If desired change the graph, change the offset, etc…
d) Click [Ok] to exit NoiseMaker
e) The Noise applied to the plane can now be rendered out*; or you can bake it into the mesh [Tool:Surface:Apply to Mesh]
- Passes using ‘Best’ and ‘Preview’ render modes (Albedo, Best, Cavity, Height, Normal, Preview) will always display active surface noise above the NanoTile geometry. It is best to apply the surface noise to the mesh before creating the seamless maps where you want to use the NanoTilePlane and the WrapMode plane together.
Let me know if that helps =)
-Joseph
NanoTile Textures
(Ver 2.3 Updated 10/28/2015)
Installation
**** Make sure you have updated to ‘ZBrush 4R7 P3’ or later! *****
ZBrush 4R7 32bit:
UnZip the attached NanoTileTextures_v2.3_x32.ZIP file to your \Pixologic\ZBrush 4R7\ZStartup\ZPlugs\ folder.
Restart ZBrush.
NanoTile Textures will be located under the Zplugin tab.
ZBrush 4R7 64bit:
UnZip the attached NanoTileTextures_v2.3_x64.ZIP file to your \Pixologic\ZBrush 4R7\ZStartup\ZPlugs64\ folder.
Restart ZBrush.
NanoTile Textures will be located under the Zplugin tab.
**** Make sure you have updated to ‘ZBrush 4R7 P3’ or later! *****
Change Log
v1.2: Initial Public Release
v1.3: Hopefully fixed the issue where Auto Exported maps were being generated incorrectly. (Thanks to ][-][4Z4R][)) for helping test this!)
v1.4: Fixed a ‘Y’ frame plane alignment issue (was slightly offset.) Added 8192 map resolution with some caveats. When selecting 8192 you will get a popup that asks you if you want to use ‘Full 8192x8192 that will have small seams on some passes’ or ‘Seamless 7824x7824.’ (Normal Map, AO, and Height Maps passes should generate seamless at both resolutions.) If you are okay with the maps being generated at 7824x7824 all passes will be seamless. If 8192 is selected on x32 bit; you will get a dialog that pops up suggesting you generate the 8192 resolution maps in the x64 bit of ZBrush.
v1.5: Fixed an issue where the default ZModeler brush would be selected after creating seamless maps (You would have to switch back to the NanoMesh brush you were last using each time.)
v1.6: Fixed an issue where NanoMesh indexes with stored Matcap Material information would not generate Normal, Albedo, or Bump Maps correctly.
v1.7: Added code to remove MatCap data from any linked textures (textures that have the ‘M’ channel baked in) before generating the Normal, Albedo, or Bump Maps.
v1.8: Added ‘Best Render’ to the list of outputs. Thanks to decorix for the suggestion.
v2.1: Fixed the issue where turning ‘Show Placement’ off was still rendering with some passes. Fixed 'Best Render’rendering twice. Added some additonal modes to help with Heavy Scenes; ‘Quad’ Array and ‘Show Seamless’. Added a switch to convert between ‘Quad’ Array and the original ‘Keypad’ Array (Thanks goes to Campi.) Added the addition of a ‘WrapMode Plane’ Subtool (This will allow you to create a sculpted base layer (make sure you have Show Seamless on when using.) Added a Cavity Pass (Thanks to decorix for help on this.)
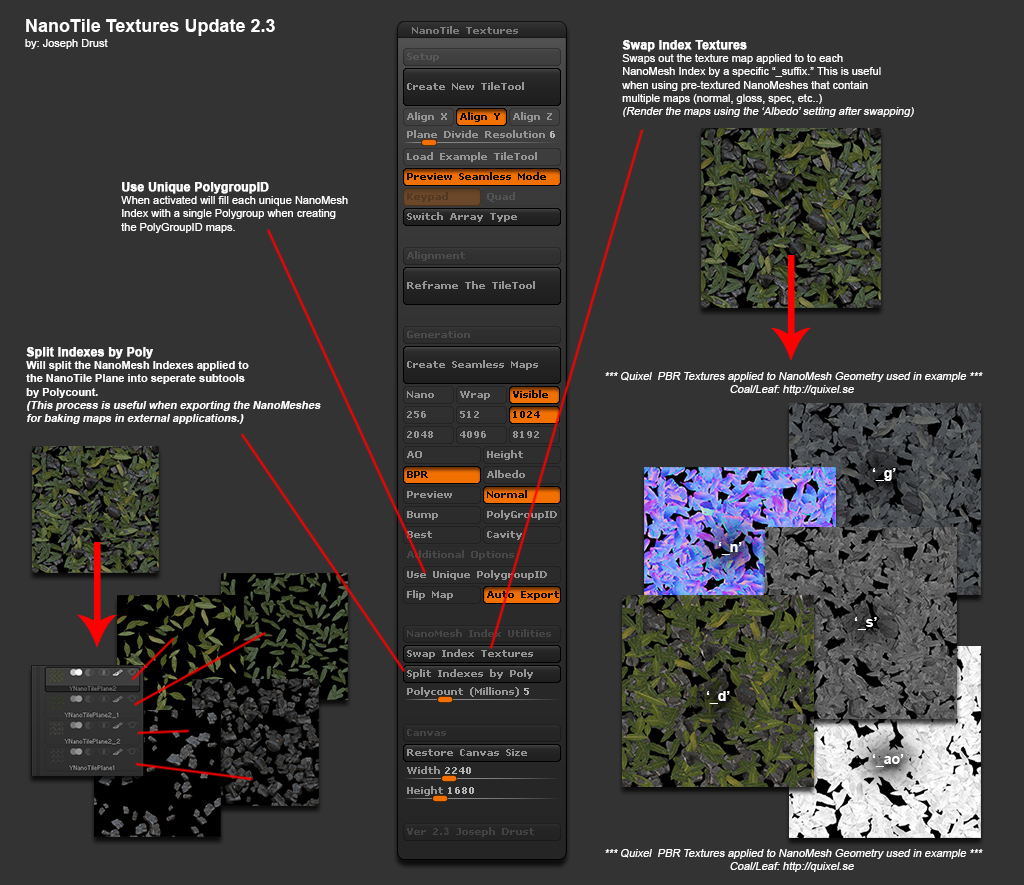
v2.2: Added ‘Use Unique PolygroupID’ option
v2.3: Added some NanoMesh index utilities. Added one for swapping textures that are applied to each NanoMesh index by “_suffix”. Also added the option to split NanoMesh indexes that are applied to the Nanotile plane into separate subtools by polycount for exporting. (Thanks to Phil Baxter for the suggestions and testing.)
Notes
Soo… This is a another big update that might break a bunch of stuff
I added some NanoMesh Index utilities to help with pipelines using NanoMeshes that have texture sets (ex. Normal Maps, Spec Maps, Gloss Maps, etc…) Also added the ability to split the NanoMesh indexes up by Polycount for exporting and baking in other applications. (Polycount used is the one that will be created when converting the NanoMesh indexes to real geometry.) Hopefully these additions will help with large NanoMesh scenes and PBR workflows.
Example image of new functionality:
As always there may be bugs; so if you find any post them here and I’ll try to fix them
Also of note: I have started uploading these scripts over to GumRoad too (They will still be FREE!) This will allow me to send out updates when new versions of the scripts are released. Here is the GumRoad link: https://gumroad.com/piggyson#
-JosephNanoTileTextures_v2.3_x32.zip (114 KB)NanoTileTextures_v2.3_x64.zip (114 KB)
:d
Hi Joseph,
thank you for this nice plugin. But on my PC it does not work.
I use Win 7 64 Bit. And i unpack the Zipfolder in the ZStartup/ZPlugin64 Folder
After i created an Nanobrush, I click on “Create New Tile Tool” an i get this message:
Ok, press “T” and “F” and turn arround …, after some time i get the plane with 6x6 Quads.
I place my Tools as in the video https://www.youtube.com/watch?v=aG1PSVFyrB0
Than i am done, I turn on hight and press “Create Seamless Maps” and i get this message:
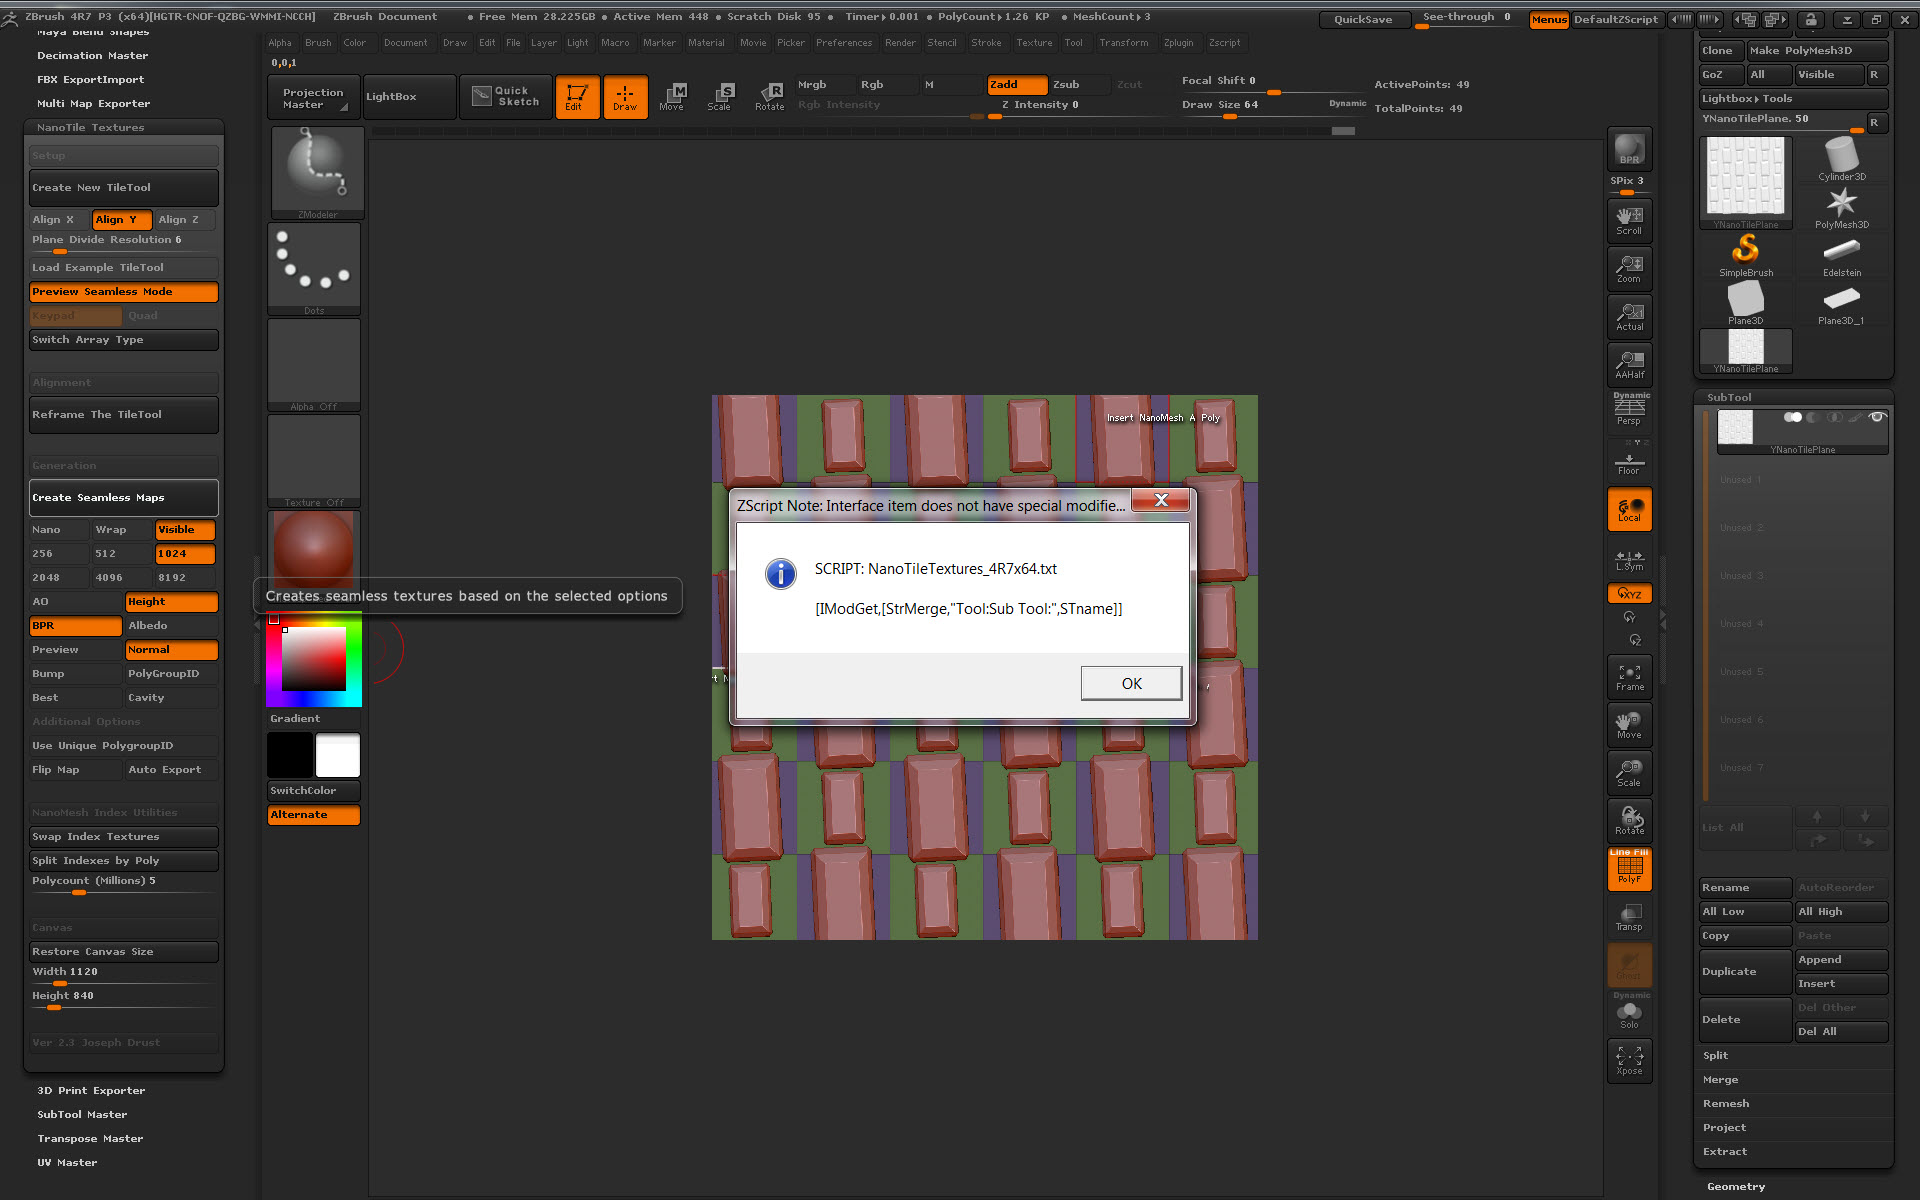
What I am doing wrong.
THX in advance
Tommy
Attachments
@basquiat79: From the screenshot it appears that you only have one Subtool in the scene? The plugin relies on the file it creates when you click “Create new Tiletool.” It won’t work if you just grab a plane and start using it =\ Try running “Create New TileTool” then see if the “Create Seamless Maps” works for you.
-Joseph
Thank you Joseph,
i have captured my workflow, I hope it will be clearer.
[video]https://youtu.be/vDz018vg8Kw[/video]
Thanks