AND since its been so long and there might be some new people using it. I thought I would include the descriptions for all the scripts. If you are only interested in the new stuff they they are ** asterisked.
Hopefully you can figure most of it out from the tool tips. All this info is also in the README and on my site.
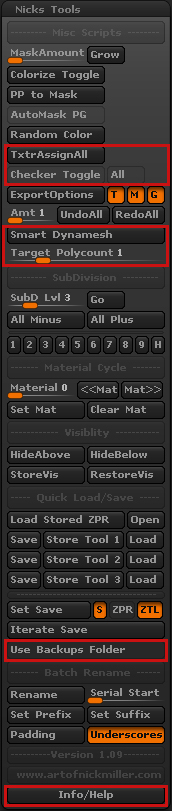
Mis Scripts
-
Colorize Toggle: this script sets Colorize (Polypaint) on or off for all your SubTools at once. This script is now somewhat redundant now that you can SHIFT + CLICK the paint brush icon to do the same thing. However the button is still useful if you wish to make this a hotkey.
-
Random Color: This script will assign a random color to each of your subtools. This is useful when rendering a flat color pass so you can easily select your subtools when compositing.
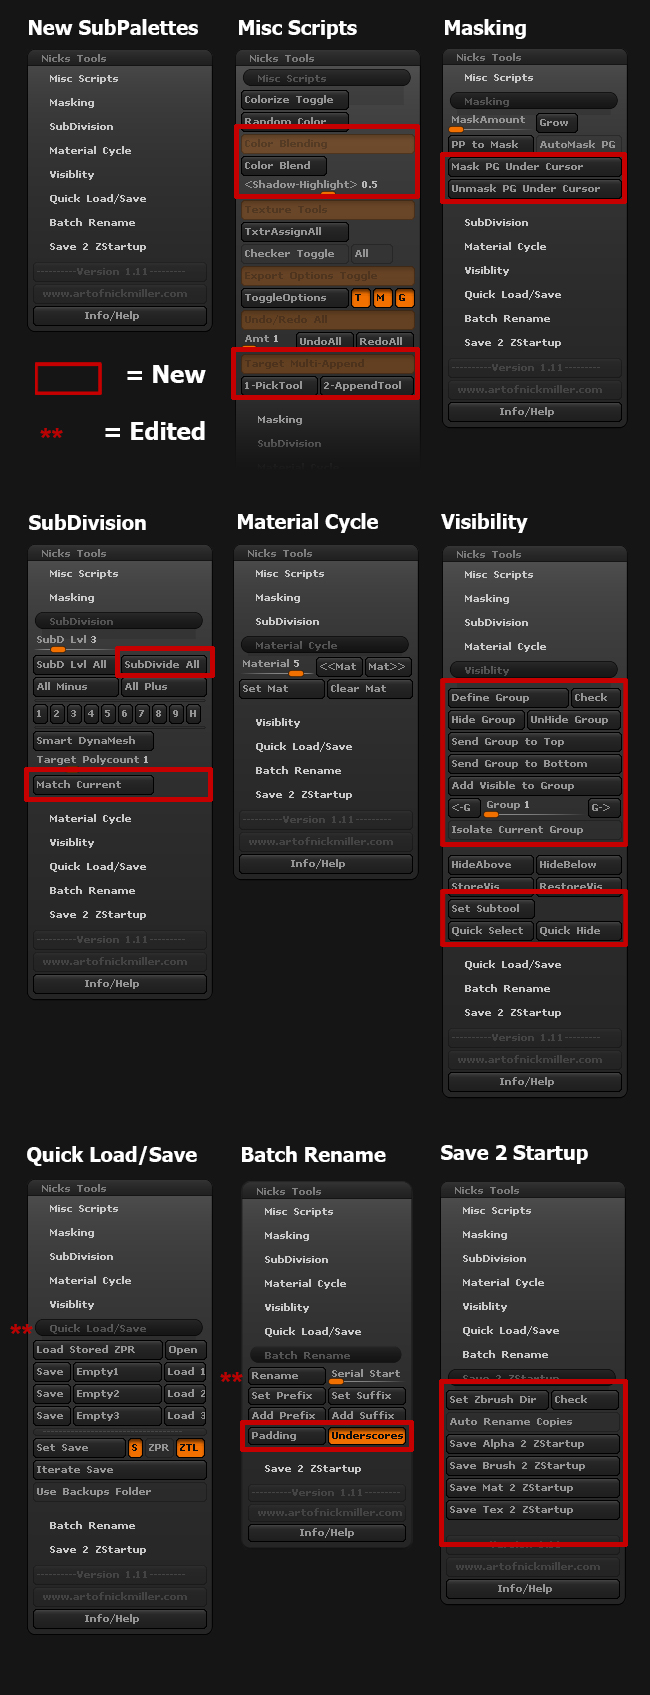
** - Color Blend: Requires a hotkey to use! This button will blend your active color with the Polypaint color under your mouse cursor. The “Shadow-Highlight” slider will skew the hue and value towards a lighter or darker color. Higher values moves the color towards a highlight and lower values moves towards a darker color. At 0.5 it will blend between the two colors.
-
TxtrAsignAll: This button will assign the currently selected texture to all visible subtools. The subtool must have UVs.
-
Checker Toggle: This script will turn on the Checkerboard texture for the current subtool or all subtools if the “All” button is toggled. When the button is toggled off it will turn the checkerboard off or reassign the previous texture.The subtool must have UVs.
-
ExportOptions: This script will toggle the Subtool Export Options, Texture, Merge UV Cords, and Sub Group, for all your Subtools.
-
Undo/Redo All: These buttons will Undo or Redo multiple times on each visible Subtool. How many times the script Undo/Redos is based on the “Amt” slider.
** - Target Multi-Append: This script appends all the visible Subtools from one Tool to another. With the target Tool active press “1-Pick Tool” then switch to the source Tool and press “2-AppendTool” and the new Subtools will be added from the target tool.
Masking
-
Mask Grow: this script will attempt to grow your mask similar to how you can grow a selection in Photoshop. Enter how many polygons you want it to grow by in the slider and click grow. This is best used at medium to low SubD levels. At higher SubD levels it takes forever and the effect is barley noticeable. Zbr3 does have a “Grow” and “Shrink” mask now but it works differently and blurs the mask.
-
PP to Mask: if you have any Polypaint this script will convert it into a mask based on color value with a single click. This is useful if you want a way to preserve complex masks.
-
AutoMask PG: ordinarily the brush setting “AutoMask by Polygroup” is a slider. While this feature is awesome when you want it… it’s irksome when you don’t. This button toggles between 100 (on) and 0 (off) with a button press. Ideally this button should be pulled into your interface somewhere so it’s handy.
** - Mask PG Under Cursor: Requires a hotkey! When pressed the Polygroup under the cursor will be masked. This adds to the mask and does not clear any already masked geometry.
** - Unmask PG Under Cursor: Requires a hotkey! When pressed the Polygroup under the cursor will be unmasked. This does not clear any other mask except for the Polygroup.
SubDivision
-
SubD Lvl All: this script will put all your visible subtools at the SubD level indicated by the slider. This is similar to “All High” and “All Low” in the SubTool menu only with more customization.
** - SubDivide All: this button divides all visible Subtools multiple times based on the SubD Lvl slider.
-
All Minus/Plus: These buttons will go up or down SubDivision levels for all visible based on the SubD Lvl slider. If the slider is at 3 then pressing “All Minus” will take all your subtools down 3 SubD levels from their current.
-
1-9 buttons: Pressing these will put your SubD level at the number indicated. Ideally these would be hotkeyed for quick access.
-
H button: Puts the active subtool at the highest SubD level.
-
Smart DynaMesh: This script takes the guess work out of getting an acceptable poly density with DynaMesh. No more moving the Dynamesh Resolution slider around and repeatedly undoing to get polygons you want. The script will create a Dynamesh near the “Target Polycount” slider. This is especially useful for hard surfaces that you know you will need a dense mesh. Use this script instead of initially pressing Dynamesh then just Dynamesh as normal. This script is also great for reducing the polycount of your Dynamesh when the mesh gets too heavy. Reducing the polycount this way has very little detail loss.
-
Target Polygoncount: Slider used for the Smart Dynamesh. Number is in Millions.
** - Match Current: This script looks at your current point count and tries to Dynamesh close to it.
Material Cycle
- With these set of buttons you can “store” up to 6 materials on the “Material” slider numbers. Start by picking a number and a commonly used Material. Then click “Set Mat.” That Material is now set to the slider number. You can either move the slider manually or use the “<<mat mat=”">>" keys. For best use assign those buttons to hotkeys. To remove a Material from a number you can use the “Clear Mat” button or overwrite it with a new material.
**Note 1: If a number is “blank” the “<<mat mat=”">>" buttons will not skip it. The Material will not change but you will have to press the buttons to move on to the next number.
**Note 2: Stored Materials must be loaded for the script to assign them to your mesh. Please use Materials in your ZStartup folder or load them before hand.
Visibility
**- Define Group: Use this button to define a keyword that the script looks for in the name of each Subtool you want in a group. This is case sensitive. The keyword can be anywhere in the Subtool name. Groups are chosen by the “Group” slider below.
**- Check: This button displays the keyword for the chosen group.
**- <-G/G->: These progress the slider forward or backwards. Because you cannot assign hotkeys to sliders these are primarily there to assign hotkeys too if you wish.
**- Hide/Unhide Group: Press these to hide/unhide any Subtool with the Group Keyword.
**- Send Group to Top/Bottom: Press these to send each Subtool with the Group Keyword to the top of the Subtool stack.
**- Add Visible to Group: This script adds the keyword as a prefix for the selected Group to all visible Subtools.
**- Isolate Current Group: If the active Subtool is in ANY group this script hides other subtools if they are not in the same group. Pressing again with un-hide those subtools.
-
Hide Above/Below: this script hides Subtools above or below the active Subtool in the Subtool menu. This DOES NOT hide Subtools above or below based on the canvas position, only based on menu order.
-
Store/Restore Visibility: when you press “Store Visibility” the current visibility status of all your Subtools are stored. You can hide/unhide subtools any way you want and then recall the stored visibility later. This is saved in between ZB sessions as well.
** Note: It is very important you do not add/delete or rearrange subtools after storing. It will give you an error and you will have to store the visibility again.
**- Set Subtool: This script “tags” a Subtool to be used with the “Quick Select” and “Quick Hide” buttons below.
**- Quick Select: This button will toggle between your selected Subtool and the “tagged” Subtool (from the “Set Subtool” button).
**- Quick Hide: This button will toggle hide and unhide the “tagged” Subtool (from the “Set Subtool” button).
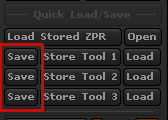
Quick Load/Save
-
Load Stored ZPR: This button will load a project stored with the “Open” button to the right.
-
Pick: This button will open the browser for you to select a project. This button also automatically stores the project you open. So after you “Open” a project once its forever stored until you open other with this button.
-
Save 1-3: These buttons will save over the mesh saved with the corresponding “Store Tool” slot. If a different mesh is selected or the mesh has a different name than the one saved a warning prompt will appear. This is so you don’t accidentally Overwrite a file.
-
Store Tool 1-3: These buttons will store the current tool you are on. You can have three different tools stored at once. Clicking it again will overwrite the previous save. The names of these buttons are updated to the name of the stored subtool AFTER you restart Zbrush.
-
Load Tool 1-3: These buttons will load the Ztools assigned to the neighboring buttons.
**Note: To get optimal use out of these scripts I HIGHLY recommend making a custom menu with these buttons and docking it above the “Tools” palette so that it will be close to your other Save/Load buttons.
-
Set Save: Press this to set a file to iterate on. You can choose an existing file or create a new one. This must be done before the “Iterate Save” button will work.
-
S: If enabled, the original file will be saved as well when Iterate Save is pressed.
-
ZPR/ZTL: Choose if you want to save a ZProject or a Ztool.
-
Iterate Save: When pressed a copy of the current Tool or Project will be saved. A file must be set using the “Set Save” button before this will work.
-
Use Backups Folder: If this is enabled all the files created with “Iterate Save” will be put into a new folder called “Backups.”
Batch Rename
-
Rename: These set of buttons will rename all visible Subtools. Start by entering optional Prefix or Suffix.
-
Serial Start: What number the serial at the end of the name will start at.
-
Set Prefix/Suffix: Use this to add a prefix/suffix at the time of batch rename.
** - Add Prefix: Adds a prefix only to the existing name to all visible subtools. Uses an underscore if enabled.
** - Add Suffix: Adds a suffix only to the existing name all visible subtools. Uses an underscore if enabled.
-
Padding: Use to add a letter or number in front of the serial.
Save 2 ZStartup
**- Set Zbrush Dir: Use this to set the ZStartup directory to save the files too. Example: C</mat></mat>***8203;:Program Files\Pixologic\ZBrush 4R5 (with no backslash at the end.) This only needs to be done once unless the directory changes.
**- Check: Displays the saved directory.
**- Auto Rename Copies: If this is enabled, files with the same name will not be overwritten but saved as a copy.
** - Save “X” 2 ZStartup: Saves the cosponsoring asset to the correct Zstartup directory.