good
Hi Gus,
thank you to show us some steps. I love the wire.
Ralf Stumpf
Gus, I’m so impressed with your first model! I had a little trouble, like you at the first, but now Z is indespensible; truely the fastest way to do modeling and texturing! I’m anxious to see any more of your works.
Keep pushin’ those pixols, and tappin’ to the code!
Amazing work man.Love the details and render.
Hi gus,
Wonderful work
I was wondering what rendering engine did you use to get that final image(s) ?
Thanks,
Dizzy Boy
Hey guys!!
Thanks for the replies! It’s nice to see how active this forum is!
Let’s show some more Ptero stuff…
Here I have two images, all the renders you see were done using Pixar’s RenderMan. That is, the Ptero is always rendered with PRman, while the clouds and background in the first and next image I’ll post were rendered in Maya.
Here the mesh is converted to a Catmull-Clark subdivision surface at render time. My good friend Olivier Soares from our R&D team coded a special displacement shader that is rigged to work specifically with ZBrush displacement maps, so you don’t need to do all that Photoshop tweaking stuff… The render you see shows the effect of the displacement map painted in ZBrush.
[]
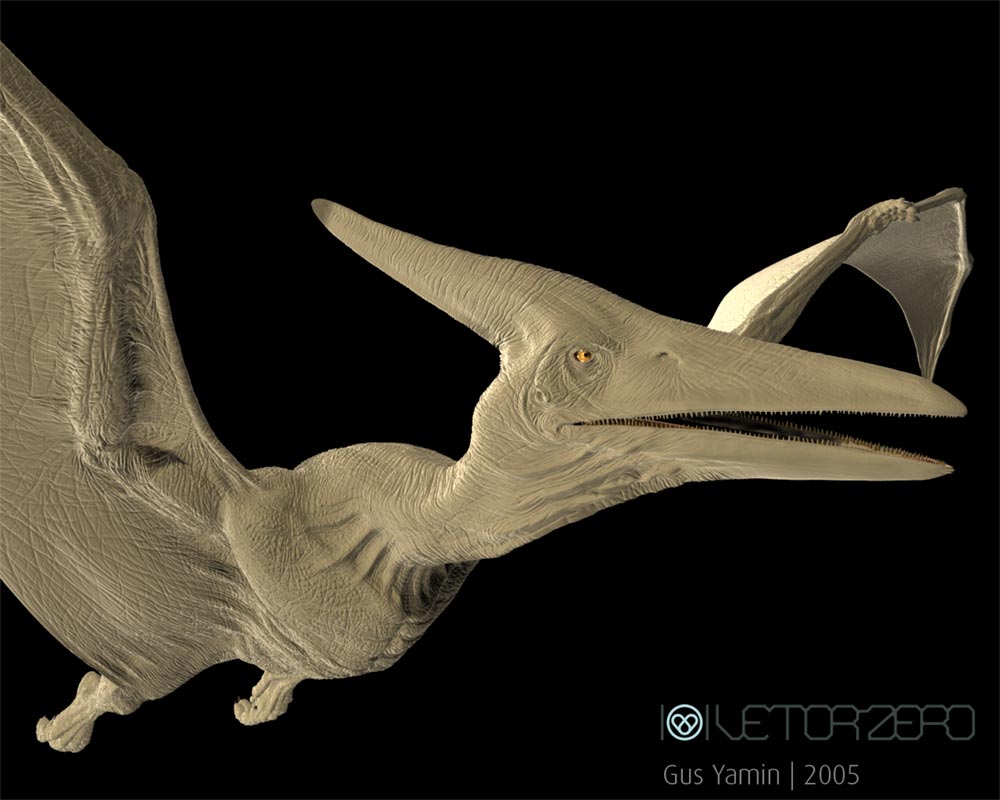
The next image shows the displacement maps combined with the bump map. ZBrush could not cope with a subdivision level that would allow me to paint this kind of detail directly on the mesh as subdivision information, so I used the bump viewer shader to paint a bump map for the high frequency details.
The shader we developed automatically takes the bump map into account - if one is provided - and renders both the displacement and bump maps as full micropolygon displacements in PRman.
This map took the longest time to finish. Every single line was painted one at a time using the Deco brush. No alphas or stencils… 
[<!--[attach=15212]Ptero_Steps2_Disp2_Lo.jpg[/attach]-->]
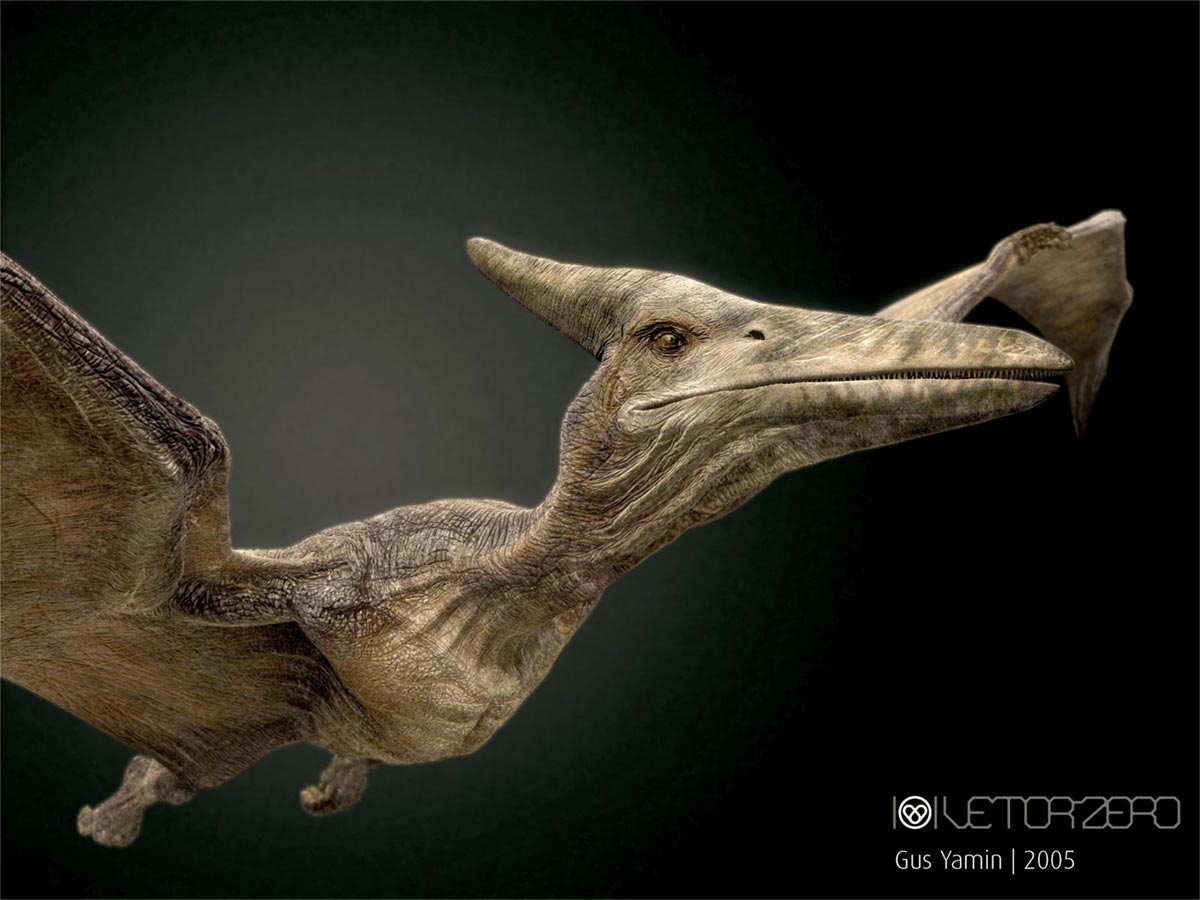
Here we have the Ptero rendered against a black background so the details can be clearly seen and the colors are more vivid. The color map was also painted in ZBrush. The displacement map is a 4K 16-bit TIFF file, and both the bump and color maps are 6K PSD files.
[<!--[attach=15213]Ptero_Flying1_Blk_HiRes2.jpg[/attach]-->]
Hope you guys like it! Thanks once again for all the kind replies and encouraging words!
Cheers everyone!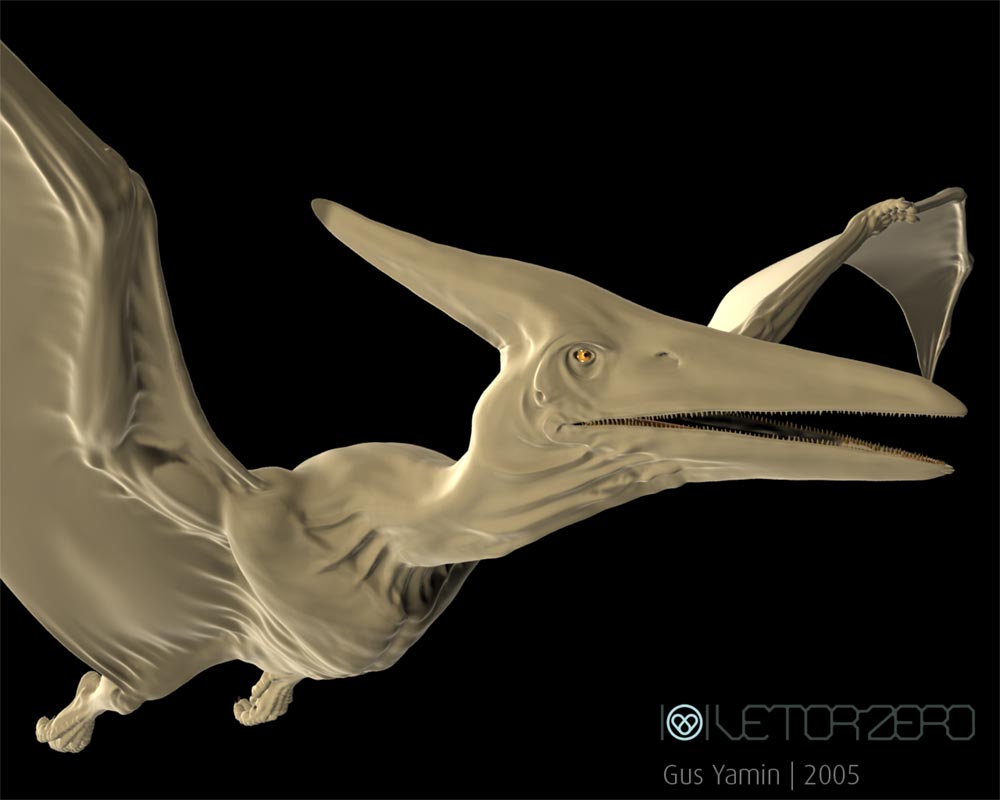
Ok,
adding to the info I posted previously, a little schematic giving an idea of the detail contained in the bump map. The little yellow square highlighted on the reduced map image is blown out to show what detail is contained inside at 100% magnification, and which area of the Ptero is affected by that area of the map (roughly).
[]
Cheers!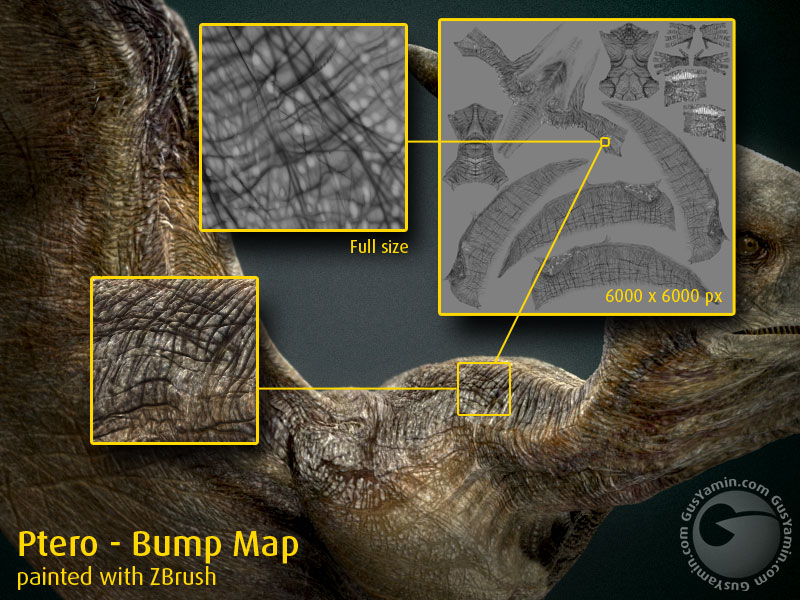
Congrats! Impressive work.
Show de bola!
Is it the one You used on this one?
http://www.vetorzero.com.br/db_images/movie0065_file.mov
Cheers, Eric
again, top work!
Ralf Stumpf
congrats for the top row!!
your links are cool and this work is amazing !!

Anychance we could see the colour map ?
Question: how’d you get a 6k x 6k texture map to work inside zbrush which has a 4k x 4k texture size limit? or is is that zbrush can only natively create texture sizes at 4k x 4k maximum, but import any size uv map?
Hey!
Thanks bono3d, stumpf, Drummer! I am glad you guys approve!
Ai02: yes, that’s the commercial. 
Stringer: sure! I’ll try to put a schematic (like the bump map’s) together to show the color map. But there isn’t much to it really…
abxy: that’s a good question. I wanted higher resolution maps because I am a high-res freak. 
I realized that ZBrush would only allow me to create a map with 4K maximum resolution, but if I quickly exported that to Photoshop, crancked up the resolution and brought it back to ZBrush, I’d be able to keep on painting on a 6K map or higher, instead of painting everything in 4K and blow up the res only after I finished.
So, I was happy, my RAM was sweating, and I got the fine details I so paranoically wanted! Heheheh :lol:
I still have a couple more images of the Ptero I wanna post… maybe later today…
Cheers guys!
Great job. Can’t wait to see the next piece!
Peace,
NickZ.
small_orange_diamondsmall_orange_diamondsmall_orange_diamondsmall_orange_diamondsmall_orange_diamondsmall_orange_diamondsmall_orange_diamondsmall_orange_diamondsmall_orange_diamondsmall_orange_diamondsmall_orange_diamond no words 
wow… I love that commercial! Great job on the model! Fantastic!
can you please share the settings you’ve created for your shaders to help with your workflow?
Hey!
Thanks Dan Gonto and wenna!
nickZ: Thanx! And yes, “Thank God for the gifts He has given”, and thank God and Pixologic for ZBrush!
ozone1979: As I mentioned previously, the Ptero is rendered with Pixar’s Renderman. I had tested Turtle for Maya in the past and loved the fact it has a special “ZBrush displacements” node in Hypershade that takes care of setting everything up so you need not worry about tweaking the map in Photoshop and doing guesswork to find the proper displacement values. So, I wanted the same thing, and my good friend Olivier Soares from our R&D department wrote a special PRman displacement shader that does basically what Turtle’s does, and a bit more… So, there isn’t much I can tell about the way I configured the shaders to get the displacement right in PRman. We wrote a tool to make it simpler for us bacuse we had no time to spend on guesswork…
Apart from the displacements, the skin is a combination of layered velvet and blinn shaders… basically, blinn for some specularity and a velvet sheen component to get the “dusty/dirty” look on top of everything.
Hope this answers your question. Feel free to ask more!
Cheers!
And,
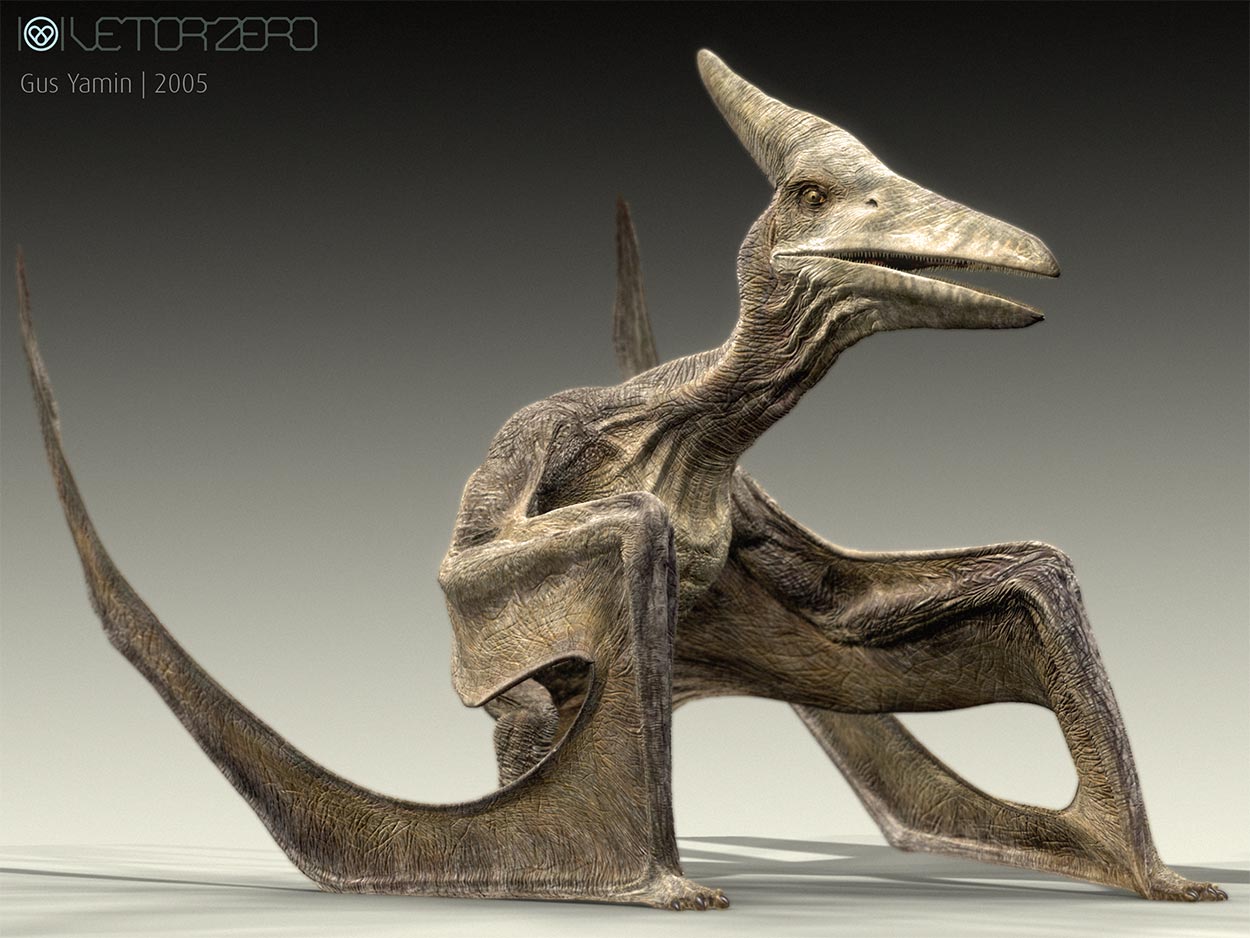
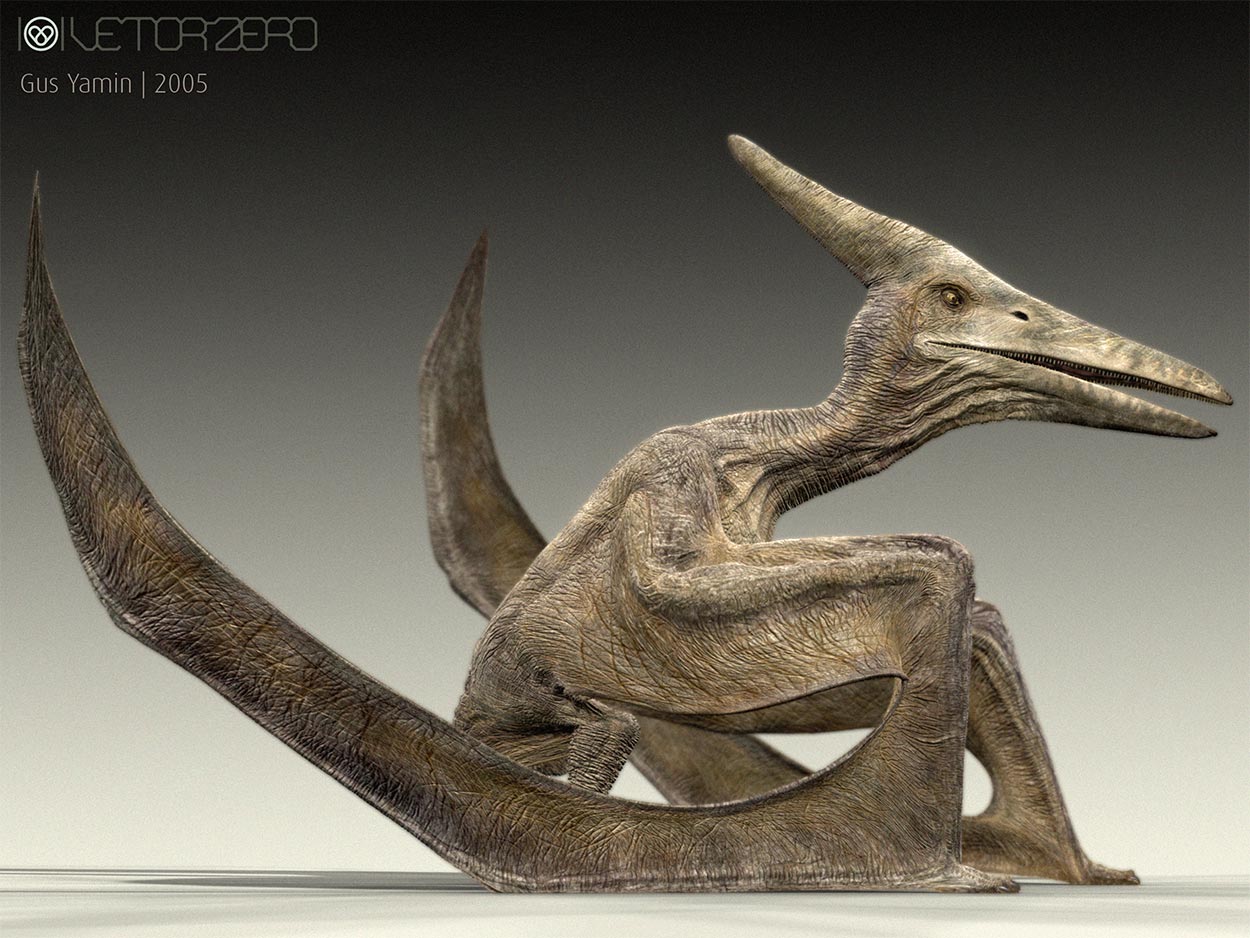
I wanted to share two other images with you guys…
These were used basically to show the client how the Ptero would look when standing on the ground.
We did some interesting research on ptero skeletons to see how the bones went together, both to nail down the model’s proportions and the proper placement of bones for rigging and skinning, but also to understand this strange pose it assumes when it’s on the ground.
Maybe we have a few paleontologists among us who can tell how faithful this is to the posture these creatures would assume when walking, but I can assure you that we looked at several pictures os ptero bones and this seems to be pretty close to how they would fold their wings to move on the ground. 
Anyway, it looked “paleontologically-correct” to the client, and looked “biologically-correct” enough when animated…
[]
Hope you like it!
Cheers everyone!