ZBrushCentral

Making Time For Art #2 - Now with tutorial movie PART 2

As a newbie, ol’ retired guy just learning 3D for fun, I watch these videos in total awe, and just really have no concept of the intricacies whatsoever.

To me, this is just totally beyond human understanding. :wink:

Fantastic, Pixolator! It’s just great fun to sit back and watch in amazement.

If I were 40 years younger, I might have a chance - but you younger folks, jump on board this train now if this is the kind of work you want to do!

The future - AND the present - is incredibly bright with ZBrush4, and beyond.

… i don’t know if anyone else noticed it, but the soundtrack by dynasty is awesome :wink: … can i download it anywhere or will i have to capture the whole flv?!?

These movies are simply fantastic and very inspirational, many thanks for these

fantastic videos…hope to see some small how too’s with narration on some of the methods you used soon

You shoud maybe have a look at my thread http://www.zbrushcentral.com/showthread.php?t=95532, not so good of course as what Ofer made but I suggest you to watch the video Image par image with the arrow key so you can see what tools and trick Ofer uses.

I thought making a pdf explaining the workflow but its too big. First I'm not sure I have the rights to do it and I think it needs almost one book to not forget anything (Yes I mean it) I'm slow : it took me one whole week to follow the first movie with this method. And I'm not yet experienced with ZBrush. I'll continue next weeek withh the second part of the movie. <i>BTW I don't know what </i><i>graphic card </i><i>Ofer has but with mine (ATI 1900XT - MacPro end 2007 - Monitor 30 " Dell) the render on the screen, during the work, looks creepy with the same number of polys than Ofer (resolution).</i>

Thank you for your kind comments.
Michel: That looks great. Please post your progress images in this thread.

I was unable to allocate sufficient time this weekend to assemble the remaining movies segments. I’ll get it done when time permits.
Thanks,
Pixolator

I have a question: Can these kind of models be optimized using decimator plugin, to import them into traditional 3D apps like Maya or Lw?
Are results good?

Wao This thread has been very helpful.

Just a hunch, but I think you’ve used ZBrush before? Nést Pas???

Incredible videos Ofer, (though I’m only up to 6 min in v1!) I’m always in awe of the way you work, it seems so fluid and effortless! I think the most important thing to take from these videos is to learn all the various ways to create geometry that exist in Z so thoroughly that you can decide which method will work best for any given task without stopping to think about it.

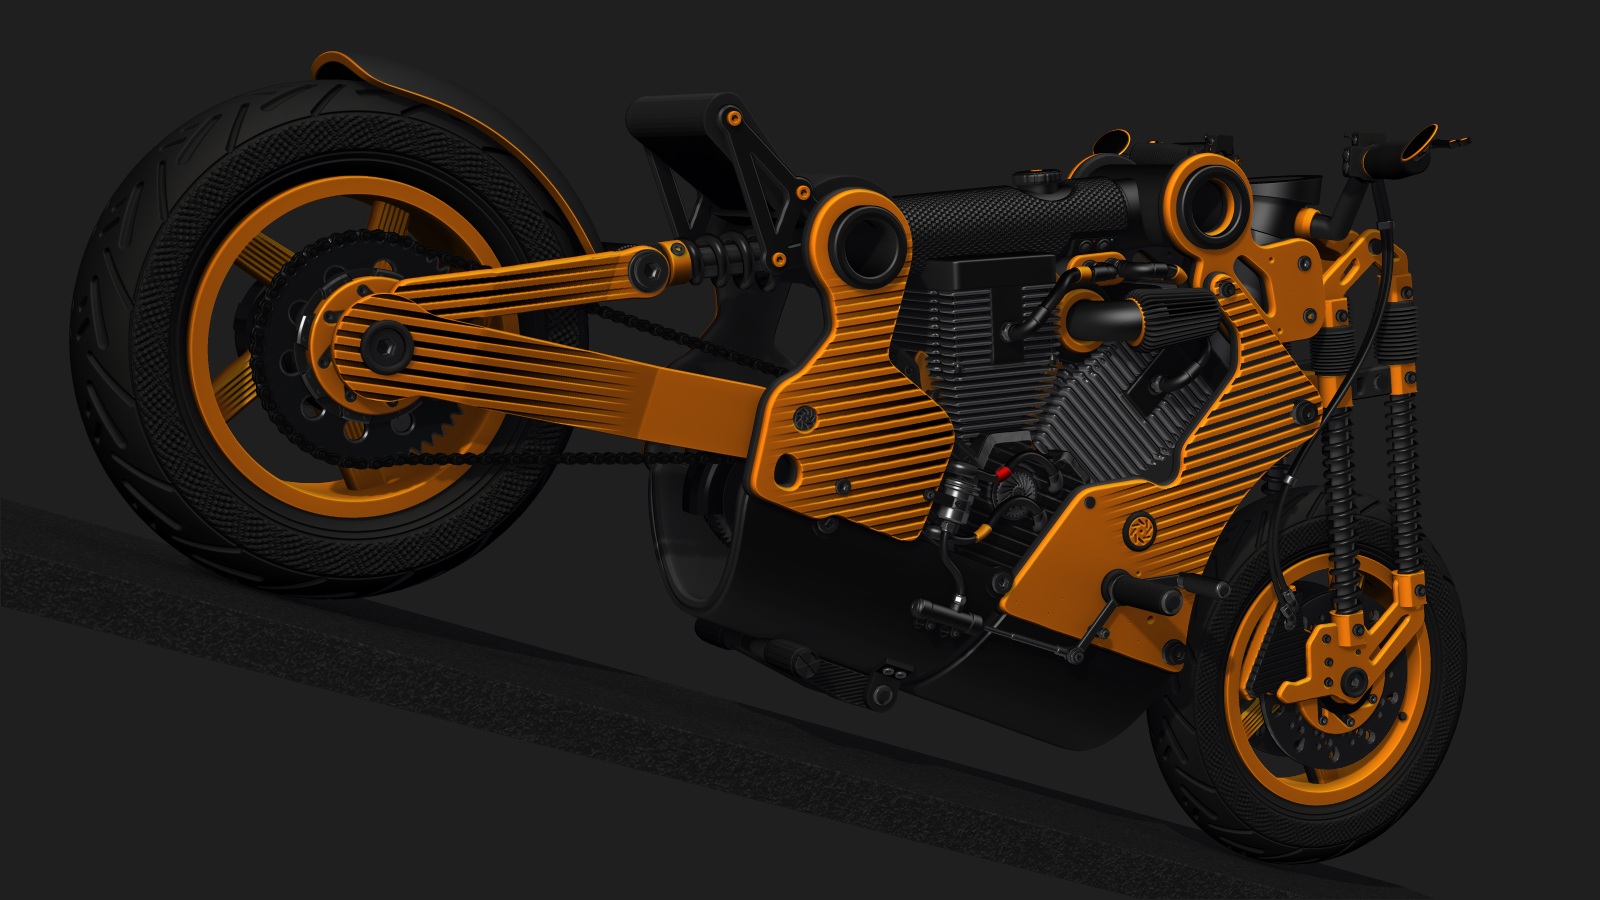
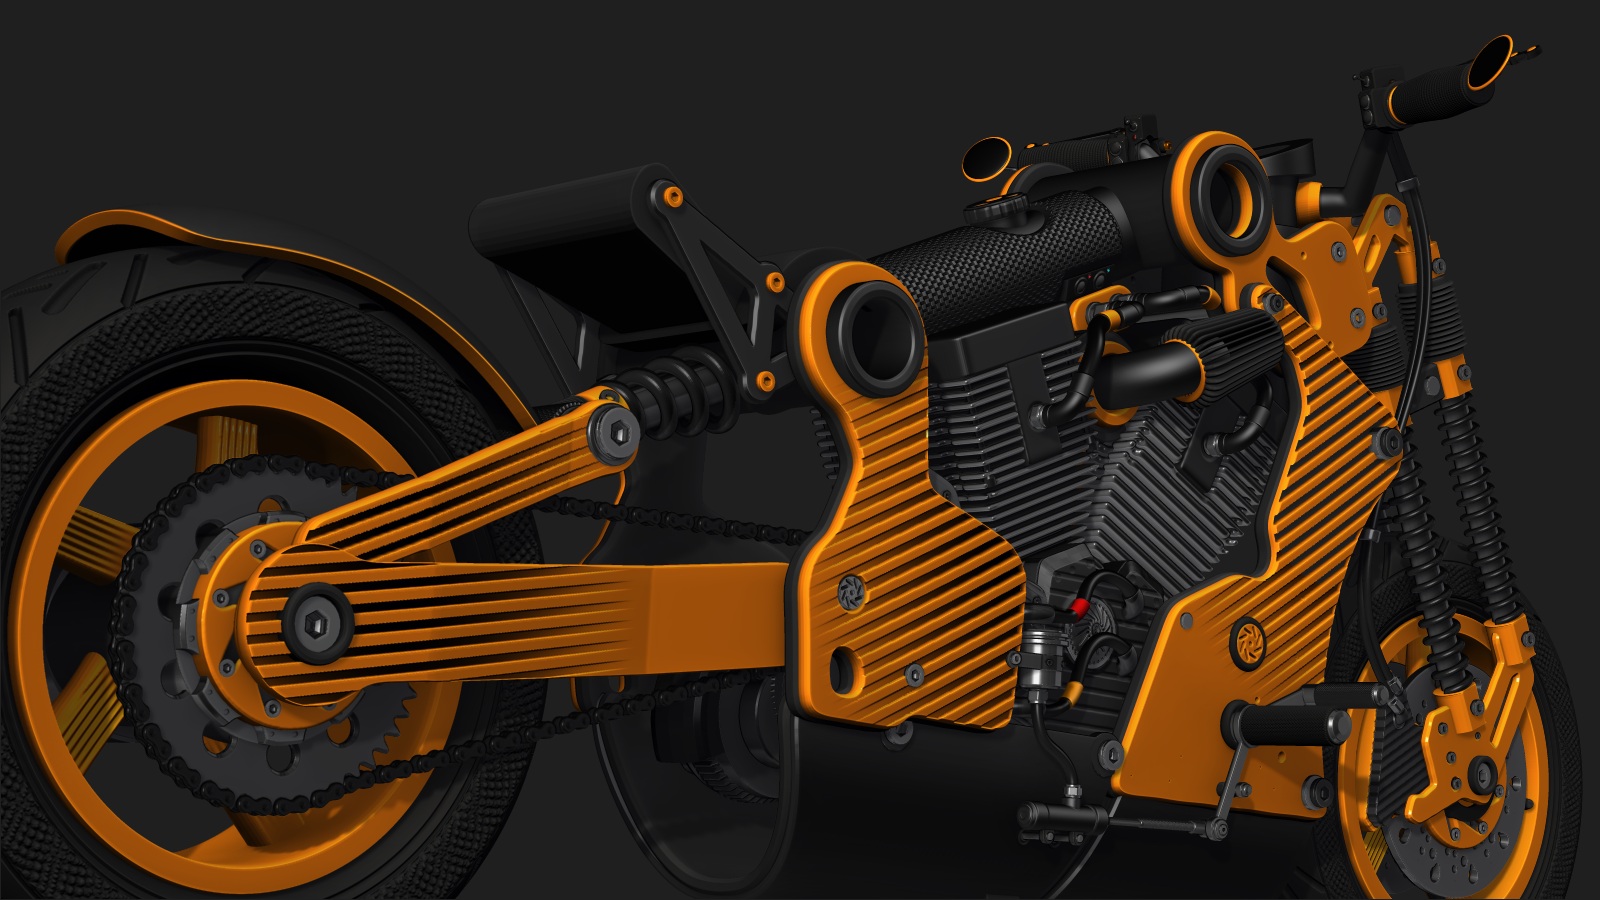
The other inspiring thing is the thought that any of us could make this incredibly complex piece! Sure, it would take most of us about sixteen weeks without a break, but still!

I’d like to add my voice to those who would love to be able to download these videos so we can watch them frame by frame to see which tools you use etc. At the moment I’m hitting ‘play’ and then ‘pause’ as fast as I can to try to slow parts down!

It is very cool of you to take the time to share your methods and insights with us here Ofer, I know it is very much appreciated and it really helps to get this knowledge straight from the ‘horses mouth’ as it were!

Thanks mate!

PS: Inspired choice to use the Confederate! Aren’t they magnificent pieces of design & engineering?! Have you got one? If not you better hurry! There’s only 4 left of the P120! My favourite, the Hellcat, is sold out, and if you prefer the ‘Wraith’ there’s only 1 left!!!

Can’t you re-design Z so that we can make a model then ‘print’ a full sized bike?!

Wow Pixolator, I’m very honored and proud you invited me on your thread

So far this is where I am today. I keep working on it at my rhytme.

![ZBrushOSXÉcranSnapz029.jpg|1100x1071](upload://6AxVVBNxtm29NXbDdyNPGBNeB35.jpeg)

Attachments

After mirroring one side to the other on the vehicle, I am starting to add other parts. Once I have all the parts in, I will go into the details. Below some updated images:

  1. Rear shot:
  1. Front shot:

Michel, your bike looks great!!

Attachments

Different color

![ZBrushOSXÉcranSnapz035.jpg|724x539](upload://psB9i55LtBBDGel1cxvRDOkSVPw.jpeg)

woooooooooooow…

this is sooo amazingly cool, looks fantastic and produces results…

but it’s causing my obsessive compulsive instincts to do sommersaults! while watching, i’m going “but how do you know it’s perfectly centered?!” or “how do you know it’s perfectly aligned if you’re not snapping?!”.

but the video is a realy eye opener for me. that you can produce very accurate looking and machined looking parts without taking such pains as i would usually do in my home hard surfacing app.

it’s a revelation that you can approach hard surface modeling with the kind of freedom and liberty as you would a character… just by “sketching” it in.

very cool. and for me very different. i’ll have to learn to let go before i can do a lot of modeling like this!

jin

Thank you for your kind comments:) Reading the responses in this thread, I see that some of the functions and techniques I frequently use may still be new to some ZBrush users. Therefore, in the future, I will try to record more of my ‘time for art’ sessions which you may find insightful and inspiring.

Dragon, Michel: Thanks for posting your progress in this thread.
I would love to see more ZBC members sharing wips in this thread.

Here are couple of wip images from part 3…

-PixolatormotoSnap10.jpgmotoSnap11.jpg

Attachments

motoSnap10.jpg

motoSnap11.jpg

Me too, I’d love to see some more revelation on exactly which tool was used in each part. A real-time, voiced tutorial would be beyond awesome!

:+1:

On Mac and Quicktime I’m just using the arrow keys (right and left) its more precise.
Just a hit like a “click” do not stay put on the key or the movie will play as usual

I am equally as wowed as Michel Pixolator, that you viewed our images. And actually, thank you for such an awsome program. Organic and now Hard modeling… who could ask for more-:wink:

I will work some more on my car this weekend and post some more WIP next week (I wish I had more time to dedicate, but, with my day job, family, getting back into ZBrush i.e. watching how to videos-like yours-, reading about ZBrush, practicing, etc… I am chugging along as best I can-:smiley: ). I am really enjoying using ZBrush again. It’s my ‘little heaven’ -:smiley:

BTW Pixolator, your bike has some amazing detail… and all those tools, just nuts. This actually looks like Bumble Bee as a motorcycle (Transformers):wink:

Best,
Dragon.

Hi Pixolator,
It’s great to see the workflow frame by frame. I’m learning so much.
You have taken ZBrush in a fantastic direction with this kind of modeling.
I especially like the look of the gradated black tones in the grooves on the yellow bike.

Problemas(lack of practice?)i encountered

1.- How to maintain centered the 3d plane,without using the frame selection?Only using the shift+click tip?
2.-When i use Frame selection the ring is distorted, how i fix this or avoid it?
3.-Is the ring by default in the middle of the 3dplane, so i have to make bigger with the transpose tool to achieve the tyre form?,is in symmetrical position always?
4.-The first cylinder, I found i dont know how to use it properly because always i make distortion of it,specially at the tip of each one?
5.-When i append one of the primitve become distorted in my worflow
Thanks in advance
ps:btw i found i am at the very beginning in my"learning curve":smiley: