ZBrushCentral

Make it look real (With mental ray)

I think I’ve given up on trying to get this to look right. I thought it would take 5 minutes, but the setting are different for every scene depending on scale and distance. Really technical. Then it takes 5 minutes per render to realize you misplaced the decimal point. :lol:

Create -> Measure Tool -> Distance Tool

@ kpamir - In the tool pallete, press the export button. Select the .ma file type, and open that with maya.

@ stoyan3d - Another “It’s a pleasure to help” to this thread :smiley:

@ womball - The mia_material comes in three flavors: Mia_material, no bump or normals with this shader right away (there is a setup to do them but it’s kind of blah), Mia_material_x wich would be your best choice (plug the normals in the standard bump slot), and the mia_material_x_passes, intended for vfx…

@ KillahPriest - The first time it will take you half an hour or two hours, the next time 5 minutes :D, a good advice is to keep your sampling levels low (for tests I use 2 samples in the bokeh) to spped up the trial and error.

defenitely a very well explained tutorial the best, that i find about this process!!, so Muchas gracias thankss and so on! haha!

this is awesome, thanks!!!

the only problem i’m having, that someone mentioned i think— is controlling the intensity of my light

I can’t fix the colors. No matter how dark I make the mia material it keeps rendering white.

@ manzarek - Gracias hermano! Echale ganas con tus zbrusheadas y subelas aqui! (Thanks bro, hurry upn with your sculpts and upload them here!)

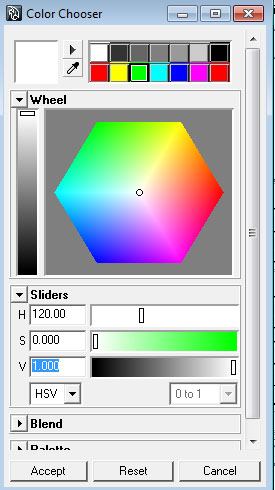
@ breakthelocke - The intensity of the light is controlled by the color of the mia_physical light, not by the light’s shape (the attributes in the top of the attribute editor. Think I somehow forgot to tell about that IMPORTANT thing :o

Tne light’s intensity with the mia_physical_light is defined by the HSV’s V-alue, just crank it up to 1000 (See atachment)

Attachments

Untitled-1.jpg

Brilliant tut. Short and effective. I did things differently too yours but i prefer this method. Thanks it works great!

I went thru the tutorial again, with much better results but there is a weird thing going on!
mia_lens_bokeh1


  • Use Bokeh = off - works like DOF
  • Use Bokeh = on - the image renders, but with black pixels all over it
I downloaded the image you posted: bokeh.bmp
in Photoshop saved it as bokeh.tif, but still get the black pixels.

FIX:
mia_lens_bokeh1
samples = 32 - no more black pixels!

I would guess it’s either:

You do not have the exposure node on the camera

Or the lights themselves are too bright, not the material.

Ok I had time to give it a try, I setted everything as it was written and I got some questions about it:

  • What are the settings of the mia_material you are using on your model? Would it be possible to have a screenshot? I tried adjusting settings on mine, it looks good but nowhere as great as yours, it seems that my diffuse color is always washed out (maybe because of the final gather light bouncing from the white panels and curtain?)

  • I see there is noise in your final render, was that added in Photoshop later or it appeared directly in your render? I am asking this because I don’t see noise in my render and I ain’t sure if it’s normal.

I’ve dimmed the light down, but everything still looks desaturated. The only thing that lets the color show is dropping the gamma down to around .45, but then it makes the overall image too dark.

Thanks so much for this small tutorial. Especially for the displacement and normal maps definitions. I came to the same conclusion using blender. Same things happen there, thanks again. :+1:

Thanks for sharing :sunglasses: :+1: .

Sorry for long time - no replys… I’ve been a little busy…

@ brettSinclair, michalis, Etcher - Thanks guys!

@ sadicus - The black pixels?? could you please upload an image of them?

@ Mighty reg - This is great!

@ Killah priest - Adjust the color swatches a bit darker, when rendering the color tends to lighten up a lot.

Haha I see you liked my render since you posted it yourself :stuck_out_tongue: I was planning to post it on this thread anyway after my thumbnail would get out from the bottom row, so there’s no problem!

Thanks for the tutorial again, really helpful!

Thanks alot for sharing!:+1:

The black pixels were a result of low samples (4) increasing the samples to 32 fixed it.

FIX:
mia_lens_bokeh1
samples = 32, no more black pixels!

By the way, nice creature sculpt, I’ve been so into the tutorial I forgot to comment on your creation. :+1:

i tried to achieve the same result in 3ds max and i failed. :cry:

ISK-86,
can you comment about why we want to use the settings to generate maps for Rendering in Mental Ray?
~ also, why not use the 32bit Displacement? ( I could not get it to work in Maya 2010 anyway, but I am curious)

Normal Map

:large_orange_diamond: Tangent = on
:large_orange_diamond: Adaptive = on
:large_orange_diamond: Smooth UV = on

Displacement Map

:large_orange_diamond: Adaptive = on
:large_orange_diamond: DPsubPix 1 = on
:large_orange_diamond: Smooth UV = on

cool works man, that renders are so real!