ZBrushCentral

If you want your lightwave mods to mimic closely zb models, read this.

That could be it, as displacement happens on xyz space. You could scale up the model and see if it helps.
Or since it is a simple mesh, perhaps fold out the edge and see if it distorts. Sometimes I have encontered polys that for no apparent reason refuses to shade and render properly; the only fix was to delete those and surrounding polygons and rebuild.:cry:

Why does the polygon flow look so odd and the mesh so straight at the back? I think the “Y” branching is redundant. Spinquad and merge polygons should resolve that area.

It is a good idea to alway model in real scale because once you move into GI and Radiosity renders, scale will effect your light renders.

Well, those shoes were the result of a “IGOTZBRUSHNOWLETSSEEHOWFASTICANBUILDAHUMANCHARACTER”-frenzy, hence the insane small scale and poor polyflow. Good polyflow is still something I must teach myself to focus on. Kind of the holy grail in modelling eh? I scaled up the shoes, but the problem stays. It looks like the displacement is causing the inside edges of the shoes to curl through the backside, though they don’t do that in Zbrush. As you can see on the earlier pictures, same happens at the end of the sleeves (don’t recall the English word :o ) and at the ‘end’ of the trousers. I would like to know a way around this problem… But perhaps these are just the stubbourn poly’s you mentioned. We must teach those bastards a lesson; “Bad poly’s!!” :mad:

Hey vincent1,

I’ve also found that using morph targets in Lightwave for facial animation or muscle flexing causes some weird stripping effects when animated. Have you encountered this?

HI Jay,

I have done simple morph target for eye blinks, eyebrows and body shape shift; no problems so far. These are of course very basic movements so may not be representative.

My Walk cycle shows no apparent problems yet.

thaaaanks vincent for beginning this convo about refining the pipeline started by Warner.

he did lay the grounds for it, but there are still many issues and artifacts we’d all like to avoid.

lets keep this up… i will contribute anything i can via testing… and yes… cant wait for LW9

question… when you say you use the OBJ that was directly epxported out of zbrush… do you mean always using that OBJ from that point on? … nevewr bringing it into modeler and saving it again as an lwo?

this of course omits any use of zWave hmm?

also… i have a real bad artifacting problem that I haven’t seemed to find a solution for… it happened months ago while working on a project, and now is appearing again in my renders.

here is a link to a thread where i posted pictures of it
http://www.zbrushcentral.com/zbc/showpost.php?p=224985&postcount=23

vincent… have you come across any issues like this?
your results are incredible… i have never had such fine detail in my zbrushed LW models before… do you think it has anything to do with too LOW a poly cound in my base meshes? … meaning that the fine areas of my meshes get very fineley subD’d but my areas where there are large poly’s… do not… and therefor suffer from lack of geometry to deform?

i am in texturing phase of my charcter and am trying to get all the kinks worked out for it. i have been dealing with all the ZBrush-LW discrepancies for about a YEAR now… and have yet to produce an eye popping animation in LW using a very detailed zbrushed character.

im also not comfortable with the way the nurbs work on my OBJ file when compared to my origonal LWO file. …tkae for instance the antelers on this dragon i am making now… the OBJ versions’ are about 25% thinner than the ones in the LWO file… the cuves created by my subD’s seem alot tighter than i origonaly modeled them to be. this causes for some differences in the model that i dont want.

Hi,

You still have to save the LEVEL 1 obj to a lightwave obj before you can send it to Lightwave Layout.

From what I can see, your model has not been subpatched before sending to Modeler. If you are working for game engines, then displacement maps wont help, you need to do normal mapping.

If not for games, my steps are these:

  1. With your model down to LEVEL 1, select texture under Tool menu and click once on AUV tiles.
  2. Export your obj from ZB at LEVEL 1. Do NOT switch Morph target.
  3. Export your Displacement Map also from LEVEL 1. Use 4096 map size. Once calculations are done, select Alpha, click the displacement map and click “Flip V”. Export as tif file.
  4. In Lightwave modeler, import the ZB LEVEL 1 obj model.
  5. Press “tab” to apply subpatch to the model.
  6. Press F5 to bring up surface window and click Smoothing to Selected.
  7. Save as a Lightwave Obj.
  8. Send to Lightwave Layout.
  9. In layout with your model selected, Press “p” to bring out your Properties window. Set your Display Subpatch level to 5, Render Subpatch Level to 15 and above, depending how much time you have, higher the better up to 25…
  10. Click Deform Tab and add your Normal Displacement plugin. I use the one from Steve Warner’s site. Double click plugin to bring up window. Set displacment to 120mm this 120mm value will also differ depending on model, Cahe Gemetry selected, Evaluate world Coords, Use displaced Mesh Selected, LUMINANCE CENTER to 50%. THIS IS VERY IMPORTANT, ANY LESS OR MORE AND IT WONT WORK PROPERLY.
  11. Click the Texture button, Projection is UV, UVMap is OBJ_UVTextureMap, Image is the displacement map you exported from ZB, Width tile and Height Tile is Reset, Pixel Blending is OFF, MIPMap Quality is OFF.
  12. Press F5 to bring up Surface Editor. Press “T” on the Bump channel and set the parameters as for the Displacement above in Step 11. Back to Bump channel and set your Bump value to 5,000% to 8,000%. This is not a typo error.
  13. Press F9 and voila! Enjoy.

Further notes:

a) Bump values will differ depending on the scale of your model. All these values work for my REAL WORLD Scale models.

a part 2) For further enhancement, you may or may not like it; click your bump texture in Surface Editor, click “Edit Image”, click “Editing Tab” in the window that pops up and set the “Contrast Slider” to 0.18 to 0.35. Enhances the detail further. Tip courtesy of ZB Forum friend.

b) Each time you do extreme displacement deformation in ZB, you will have to repeat Step 1 to 7. This because I think the new deformations messes the AUV tile structure and if you don’t repeat Steps 1 to 7, you get brush strokes out of place, weird gouges in the surface, etc. But if you do repeat Steps 1 to 7, the model and render works out fine 100% of the time.

c) FINALISE YOUR MODEL AS MUCH AS POSSIBLE IN LIGHTWAVE. Have to shout, this is really important and a good discipline to stick to. This is because adding horns in ZB when your model has no horns in Lightwave is a BIG NO NO. The render wil be flawed as the polygon structure will show no matter what subpatch level you set to. I think this is your problem. When I mean horns, it are the ram type of horns you try to brush out of the hornless head of the model from Lightwave. If you add horns usingmulti marker, that’s different as then you will add new geometry in ZB and this added geometry will be reflected in the model at LEVEL 1. This is one good advantage of using LEVEL 1 instead of Switch Morph target.

d) I had the same problem with Zi (My Ninji Cop model). The model has no high heels but is modelled as if wearing high heels, i.e. standing tip-toed. I said to myself, “I’ll deform different heels for her in ZB”. Good idea in theory, bad in practice. The heels don’t deform nicely in ZB and looks worse in Lightwave. This is because my model is single mesh and I have not enough memory to set Subpatch Level in ZB high enough to give me enough polygons to extract the high heels. It is bad practice anyway. Surface details like raised seams, gloves, reasonble spine deformations, muscle and vein strctures are not an issue though as there are enough polygons on the surface. Just don’t expect even ZB to extract a tree out of one polygon.

So my work flow now is:

  1. Finalise model in Lightwave.

  2. Add all detailing like costume, armour, muscle enhancement, boots, gloves, etc in ZB.

  3. Paint and texture in ZB. I just love the projection painting in ZB.

3a) THEN only apply weight maps, etc. This is because each time you export to ZB or ZB exports an Obj, the weight maps are lost. Zwave allows zb UV to LW but not the other way around, which is what we want. Maybe it there in zwave, I have not looked deep enough yet.

  1. Render and/or Animate in Lightwave.

  2. Smile and go to sleep.

  3. Repeat step one. :slight_smile:

Edit: Note on the 120mm level for displacement, this will vary depending on deformations you are asking zb and lightwave to do, Example, my Zi model without the heels looks fine at 50mm displacement, but with the high heels version, it needed 120 mm before the heels extruded to the right level. Looks ugly anyway, like the tris on your model.

You need to know, because too far a value in Lightwave will cause slightly odd looking deformations like a puffy look, etc. Perhaps like the too tight curving you mentioned?

Sticky this thing in the Tutorial page:D
and i really do mean Sticky :wink:
thx for the great post!

hmmm… yeah all those steps are the steps i have been using for a year and still problems.

the "horn " issue is not having no horns in lw, then making them in zbrush… but… actually having made horns in LW… and when i put the lwo of them next to the zbrush exported obj … the obj version’s horns are thinner… as if the calculation for the nurbing is different. and i dont like that so i use Zwave plug in to import the UV map from the exported obj file into my origonal lwo so i can keep surfaces, endomorphs, and weightmaps.

the very high bump mapping and turning off mipmaps has made some slight changes in my results. thanks.

i’m just having a tough time with my normal map artifacts. they dont have anything to do with displacement errors.

…ah the quest goes on. thnx

Are you still using switch morph target’s obj? I had mesh mismatch problems only when I was using SM Target. Once I started using level one, these problems went away, which was what led to this thread anyway.

By the way, the level one obj do look much softer and thinner than the original LWO. Once the displacment takes place, it’ll match properly.

Excellent and informative findings Vincent. Great thread.
I’m looking forward to see how LW9 Beta handles Normal maps and how well the Subdivision levels match models in ZBrush. Just have to wait till Tuesday now.

Hello Vincent. Thanks for all the great info.:+1: Please let us know if you are testing out the beta LW 9 to see if the discrepancies between the two images (ZB /LW) you show below will be fixed. Particularly in the collar area, LW is not interpreting that well and some of the bumps as well.
Thanks for your help regarding this.

Hi Rayo,

I am not on the LW9 beta list as I’m not upgrading to 9 until I see at least one revision at V9.1. Struggling with buggy 8.5 as it is.

After more days of experimenting and reading threads and manuals, The better workflow is to use NORMAL MAPS for the bump detail and Displacement maps for the ummm, displacement.

The TBNormalMapShader is a great plugin. Using normal maps, the details are mimicked EXACTLY like in Zbrush. :slight_smile: So my workflow has changed. Most previous info still applies except that instead of using Bump Channel, I now use the TBNormalmapShader. The bump channel is now ignored.

With the workflow keyed down, I’m now more confident to go full steam with character creation. The Zi model (nude from Lightwave) is completely detailed in zbrush and fully textured in zbrush using auv tiles.

yeah this workflow works nicely. with the normalmap shader results are actually accurate. i had to invert the map in Lw to make it work properly tho.
incidentally, in te process i used also Zwave, that works fine.:smiley:

Attachments

TEST SPHERE.jpg

These pictures will show fidelity of detail to zb when I used TBNormalMapShader.

It’s an exact replica, down to the dimpled texture on the leggings (you can see the glossy highlights are dimpled).

The specular map was also very quickly painted using various shades of grey in projection master and exported as specular’glossy map.

Top pict is ZB grab. Bottom is lightwave render.
zi_textured.jpg

Attachments

zi_textured_specular.jpg

i see looks good :wink: but the next time, before applying texture…always make SURE you are really happy with the model’s outcome from modeling itself… Because i have that weird feeling you could have gone WAY crazier with the modeling on this char and the texture applied to that whould devenitly would have gone Toprow :wink:
But if this was your aim in the first place then it is like i said:
looks good and keep it up! :sunglasses: :+1:
EDIT: but for the outcome of this tutorial i give it a 5starts :wink:

Hi ArtMargy,

Thank you for the comments and rating. This model will definitely be taken to another level with accessories like a weapons belt to be added in Lightwave; I’m currently building her transport…:smiley:

Have focussed too much on zb the last 2 weeks to the point I’m forgetting my Lightwave commands and workflow. This is like a drug alright.

Hey Vincent, thanks for the reply. Glad to know that it’s working to greater effect for you. Though I am curious, normal maps will not displace geometry and in that way are more like bump maps with the exception that they have better shading correct?
So aren’t those displacement maps still not displacing accurately? (like around the collar area?
Could you show a close up of that area with your new method with TBnormal shader applied? (in order to see if the displacement looks better)

Also, aren’t normal maps mainly noticable useful in low poly (game models)?

Just asking because I am very curious as too other ZB / LWaver’s experiences.
Thanks:)

Hey Rayo,

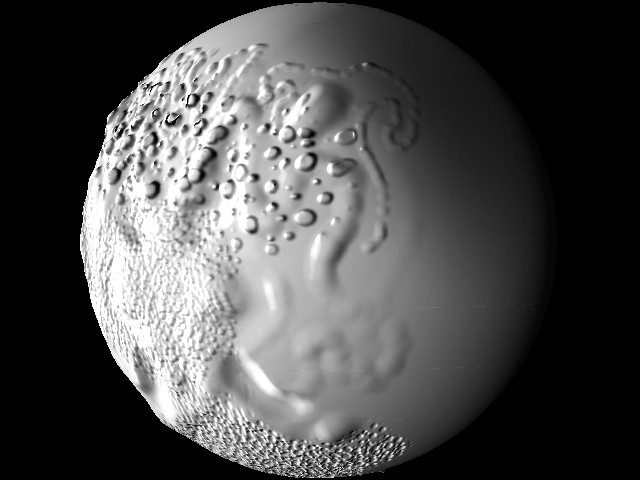
In a nutshell; yes, Lightwave is not displacing the mesh correctly, no matter what you do. Normal maps through the TBNormalMap shader does a far better job than bump channel in Lightwave to give the illusion that 90% of people will agree is the greatest thing on earth. Isn’t that what 3D is all about? It is just a grand illusion, nothing exists apart from it.

So, to me, a problem is just a problem to be solved, to the best of one’s ability, which is why I spent so much time coping with the software’s (Lightwave) shortcomings as I know that many will share the same frustrations. If I can alleviate another’s suffering through my own efforts, that is reward in itself.

yes, normal maps are the greatest thing to happen for gamers because it allows a new level of detail impossible with traditional technology and work arounds. While I don’t work at game engines, I am concerned about putting product to market in the shortest time and lowest cost involved as possible. So if a technology appears that can shorten this time, I embrace it with passion, as tests with clients has shown that they cant really tell the difference, i.e. a good job is a good job regardless of how it is achieved. The inverse is also true.

I’m at version 8.5 and trying to get as much as possible out of 8.5 before switching to 9.? As history has indicated, I don’t think V9 will be useable until the end of 2006. I just use tools as best a[pplicable to the task at hand. For example, I will never use Lightwave for large scale factory, city visualisations; as it is a most inefficient application for such endeavours. I use FormZ and more recently 3DS Max for such tasks. As do most of my peers, who also own Lightwave; while they render and animate with Lightwave, most of the hardcore construction work is done with Max or FormZ. As an example, I can extrude an entire flloor of a hospital in a day with the dxf file from the architect with FormZ or MAX, try doing that with Lightwave…

While 3ds Max has been touted as the de facto application for character animation, my own experience has shown otherwise. i.e. I can get more character work done in Lightwave in the same amount of time. When zBrush came along, it just accelerated the creation process for character work; which is why I’m sticking with Lightwave. This does not negate 3DS Max as 60,000 other users will testify. Use whatever you think is best to get the job done in the shortest possible time. In this aspect, I must confess that I have no loyalties to software, it is just a tool. I own 3DS Max 7, Lightwave 8.5, FormZ 4 and Cinema4d and BodyPaint, Zbrush, RayDream Designer and God forbid, Macromedia InfiniD.

With hindsight, I can safely say, choose TWO 3D programs and work with it, in conjunction with zBrush. This I think will satisfy most commercial productions and personal projects; rather than argue who is the best OVERALL program… there is no such thing…

To elaborate, while normal maps were first touted for use with games, the technology is applicable for use with higher resolutrion meshes such as SubD surfaces. So , If i can get a character animation done with the lowest or medium density mesh possible while maintaining an illusion of high resolution in the shortest possible time, to me, it generates an immerse personal satisfaction… And in this area, zBrush has no equal. For example, my first head in Max took six weeks, it took me six hours in zBrush (it is not an entirely fair comparison as I have improved as an artist in the 3 years since acquiring Max; still, I can never achieve what I can with ZB in Max, even now). Texturing took days in BodyPaint while in zB it took less than an 8 hour day.

Bottom line, I think for me now, Lightwave and ZB makes for a very convincing partnership in my quest for 3D character prowess. It is, as always, a lifelong quest.:slight_smile: I wish you all the best in your journey.
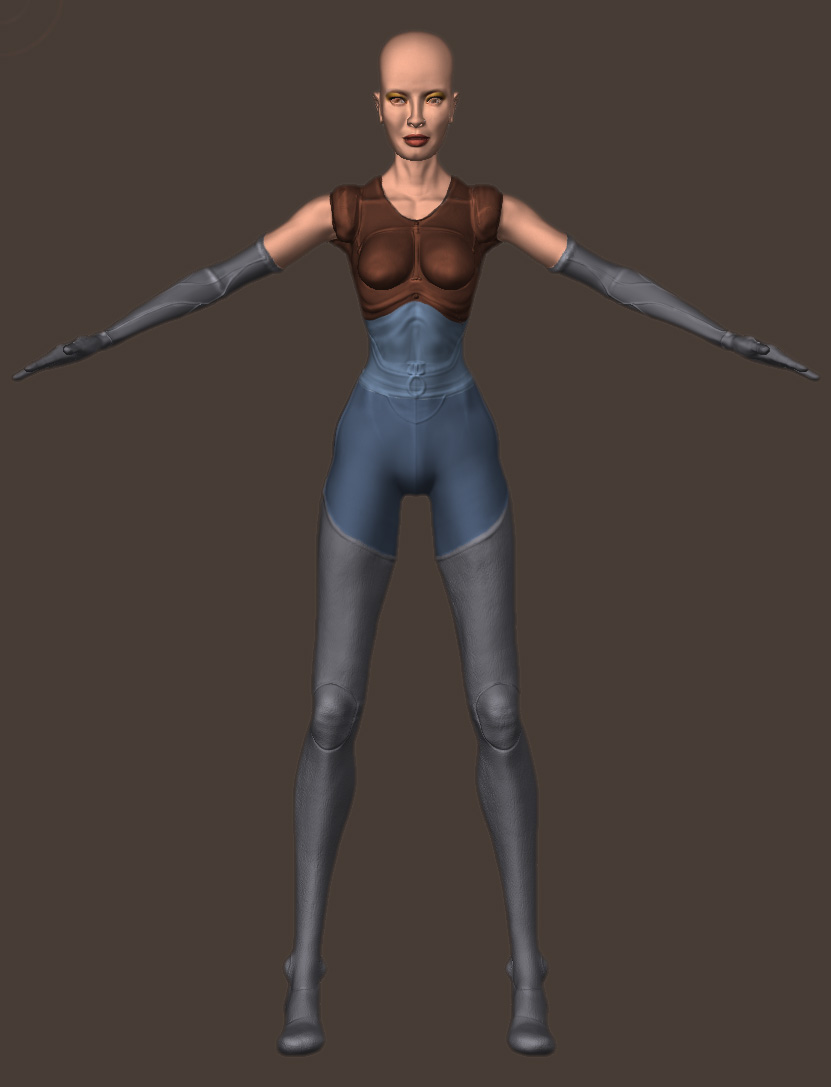
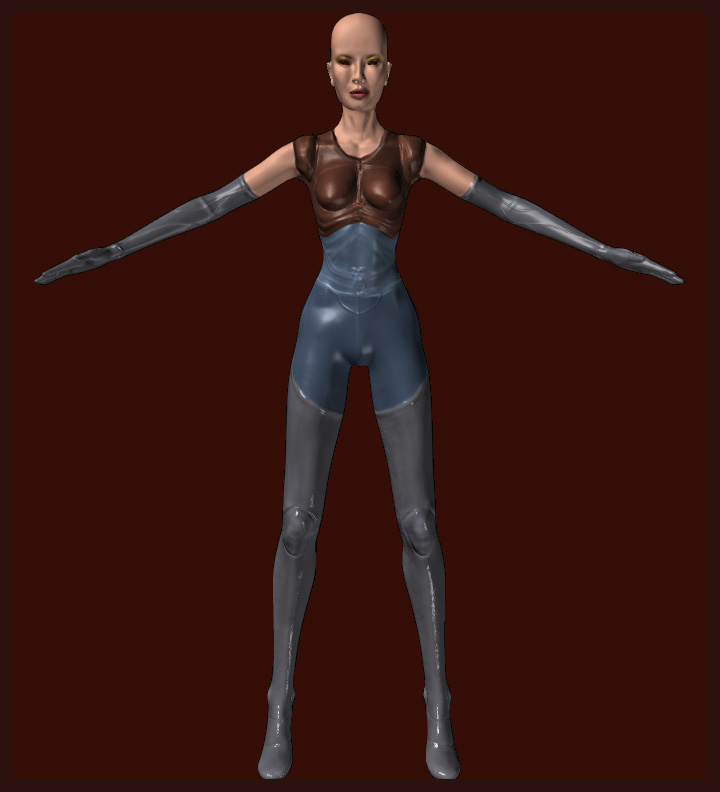