thanks… i have been using the first method… always wonder how to use it with Vray… i will try the vray method and see how it look.
Thanks again.
Thao
thanks… i have been using the first method… always wonder how to use it with Vray… i will try the vray method and see how it look.
Thanks again.
Thao
Hope my method works for you both?
I’m interested to know how it works out for you.
Hope to see your results and any improvement’s you have made.
Thanks for the feedback!
Ben…
Thanks mate,
You helped me cure my curiousity on how to export from Zbrush to 3d Max.
Cheers
Thanks for all the tips Scratchy. 
My displacement maps are working okay but I have a question regarding UV mapping. I’m going to upgrade from version 7 to 8 mainly for the Pelt Mapping.
I don’t have much experience with UV maps except for applying planar, spherical, box with a UVW modifier.
I need to model low res models in Max, import and detail in ZBrush, and then apply the displacement AND TEXTURE maps and render in Max. I’ve started out with Zspheres on previous models so I skipped the step of creating a mesh to be exported to ZBrush.
Does the low res Max created model need to be ‘primed’ in some way before exporting to ZBrush as an OBJ or can the UVs be created in ZBrush? Is UVW Unwrap to used before exporting from Max?
Anyone know the basic steps to ending up with both textured and displaced maps in Max?:question: There is already alot of useful info on the displacement map part but I need the model to have all it's textures look the way they did in ZBrush with the help of Projection Master.If (after modelling) you first create your UV mapping in MAX then collapse your model(s) and export as OBJ to Zbrush, the UV mapping is kept throughout and so the texturing process can incorporate it’s Photoshop stage more easily etc - hope that’s what you wanted to know anyway!
Fair question!
The way I’m doing it now is to use ZB’ GUV tiles. I can use Max’s Uv Unwrap, but even Max’s pelt mapping doesn’t compare with ZB GUV in the sense that it’s a lot faster (hey and I have stated before in this thread about GUV tiles and image apps like PS (obviously this is no longer the case with the ZApp Link)).
I can’t so far say many good things about Max 8, being a subscription holder I won’t even use it with all the bugs (some are concerned with the new UV Unwrap tools) and am still using 7.5. This is just my own opinion. I have been informed that an update to fix most of these is in the works.
Back to GUV tiles; three clicks and you have a perfect map done for you, can’t get much easier than that! Works with both Max base meshes and ZSphere’s. Swap em about-ZSphere-max-OBJ etc, it all works great (for me at least).
Meshes made in Max, UV’ed using GUV:
1: Model low poly mesh with no n-gons and if you can help it no tris.
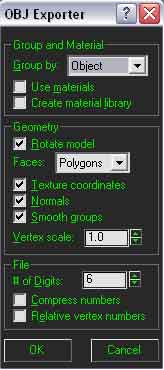
2: Export using these settings (hey once again, if you don’t like these settings fine use your own):
5: Now you can add a texture at a Res you choose and paint away from the Texture Menu. I’m not going to go into any detail about this, just experiment. Check out Caroline Delen’s Artist in Action, big help for me watching her work:
http://www.zbrushcentral.com/zbc/showthread.php?t=28111
6: Use the settings I’ve posted up before with the displacement exporter or whatever works for you. Import back into Max and all should be good.
Hey another long winded description, but better to be to really descripted than not enough when talking ZB stuff.
Next Max Mesh, Max UV’s
It’s pretty much the same deal here except you use Max’s UV Unwrapper to do your UV’s.
1: Unwrap you base mesh in Max. Make sure that you have no overlapping UV’s (very important this). Use whatever technique that your happy with (hey unwrapping is an art form all to it’s self).
2: Use the same OBJ Export options as above. The 6 in the OBJ Exporter>File># of Digits is very important, without this your UV’s WILL NOT TRANSLATE over into ZB.
3: Deform your mesh.
4: Assign a texture (as above) and paint in ZB or leave it for PS later, up to you!
5: Click on Fix Seams as above just to be safe.
6: Export your model back into Max. All should be good.
Hey hope this helps a wee bit. As always this is not the only way to do things, just what works for me. If you have a better way, fantastic.
Happy ZBing,
Ben
Once again, good stuff Ben!
Your last tutorial inspired me to solve the annoying polygroup transfer that every other application can seem to handle, but not Max.
I’ve never been able to export an OBJ file out of Max and magically be able to have polygroups based on the UV mapping applied to the mesh. I like my polygroups!
I’ve knocked out this small web page that shows you how I can do it with a little help from a max script from Script-spot.com, and also UV Mapper.

Now I just need to figure out what to do with a teapot in ZBrush!
Upham 
 Hi, im want to know what is the process to max 8 if i have a model, total made in zbrush, since zspheres, and painting in proyeccion master, if i want to do the render in max, but im begin in zbrush, can be its be possible?. because i cant to model a basic geometry in max if someone could help this be wonderful. thanks
You have made a model in ZBrush using Zspheres, and want to render in Max?
Is this right?
Just export the model from ZBrush and import it into Max. Follow the steps Scratchy has mentioned in the posts on the previous page (post 73)
Hey thank you Upham.
Mate this is gold, I love my polygroups as well. This will definately come in handy when I map in Max.
Cheers,
Ben
Scratchy, thanks for your reply. Your steps are all very understandable but I haven’t had success yet. The texture imports into Max but it is improperly mapped. Somewhere along the way I must have done something different.
I tried with a pretty low res model, wasn’t successful, and I ended up trying to break it down to a very basic extremely low poly model.
I started out with a low res model made in Max. No UVs just a basic model exported as a OBJ.
Imported the obj into ZBrush, followed the GUV,check UVs, fix seams. Textured and exported as a obj .
Imported into Max but the texture is off.
My test was very basic, no deforming/dividing. I just want to see a texture created in ZBrush imported correctly into Max. My work never required UVs until now so I’m not up to speed on UV-unwrap. I’m going to delve into starting out with a Max UV’d model after I am able to import a ZBrush UV and textured model.
Upham, that tutorial will come in handy soon. Thanks.
Here is a visual of what happens:

are you flipping the texture before exporting from z?
Yes, you must flip it vertically. Either before you export, or while importing in your target app. ZBrush also allows you a permanent ‘auto flip during export’ setting in preferences->export when you need that for your workflow.
Cheers
Lemo
Thanks, Aminuts and Lemonnado. That was what I was missing. I had been doing it with the displacement maps but missed that step with the textures.
Is there some kind of guide online or in a book that describes the basics of UVs , smoothing groups, and polygroups? What is involved technically as opposed to how to apply them in a program. I think a basic knowledge of that would help in troubleshooting.
I happened on another thread where Lemonnado answers someone’s question and in so doing answered this question as well. The books are 3D Math and the advanced Renderman manual. No doubt more info online as well.
Im
The help guide in Max has an excelent documentation that shows you exactly what smooth groups are. (look under “Viewing and Changing Smoothing”)
Polygroups are from the family of wavefront OBJ format, which are mainly used in ZBrush, Maya, XSI & even Milkshape & Wings 3d. Max can do .OBJ format but does not keep the grouping.
A good tutorial about applying UV mapping can be found in the tutorial mentioned in my web page by Logan Foster: Material ID Unwrapping
No quick & easy answer to your problem. You’ve got some study in front of you.
Upham 
Yep, smoothing groups, uv’s, texture projection, subdivisions, all good fun (eyes roling back in head). Also look at the excellent and priceless new ZMapper Documentation first. Then look at the QuickLinks. There is a lot about texturing. And then refere to the external sources. Actually… get a book about CG Math first and read up on vector math and the like. Then the rest will be easy to follow up on. If you are out of the math loop for a while, as I am, then you have to put the puzzle pieces into place using the aforementioned information fragments.
Cheers
Lemo
Thanks, Upham and Lemonnado. I’ve started checking out your suggestions.
I think people who know that info have an edge in certain aspects of 3D so I’ll have to become one of those people. It won’t happen overnight but it’ll happen!
I have followed step by step the whole exelent material that here has been exposed. I have not had problems with the Displacement but when I try with Normal Map, I cannot illuminate it in 3D Studio.
How a model it is illuminated with normal map?? Why the model seems to have its own shadows?.. ??
Thanks a lot