I agree it’s fast, but thorough:D Most of the fast stuff is changing Zadd and Focal sizes due to the nature of ZB work intergraetion, etc.
Excellent work Numse, your an excellent ledgend matesunglasses: And a man of your word And you are certainly more skilled in the art of ZB than myself. I have learnt a great many techniques from you & your VTM.
A couple of things that aren’t addressed in this VTM, DDS are:
1: “what if you don’t use Vray?”
2: “What if you want to texture in Photoshop or Bodypaint.”
3: “what if you don’t want a grey head rendered in Max?”
4: “It doesn’t show the power of manipulating verts at base level in ZB.”
4: and I don’t think “Numse shows how he arrived at the Vray Dis amount and Shift amount from the OBJ file”, (I might be wrong on this).
To me, unless your intending to use Vray and have a grey mesh / still image (unless you plan to texture your diffuse in ZB) these VTM’s are a great start, but are aimed at Vray and texturing in ZB (this is great & ZB certainly has the tools to do this exceptionally well. I just don’t like the way GUV tiles work with PS, as I’ve yet to find a way to paint on these in PS (although someone did a nice tute involving LW and squashing the mesh).
For me I’m still trying to work out the need for Morph targets apart from creating Morph targets for Max and lip-syncing purposes (which I find ZB great for)? But everyone has different ways of doing things for there own needs!
Inspired by NUMSE I too will in the future will be doing a VTM using ZB, Brazil, Vray, and Scanline. I won’t be going into doing fine detail with Bump maps, as I like to use PS & BP2 to do them, which can be helpfull if you intend to sculpt in ZB and ad bump in PS. This will be an attempt to add & expand on Numse’s very fine tute. Aimed at beginners, this might is not for experienced users of ZB, but for new Max - ZB users. I intend to have English sound with this VTM.
Thanks again NUMSE, I have gainded a lot from your VTM:D
Really DDS or should I call you DDT, because anything that infects the world by coming out of your mouth is toxic, it seams you missed my point.
I was being sarcastic towards you, you dope:D !!! And you didn’t even get it!
You thought I was praising you. Or you hold such a high self-esteem of yourself that you don’t realize that someone is taking the Mickey out of you:D!
DDS, I believe you asked some questions and you called me crazy, if I’m crazy you look like a FOOL in my book, a VERY BIG FOOL!
The idea is, compiling all the info on 3dsmax and ZB into one tute, matey.
Not having to search over ZBCentral or the web for it. This leads me to believe after you posting these links, that it is you who likes to keep secret’s, what a selfish thing to do. Why not pass this info on earlier so other’s could benefit?
In the 3dsmax class I teach, I have questions from student’s every day about ZB and Max and you have (being the expert you are) have answered none of them:D from your most fantabulous pointers. This just compounds your obvious ignorance of Max and the other features that ZB offers:D.
I don’t think I know Max well, but I can tell straight off the bat that you know much less than I do;)!
Secondly, who do you think you are by saying that a topic is finished? GOD!!!? Are you a moderator on ZB Central? When they say it’s finished it’s finished, not from you!
Really matey, it shows your immaturity;).
Why didn’t you share these tutorials beforehand??? I can only think that sharing can benefit all, and I have read some misleading tute comments advising on this site, but I don’t bag them with my full hatered, or persecute them by trying to belittle the authors, like you do! I don’t bag them at all, I take what I want and thank them anyway! Or don’t say squat!
Now I shall answer some of your questions champ!
DDT, I have many more doubts about you and your personality, but really I don’t give a damn !
I hope I have solved yours DDT. But somehow I doubt it!
Maybe I have showed you new ways to incorporate ZB in you company’s pipeline DDT. But really this is not at all for you as you know it all, and condem all others
Crazy to lazy mate, you the champ. You finally realised the implications of accusing someone of being crazy. Thank god for the edit function hey matey:rolleyes:.
Now you’re back stepping. I Have a screen print of this before you changed this champ.
Grow up DDT:rolleyes: ! Be a man:qu: and stand by your word.
Quote:
Originally Posted by scratchy 4: “It doesn’t show the power of manipulating verts at base level in ZB.”
DDS: True…but…is it really necessary? You can manipulate vertexs in max (it was a zbrush <–> max tutorial).
Yes but as Meats Meier explians in his Gnomon DVD tute (which is not based on Maya explicitly) this is a powerful tool for creating morph targets. Give it a try if you create morph targets, it will save you heaps of time, yes in 3dsmax also.
Quote:
Originally Posted by scratchy 4: and I don’t think “Numse shows how he arrived at the Vray Dis amount and Shift amount from the OBJ file”, (I might be wrong on this).
DDS: This is the easy part man…just tweak during some minutes…each model has its own problems.
DDS man, there is an exact mathmatical formula for this and not a guestimation found here:
just want to say thanks to Scratchy for sharing his knownleage about displacement map… i had an issue that i couldn’t get rid off and after i followed your method to do displacement map in Max… it fixed my problem… i have no idea what i did wrong but its fixed now. Thank you…
one cool thing about your displacement method is you can view the displacement on viewport…
One question… do you have anything to share about Vray displacement map rendering? i am going to use Vray for that, and i have no idea how to do… Wonder if you know.
Thanks again Scratchy!!!
Thao
I have read about edit poly modifier changing the point order of OBJ’s. Does anyone know if this has been corrected in Max 8? And is their a .3ds import plug-in for Z Brush being written by anyone ?
I’ve tried displacements on a few different models and each time I have to use different settings for strength and decay on the displace modifier. One I used the same settings as the first tutorial, one I had to have strength all the way up to 60 or so. This may be the result of the models resolution or something else. The alpha maps were of the same resolution. Also I notice that some alphas have info on the entire square 4096 and some just have a little and the rest is solid gray. That is independent of how complex the model is.
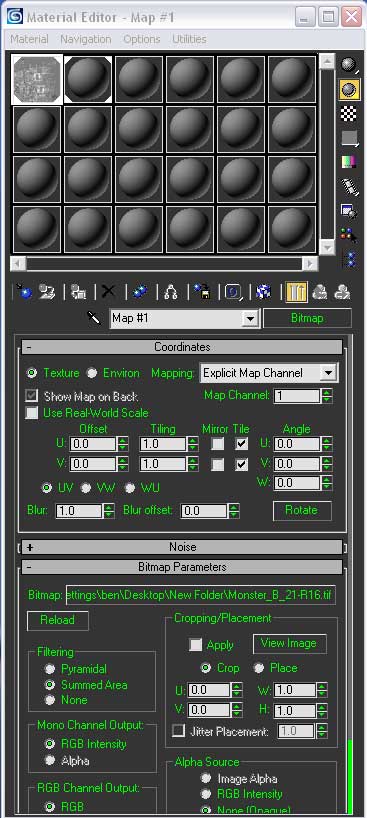
Anyway, I did a search of this thread and the manual for the word ‘blur’ as it relates to the displacement map in the Material Editor and couldn’t find anything. I had stepping on the model but I hadn’t read about the blur solution in Max. I hadn’t had stepping with the 3 previous displacements in Max. I ended up solving it by lowering the blur as shown in the picture below to its lowest setting from it’s initial default of 1. This might be common knowledge but I hadn’t read about it happening in Max or encountered the stepping problem in Max before. I’ve seen it it on people’s Maya displacements, I did a displacement in Maya but never had the problem there.
The model below is less than a day’s work and unfinished. It looks tighter/sharper in ZBrush. Mabey I’ll test sharpening the map in Photoshop. I don’t have the map working like I want it to yet.
There doesn’t seem to be a uniform setting in Max or uniform results regardless of the settings used. Each one is an experiment to find the best settings.
This is in Max 7. I'm getting 8 soon.
[]
Hi,
I’ve only been using ZBrush for a week or so and feel I’m getting up to speed fairly quickly.
Someone earlier in this thread mentioned the unwrapped that’s exported from ZBrush is impossible to touch up in a paint program, after it’s been GUV tiled.
What I’m doing at the moment is making my lowres model in Max, then unwrapping it (Which Max 8 is great for, due to the new Pelt mapping), Then export to an .obj with the correct settings to take the UV coordinates with it. Then I save my max file at that stage and go over to zbrush do my detailing, then export my maps.
After that, I save it as a tool, but I don’t bother with the the importing back into Max bit at the end, because you’ve already got the model in Max from just before you exported it. And it has UV coordinates from the unwrap, so just start a new texture and the maps you exported from ZBrush should fit it perfectly.
This just seems simpler than worrying about getting the correct import settings when going back into max, plus because you unwrapped the model yourself, it’s easy to look at and edit afterwards, should you need to!
It is better to import the model back from zbrush in it’s lowpoly form because the geometry will change slightly (or sometimes quite a bit) - This will give more accurate results, although in some cases the difference will be negligible.
So I just started using zbrush and I have run into some trouble. My displacement maps are incredibly undetailed. I am attempting to use the UV’s from Max but when I generate the displacement map it is gray with some smudges on it.
br
The steps I take are:
Model and unwrap in Max
Collapse the stack
export making sure UV’s are included
Import into zbrush and make a morph target
edit and divide
restore morph target
create displacement map.
I then view the displacement map and it looks wrong. Needless to say if I try to apply it in MAX it does not look correct.
Any help would be appreciated! I’m going crazy!
Ryan
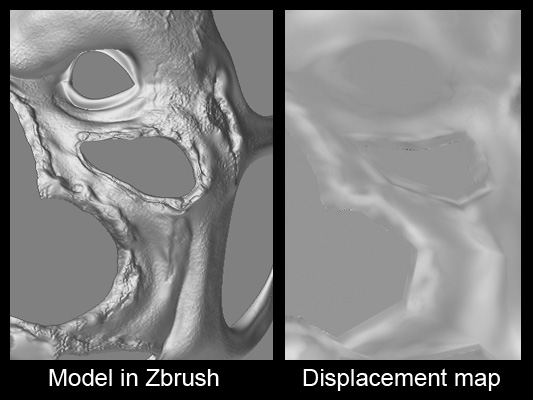
Doesn’t matter how detailed my model is in Zbrush and how large I render my displacement map, none of the detail is visible in the map it creates. Check out my JPEG
This is what works well for me, hopefully it will work for you too?
To clear some things up first for guanoria and 3dmunki; the displacement map will always look dull, what’s important is the detail information is still contained in the map.
LM, if your using the Max Displace Mod, you can try setting the filtering in the Material Editor to Summed Area, this has removed the banding for me.
Ok my basic work flow now is to make my base model in Max trying not to have any n-gons or tri’s. I don’t worry about unwrapping my mesh in max (why bother when ZB does a good job with a couple of clicks). But if you prefer creating your UV’s in Max great (just make sure you have no overlapping UV’s. With the ZAppLink you can paint in Photoshop straight from ZB using the AUV or GUV UV’s, also texturing in ZB is a breeze). OK so you know this already.
So you’ve imported your OBJ Mesh into ZB, done your detailing and are ready to create your displacement map for use with Max’s Displace Mod. This is what I do:
1: Make sure the mesh is at it’s lowest sub-d.
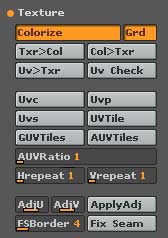
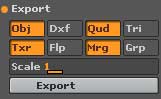
2: If your going to use GUV mapping: go to the Texture rollout in the Tool palette and click the GUV button. Then click UV Check and then click Fix Seams button. (see image below)
This next bit is staight forward, but I thought I’d do the whole process in detail just in case. Sorry if it annoys you.
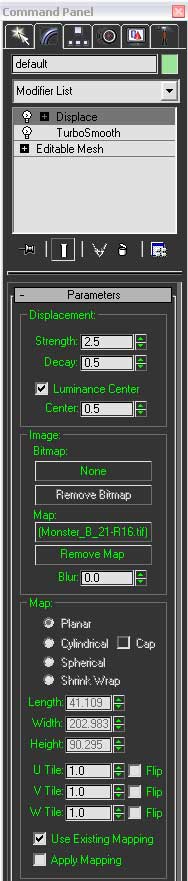
So I’m ready to bring my mesh back into Max and set up the displacement.
1: Import your OBJ (this is pretty straight forward).
I leave the mesh (if I can) as an Editable Mesh (Max likes these better than Editable Poly).
2: I then apply a Turbosmooth with a minimum of three iterations in the viewport and I’ll set the Render time iterations to whatever my system can handle (normally 5).
3: Next I import the map into a slot and in the Mat Ed Filtering section change the filtering from Pyramidal to Summed Area (this stops the Banding effect for me).
Well that’s it. If you do it a different way, good for you. This works for me and maybe it will help other’s out there?
I thought I’d post this up for those who use Vray. Once again, if you have better settings, great, use them. These just work for me, but might help others out?
1: While in ZB I make a note of the Alpha Depth Factor (found in the Alpha Palette). For example mine is .3037.
2: After I’ve exported my mesh, I’ll open up the OBJ file in Notepad and look for the Auto Scale number (it will be at the top & there will be a value for x, y, z use any one, they’re all the same) and note this as well. For example Mine is 1.57695
3: Now I’ll fire up the Calculator and devide Alhpha Depth Factor by the Auto Scale:
.3037 / 1.57695 = 1.926 rounded up. This is my Vray Displacement Mod Amount.
I then devide this by -2:
-2 / 1.926 = -0.963 This is my Shift.
Amount = 1.926
Shift = -0.963
Of course your figures will be different.
OK, I’m not really sure if this is the correct formula for doing this, but it works for me and I don’t end up with any bloating of the mesh. So use this at your own risk!
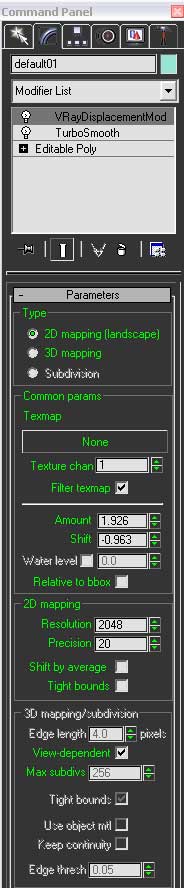
4: Import your OBJ mesh into Max. Add a Turbosmooth Mod, set it’s iterations to 1 for veiwport (if you like) and 3 for Render time. Add the Vray Displacement Mod and enter in your Amount and Shift values. Enter in your Map Resolution in the 2D Mapping section and you can raise the Precision value to your liking.
See below image:
Then drag the map to the Vray Displacement Mod Texmap slot.
 sunglasses: And a man of your word
 And you are certainly more skilled in the art of ZB than myself. I have learnt a great many techniques from you & your VTM.
 thanks


 .
. . Why not pass this info on earlier so other’s could benefit?
 !
!