I agree with Tez on those comments. I find it really helpful to concentrate on individual areas as well and z-brush has all the tools you’ll need to build something like this without Maya at this stage. Nice starts.
Do you use reference? Keep lots of reference on your second monitor, check out 3d.sk, art books with female form or just an anatomy book.
Like mentioned before, first do the proportions and relations between limbs.
Also try relaxing her, she looks really tense in this half squad, upper back exercise pose.
It’s a girl, girls are soft. The hip bone and ribs showing that much suggest anorexia or something like that. The knees are really really hard, like the bone is sticking out, check the masses of the shoulder, it actually looks like there’s a part missing there. The neck looks ok, but don’t over do the neck muscles. Girls are subtle and soft 
and as mentioned before, focuss on the sculpt right now and rendering later haha 
Ok so i have tried to go over it again working on individual areas and tried to relax her shoulders. I painted in all the muscles that i copied from an artist anatomy book i have and then smothed them out. I think i will settle on this model for now and move on and make some clothes and rig and pose her etc. Its been diffucult without using one person as reference as everyone is different and find it hard to find FREE front side pictures of people. Im still open from any comments or crits on the model.
Enjoy! Thanks again!

Well done for sticking at it. We only get better with time, and if we listen to more advanced artest we can skip a few pit falls that most of us make.
Regardless of having one, or many refferences, your soon start to see patterns, rythems in human anatomy that are seen in all of us.
Proportions and forms are essencial, and this is where you may want to pay more attention to. Details, rigging, clothes, hair are in addition, but will never hide the foundations of these.
3dsk.com is well worth the money, your have all the images you need, and for most, one month is enougth when you concider you can download upto 250 images a day, for a month.
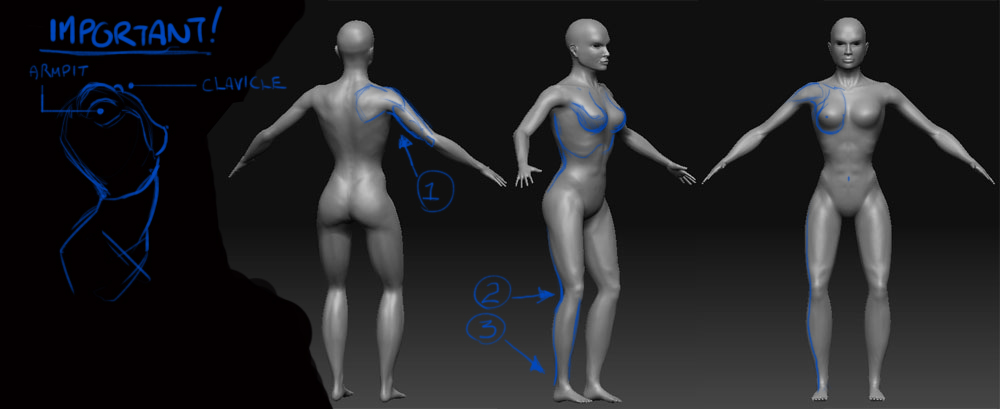
Looking good so far. I have a few tips on female anatomy, and I did a paint-over to show some of the improvements you could make.
[attach=153280]female4.jpg[/attach]
Okay, so the most important thing about female human anatomy is the subtle curves and shapes that the body creates. I agree with oshiroii, women are soft and curved - always think about this when modeling a female. The breast is incredibly challenging, but we must think about how and where it connects. The breast is just fat lying on top of the pectoralis muscles and it connects to two main places. There is skin the connects it up to the clavicle. Imagine the fat being held up by the clavicle. But the breast is also connected under the deltoid muscle towards the armpit. Which is why in the natural position, the nipples slightly point outward from the body instead of straight towards. Only very subtly though.
These are just nit-picks;
1: A bit more definition to the arm, where the tricep lies.
2: Watch where the curve goes down the leg here.
3: Add some more love towards the feet, just needs more mass.
Female anatomy is really tough! I’m currently doing a female model myself, I’ll post mine soon and we can compare notes! Keep it up, you are doing great.
Attachments
Your an absolute legend thank you so much Ill try out those changes and have a new pic up soon. Look forward to seeing your model too!! I started a new model as I needed a break from this one and I only saved one copy of it and i get the error “error loading high def model”  all that work for nothing. I need to get myself in the habit of using layers too.
Ok i think Im done with this model for now going to play around with getting it working in maya. Thanks for all your crits and feedback. I am wondering if it is possible to do a wireframe render in zbrush or do i need to do that in maya??
Here is another still.
enjoy!
edit: nevermind figured out the wireframe thing. cheers

Hehe, getting better keep at it
if you find it hard to find reference you can also look for it at ZBC itself, for example: http://www.zbrushcentral.com/zbc/showthread.php?t=058068 It’s not the real thing, although this one comes pretty close imo
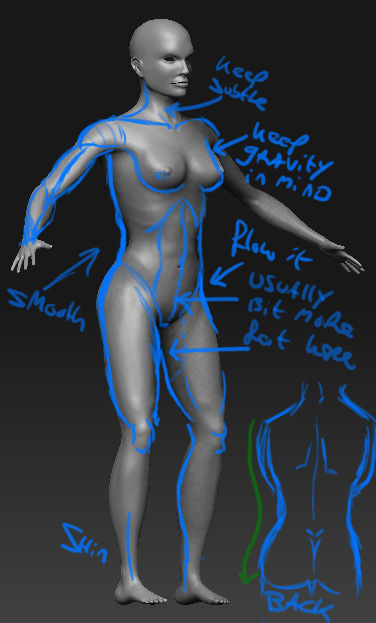
hopefully you don’t mind my paint over
[ ]
]
Main points:
- keep gravity in mind, this will help with the softness, especially in the breast area.
- Notice fat distribution at the tummy area and the thighs there’s usually a bit more.
- Keep the side curvature there, but don’t over do it hehe.
- Same goes for the muscles. A good way to add them is to sculpt them in roughly and with rather hard, but then start adding mass to them and smoothen en soften it and try blend them with the rest of the body.
- Also mind the attachments of the limbs like Michael Janzen said. :D
Danke Wel oshiroii!
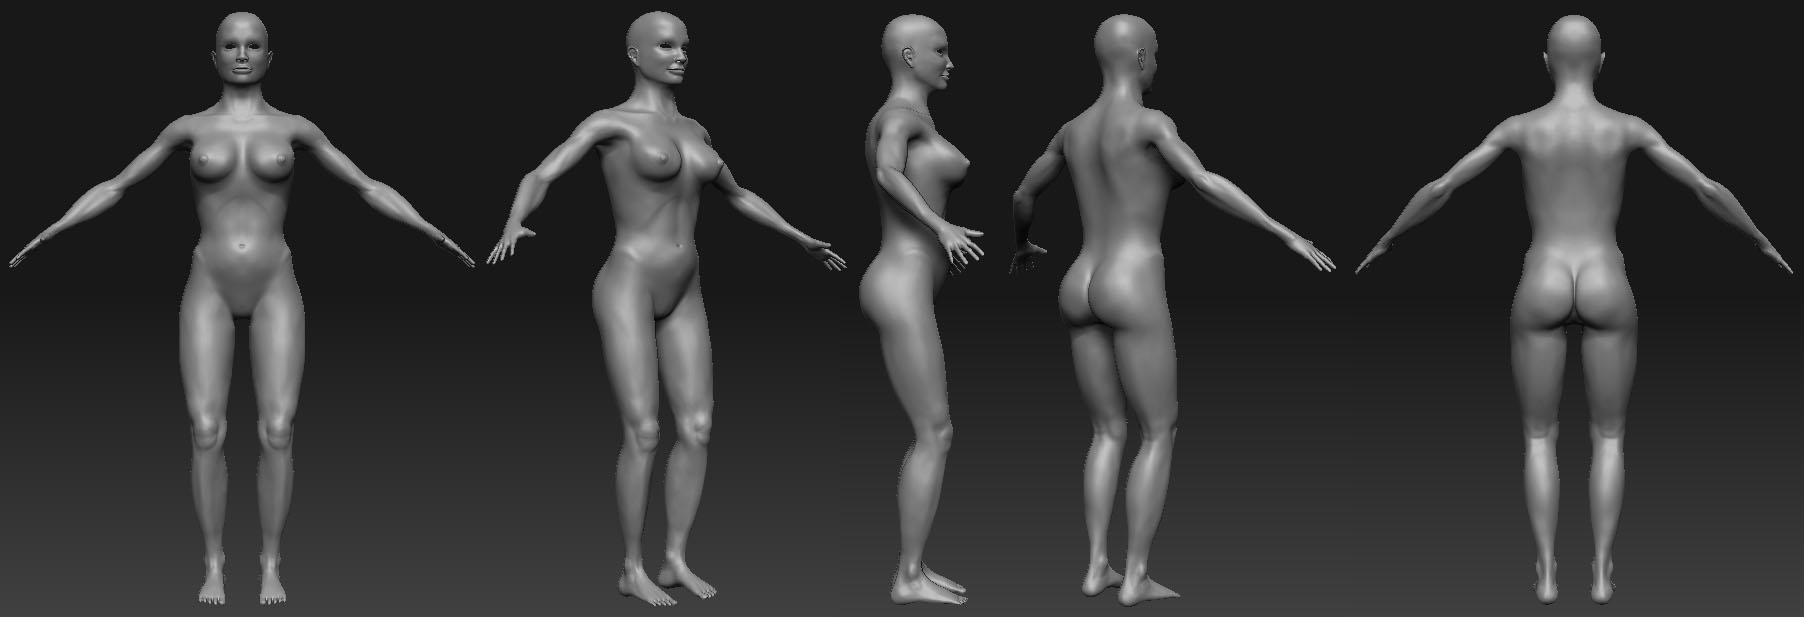
I tried to go over your suggestions i fixed up the forearms and widened them a bit and made the muscles start more near the elbow. I filled up her waist and back I realised it was way to extreme. I improved the details on the knees, feet and hands. Really appreciated the effort people are going to too help out. Cheers!
edit: also have shortened the arms and scaled up her feet

Just a few observations.
Take or keep as you wish. 

In my opinion the single quickest way to get more familiar with anatomy and proportions is to take figure drawing a bunch of times…like five times in a row at least. It will nail it in, and you’ll get lots of quick sessions - 5min, 20min, etc. All that stuff will translate to your sculpting.
Thanks again Tez ive had a bit of a go improving those areas especially the knee and pelvic bone I also noticed some problems with the way her armpit flowed. However I am loosing my mind and cant tell what is an improvement anymore so Im taing a little break so i can look at it with fresh eyes, Ive started modelling an outfit for her Ill post my progress up soon.
Thanks Dustinbrown I have attended life drawing just about every week for the past 2 years maybe it hasnt payed off  I totally agree with you hopefully it works visa versa too Ive learnt lots about muscles bones etc from this excercise hopefully when i draw again ill have a better understanding of what i am drawing.
There’s definitely an armpit flow problem. Looks like she’s shrugging as well and again, keep it subtle: of course there’s thickness variation in the arms, but don’t make it looks like popeye
The waist area look better but I think you could push it even further by adding more mass. In photoshop I selected the waist and with the warp tool I pushed out the center while keeping the borders in place and it looked twice as natural :lol:
The legs are starting to look better although they’re quite far apart from each other imo. They look a bit more chubby compared to the waist area, try to balance that a bit.
I think the breasts could go a little lower and don’t do the teacup shape thing, think of them as water drupplets (friend of mine ones told me, she helped me a lot modelling female character). Concider weight and smoothness: don’t overdo the flow towards the middle of the chest that makes it look like Tombraider (unless that’s what you’re looking for) Also big breasts = usually more body fat in general (at least naturally from what i know :rolleyes:)
About figure drawing classes, I totally agree with that. (I should do it more often myself) Now that you’re doing this zbrush thing and getting pointers, maybe you’ve got a better idea of what to look for in class and that will help you progress faster. If you encounter problems while sculpting check out how it flows in real life and focuss on that area in figure drawing class. Notice landmarks on the body and the way the form flows (if you have a girlfriend that’s especially easy of course and will help a LOT)
Cheers
I cant figure out how to mover her legs closer together without scaling them I might try moving them in maya and see if it worked when i import back into zbrush. Anyway here is some clother i have been making for her. I really need to do an illustration instead of just modeeling items then seeing if they work or not, anyway here goes let me know what you think. I havent textured them just getting an idea of colours. Thanks

I cant figure out how to mover her legs closer together without scaling them
Just simply use the Transpose tool. Here is a quick video I did for you showing this.
Thanks Tez never thought of rotating required a little remodelling/tidying but worked well.
Here is another update I think Im just about done with this.
Attachments
Hey again a bit of an update on a model i made from the anime series Deathnote… Enjoy

I love Deathnote, read all the manga, saw the film, even named one of my hard drives Shinegami.
So sad, i know
Very cool… more shinegami please!
haha thanks RawLight. I can understand that its a great series I havent watched the films yet. I have a few figurines I used one as reference when modelling this.
I have come across a few problems while trying to pose in zbrush it seems that even though having a section masked out it only moves a portion of the mesh when moving rotating etc.
Does anyone know how tro fix this???
Here a pic of what it does. Thanks

Masking a section excludes it from sculpting, posing, just about anything in Zbrush. Its not wise to try and pose with parts with other areas hidden, unless your shure your not going to move a limb that will effect that area.
Now to fix it. This is the case where prevention is better than cure. If you have done what I always do, and thats store your pose in a layer, then you can just undo that layer and delete it. If you had stored a morph target, then you can restore it back. The first thing I would do if hit that Ctrl & Z a few times.
If you have not saved over the previouse save, then open the last one, export the base level obj, open this screwed up one, then at level one, import level one base mesh to restore. You can do this at any level, providing you have exported the obj from your last model at the same sub d level, and havent made any geomrety changes like adding or removing verts e.c.t.
Other than that there is no way to repair it.