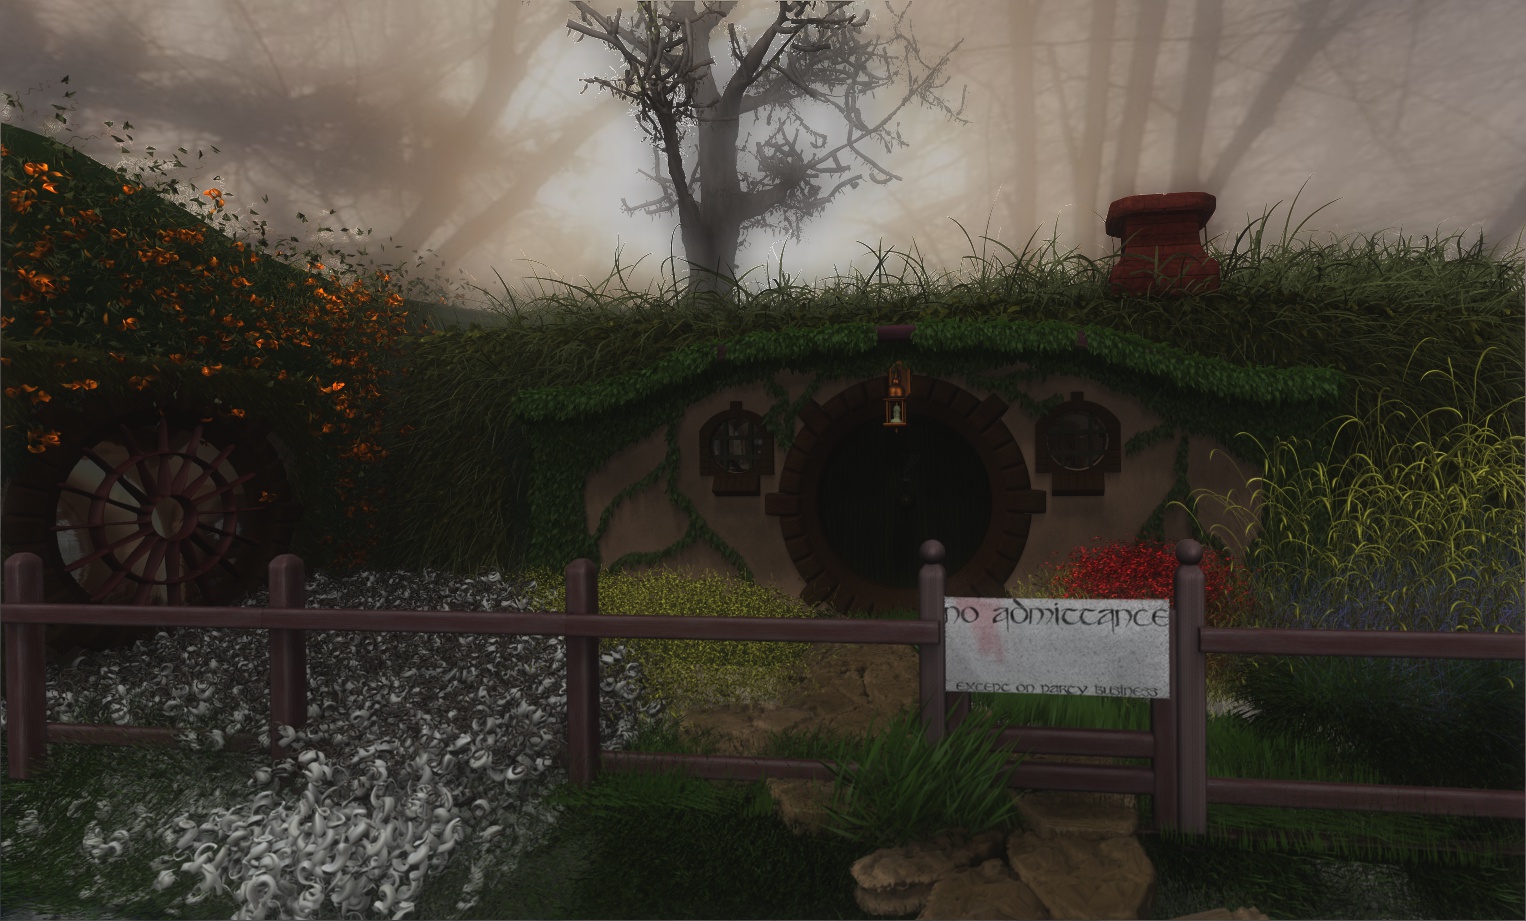
Thanks, Truubluu! After Mealeaying and I worked out how to do fog in bpr and finding that great hdr forest image for the background it all seemed to come together really well.
Looking Great Gary…:)…That atmosphere really did the trick…took it to a whole new level of realism…Outstanding… small_orange_diamond:)
Glenn
Hey Voodoo, I was wondering if you explain your seetings for the fog. It seems everytime i try to use fog with BPR it never works, but when I use the “Best” render it sometimes works. I’m not sure what im doing wrong, any advice wuld be so helpfull, thanks.
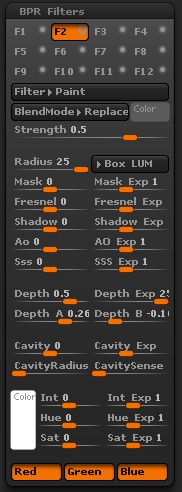
I’d be glad to, Truubluu! The first thing you need to realize is that the actual “fog” button in the render palette only applies to “best” render mode. That fog setting will work only if you press the best button on that palette. Apparently this has been true since 4.0 came out and it took me a few months to realize why it wasn’t showing up when I did a bpr. To actually achieve a fog effect with bpr (or depth cue, for that matter), you need to go to the bpr filters after doing a bpr render. I’ll do a mini tutorial with the filter settings I used for the last render I did of Bag End below.
-
Render your image using bpr and whatever settings you prefer. You will not need to activate fog or depth cue to get the effect.
-
Once your image is done rendering, go to your bpr filter subpalette and change one of the default filters type to “paint”.
-
The main settings you’ll want to use will be all of the depth sliders. I’ll post my settings alongside my latest render at the end of this post. Keep the strength slider at 1 until you start getting the kind of depth effect you want. You can also tweak some of the other sliders as well, but I haven’t messed with most of those yet because I’m pleased with what I’ve got now.
-
The main depth slider will control how far “forward” or “back” your fog effect starts in the image. I try to set it up initially to where it looks like it’s too far forward and play with the other settiings as detailed in the next few steps. It’s an overall slider for the rest of the settings so it’s best to set and forget it till the end as it will make drastic changes to the effect and it’s best to fine tune with the other settings.
-
Use the “depth a” and “depth b” siders to fine tune the gradient effect from the front of your image to the rear. These slider will work as “pickers” so you can click on the slider and drag to your image to pick where you want the gradient to start and end. I’ve been setting “depth a” to something very close to the front of the image and “depth b” to about 2/3s of the way back, this seems to give a softer gradient than anything closer together. If you place them farther apart, you might end up obscuring parts of your image you want to keep clean.
-
Use “depth exp” to control the falloff of the fog effect. This is the setting that probably gave me the biggest headache. Too much, and you’ll have your fog abruptly starting right in the middle of the image, too little and you might not be able to tell there’s fog there at all. So keep tweaking this one. I didn’t use the slider at all on this setting. I just kept narrowing it down by decimal points until I felt it looked right.
-
Profit!:lol:
Everything above can be applied to get a depth cue effect, also. The only difference is that the filter type needs to be “blur” instead of paint.
The finalized settings are pictured with the final render below. I hope this helps a few people. I know it helped my by typing it all out! 

Attachments
Thanks for the info. Nice of you to share. I think I asked you in a reply in my thread that took me so long to type that it logged me out , are you the same voodoo dad from CHFB?
Hey Rick, not a problem at all. I’m happy to share what little knowledge I have regarding Zbrush any time! Regarding CHFB, unfortunately that’s not me considering I had to google it just to find out what it was, but it looks like a site that was designed with my interests at heart, so I’ll have to look into it! Thanks for your comments.
Gary (aka voodoodad)
Hey Gary, just wanted to say thanks a bunch for the info. It is absolutely greatly appreciated. Keep up the great work.
Thats awesome mate, totally love the scene! Reminds of The Shire of the Lord of the Rings!
Really great and something new voodoodad  Keep up the amazing work!
All the best to you,
- Kenny:)
Truubluu; not a problem, man! I was having a hell of a time finding info about doing fog through the render filters, and Mealeaying and I worked out how to recreate the best render fog. I wanted to try to return the help that folks hlave given me here over the past few months by posting what I knew in one place. If there’s enough interest, I may end up re-posting the info in the tutorials forum.
Kenny, thank you! I’m really glad you like it. And you nailed it. It’s an attempt to recreate Bilbo’s “hole” from Fellowship of the Ring.
Now I’m going to ask you fine folks to help me out again by giving me some advice on my latest wip. I have a hard time judging my own work and I think this looks okay, but I don’t trust my own judgement lol. I’m thinking the legs may be a tad short and I’d like to know what you all think about that and anything else you may see that looks off.


Hey
Really great piece. Would be cool to see this in the new perspective camera for ZBrush4R3. You can activate the camera by turning off the Local button on the right side of the interface.
You can also play with the perspective angle of view in the Draw Palette. Really great scene. Keep the images coming.
Thank you gabo! I knew about the angle of view thing, but the updated perspective thing I hadn’t read anything about. I’m playing with it right now on a new environmental piece and when you crank the agle up you really get some wild effects! Great, every time I think I’ve got Bag End and Rivendell finalized, I find a new toy to play with on them lol. Damn, Zbrush is entertaining!
Thanks again, Gabo 1991!
Hey your Shire scene is pretty awesome , nice work
I tried out your fog settings and they work with some tweaking of course (he he ) the result is posted in my last two posts…
Looks like a good start on a Clydesdale type war horse…
And thanks for posting your fog tutorial… Deke 
We’re busy cross-posting, Blue lol. Thanks for the compliments and I’m glad to see you making such great use of the fog! Your horse scene looks awesome!
HOLY CRAP! Gabo1911’s suggestion just gave Bag End a whole new… errrmmm… perspective. Enjoy!
Edit; reposted image after updating fog depth settings a little.
Attachments
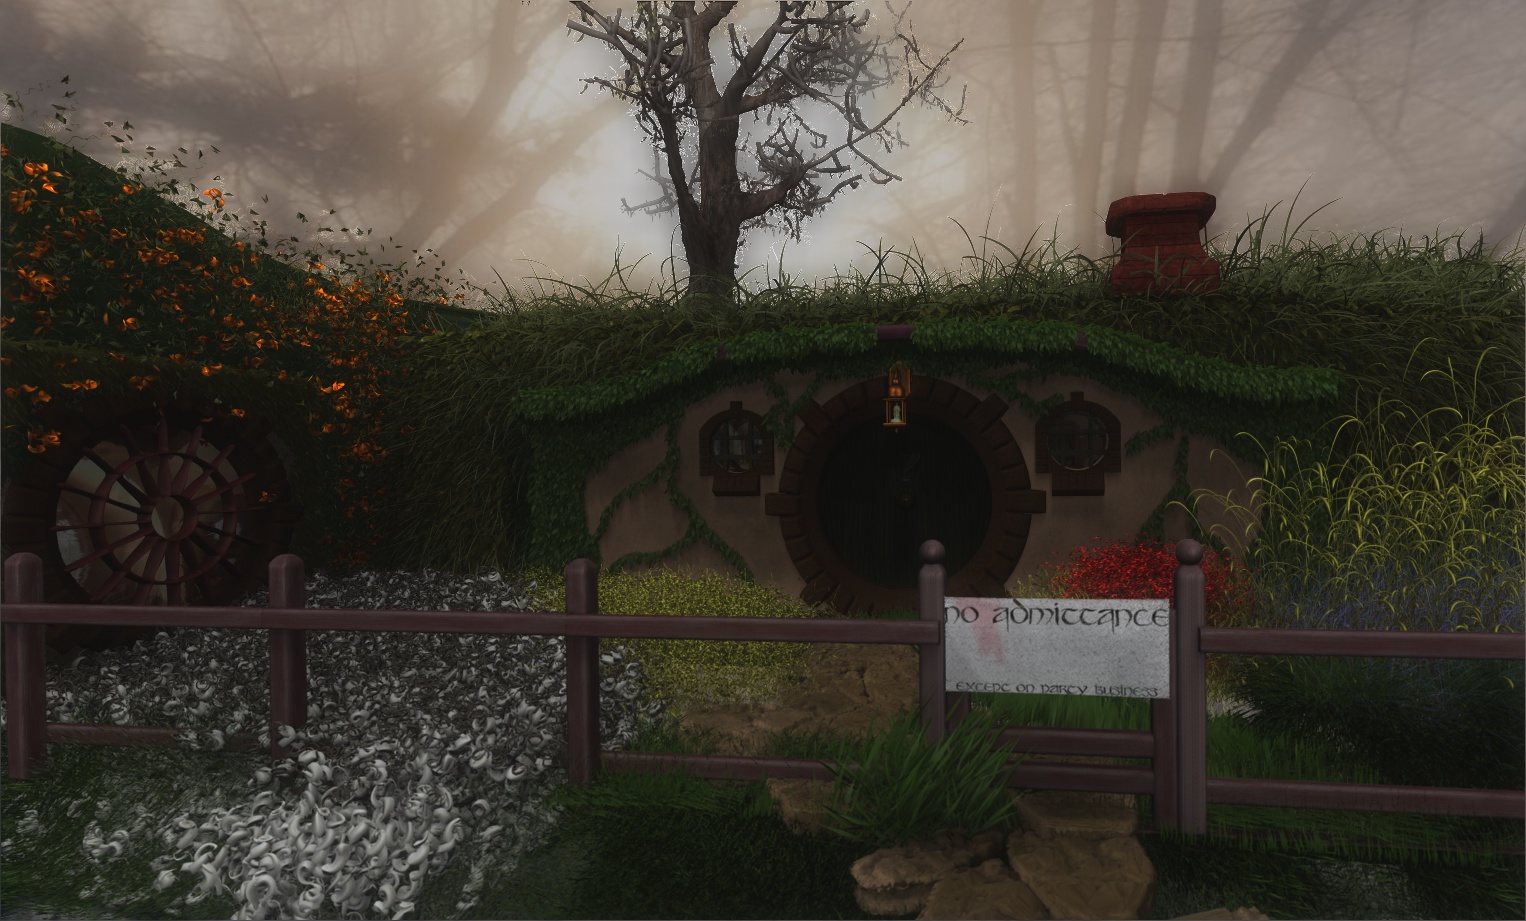
Wow, the perspective just puts you right in the scene! Really beautiful. Every time I look at this image, I can hear leaves rustling and birds singing.
Forgive me for being corny, but there’s something magical about this image; it’s so transportive!
Can’t wait to see what comes next!
Thanks again for sharing, and for your previous reply. I have to confess that I had not come across that fact regarding your challenges with seeing certain colors. Good to know!
Terry
Terry, thanks once again for your very kind words. They weren’t corny at all. In fact, that is the very feeling I wanted to achieve when I started this piece. Some day I’m hoping to be good enough at organic work to add Gandalf the Gray standing there knocking on Bilbo’s door with his staff like he did way back at the beginning of The Hobbit. You can’t really see it unfortunately, but on the door is carved Gandalf’s mark as it was described in the book, signalling the dwarves that this was the house they were to meet at and start all of the glorious adventures in that book and those to follow.
Anyway, thanks again for your help earlier with this piece and I’m very pleased that you enjoy this image as much as I enjoyed making it.
Very nice… a fine picture of sereness ( or serenity )… I also tweaked my horse project one last time…Deke
wow the perspective really helped.
I saw that Deke! Inspiring work! Was any of that done in PS, or was it all in Zbrush? Because you got a swirly effect to your fog in that last one that I have no idea of how you did it in Zbrush.
Thanks Rick! Perspective was already on in the original renders, but Gabbo1991 gave me that tip about the new perspective camera a few posts back, and it had an amazing effect. Added a whole new depth to the piece that hadn’t been there before. (I’ve been managing to keep my heartbeat under sem-control the last few times you’ve posted here, btw :D)

